
A professional-looking artificial lawn is 90% groundwork and only 10% the grass itself. It’s a hard truth many retailers won’t tell you, but focusing solely on the pile height while ignoring what’s underneath is a recipe for sagging surfaces and poor drainage. We know the common fears: the worry that your lawn will pool water after a typical UK downpour or that those tell-tale joins will ruin the aesthetic of your home.
To be perfectly frank, you don’t need a professional crew to get a high-end result if you have the right technical knowledge. This guide will help you select the best artificial grass for DIY and master the art of installation with a focus on professional-grade engineering. We’ll walk you through the complexities of sub-base materials and the precise steps needed for a perfectly flat, green finish that adds genuine value to your property. From initial excavation to the final brush, you’ll learn how to build a lawn that’s built to last for the whole family.
Key Takeaways
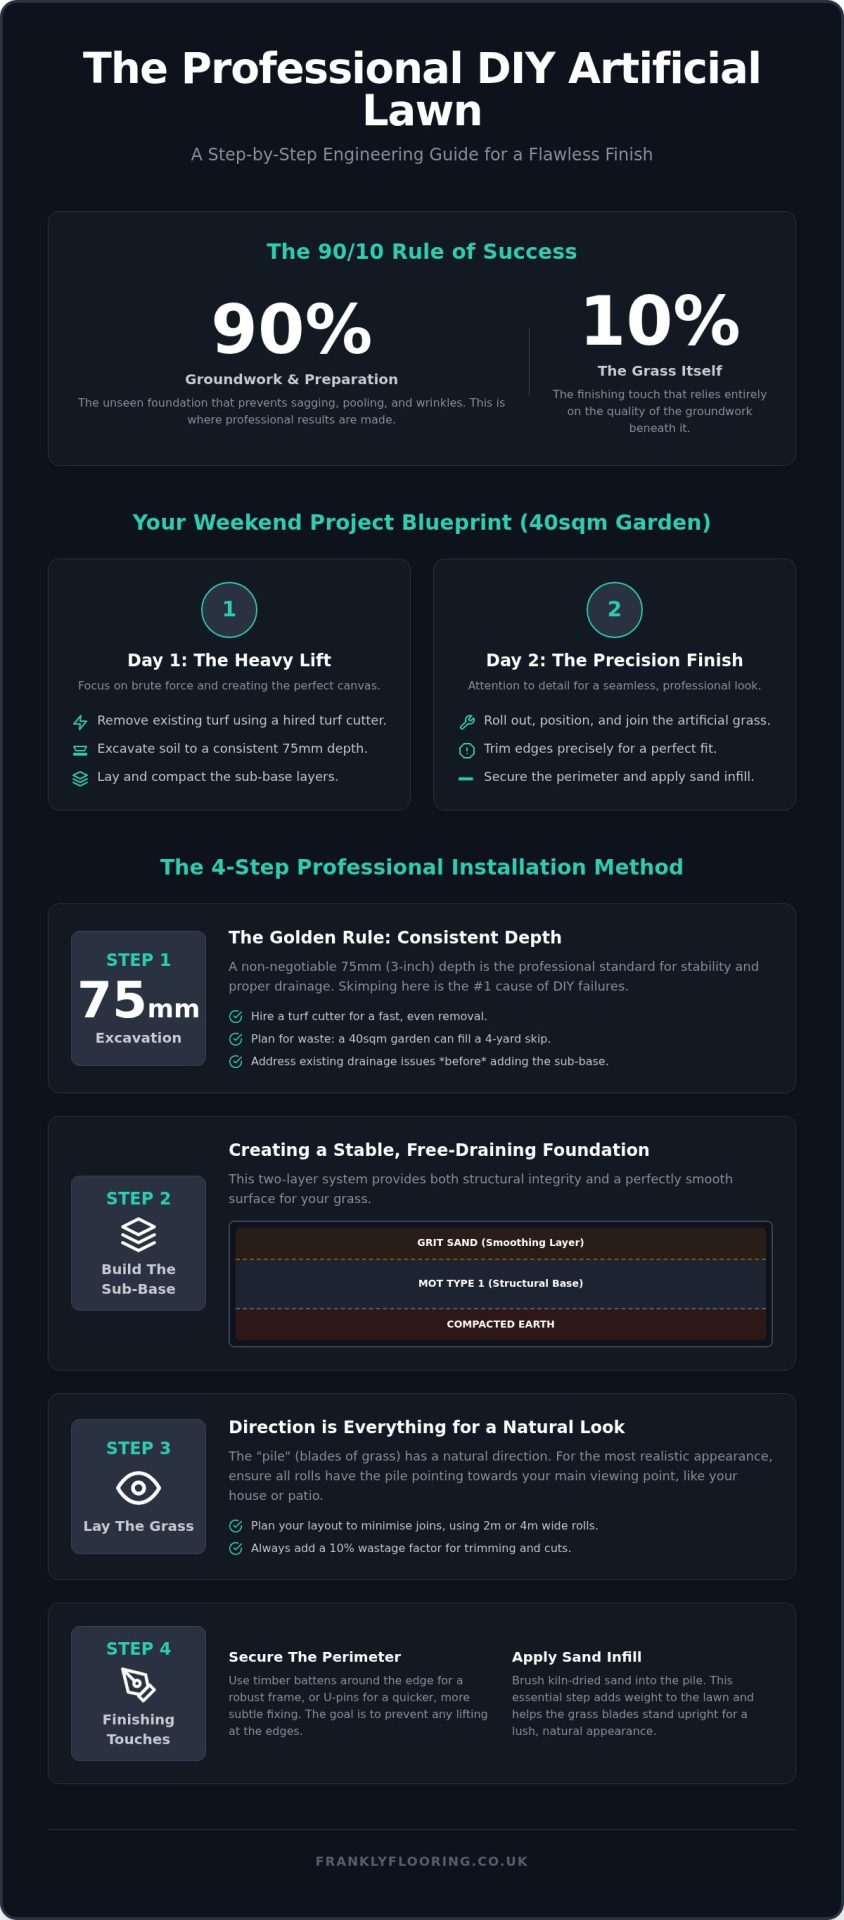
- Understand the realistic commitment required for a professional finish, including why a standard 40sqm project typically takes a full weekend of focused work.
- Learn the “golden rule” of excavation and how to tailor your sub-base layers using MOT Type 1 and grit sand to prevent sagging and pooling.
- Discover how to select the best artificial grass for DIY and why orienting the pile direction towards your home is the secret to a natural appearance.
- Master the technical finishing touches, from choosing between timber battens and U-pins to applying the essential sand infill for weight and blade support.
Planning Your Artificial Lawn: Tools, Timings, and the Frank Truth
A professional DIY installation isn’t about having a van full of expensive gear; it’s about a commitment to the “unseen” work. Most homeowners think the hard part is laying the green carpet, but the reality is that 90% of your success happens before the grass even leaves the roll. To get the best artificial grass for DIY results, you must treat your garden like a civil engineering project. If you rush the groundwork, your lawn will look like a wrinkled rug within six months. Since the history of artificial turf began, the technology has evolved from hard stadium plastics to realistic, soft fibres, but the requirement for a solid foundation remains unchanged.
Be realistic about your schedule. For a standard 40sqm garden, you should clear your diary for a full weekend. Day one is for the heavy lifting: removing the old turf and preparing the sub-base. Day two is for the precision work: laying, cutting, and securing the grass. Don’t try to squeeze this into a Sunday afternoon. While you are upgrading your outdoor space, don’t forget that interior transitions are just as vital for your home’s value. Ensuring your garden connects seamlessly to high-quality laminate flooring in your living area creates a cohesive look that spans from the sofa to the fence line.
The Work Smarter Tool List
You can dig out a lawn with a spade and a bit of grit, but your back will regret it. Hiring a petrol turf cutter for roughly £70 is the best money you’ll spend on this project. It turns hours of back-breaking digging into a twenty-minute job. You’ll also need a vibrating plate compactor, often called a wacker plate, to ensure your sub-base doesn’t shift later. Beyond the heavy machinery, keep a sharp utility knife with a pack of fresh blades, a heavy-duty rake, and a stiff broom nearby. For consumables, ensure you have enough joining tape, high-strength adhesive, and several bags of kiln-dried sand for the final infill.
Measuring Your Space to Minimise Waste
Buying the best artificial grass for DIY doesn’t have to break the bank if you measure accurately. Most grass rolls come in 2m or 4m widths. To avoid unnecessary joins, try to plan your layout so the rolls run parallel to each other in the longest direction. If your garden is an irregular shape, draw it out on a grid. Calculate the total square meterage and then add a 10% wastage factor. This extra buffer is essential for perimeter trimming and ensures you aren’t left an inch short at the most visible edge of your new lawn.
Ground Preparation: Why Your Foundation Dictates Your Lawns Life
The golden rule of any landscaping project is that your finished surface is only as good as the ground beneath it. Excavation is the single most important step for a flat, professional finish. If you cut corners here, you’ll end up with a lawn that sags, ripples, or becomes a swamp after the first heavy UK rain. Many DIYers make the mistake of hand-digging with a spade. This almost always leads to an uneven base because it’s impossible to maintain a consistent depth across the entire area. To get the best artificial grass for DIY results, you need a clean, uniform excavation that provides a blank canvas for your sub-base.
Before you start digging, identify your soil type. UK gardens typically fall into two categories: heavy clay or sandy soil. Clay soil is notorious for poor drainage; it holds onto water and can expand or contract, which threatens the stability of your lawn. Sandy soil drains well but can be prone to shifting if not contained properly. Understanding this helps you decide if you need extra drainage measures before you even think about unrolling your high-quality artificial grass.
The 75mm Excavation Rule
While some generic guides suggest a 50mm dig, professional installers in the UK stick to a 75mm (3 inch) standard. This extra depth is essential for long-term stability. It allows for a substantial layer of MOT Type 1 to provide structural strength, topped with a smoothing layer. Use a turf cutter to remove the existing grass. It’s safer and more effective than manual digging because it slices through the root network at a precise, adjustable depth. Once the turf is up, you’ll have a significant amount of waste. A standard 40sqm garden can easily fill a 4-yard skip. Plan for skip hire in advance, as leaving wet turf in a pile on your driveway will quickly turn into a heavy, messy problem.
Solving Drainage Issues Before You Lay
If your garden currently has boggy spots where water sits for hours, laying artificial grass won’t magically fix the problem. In fact, it might make it more obvious. Address these areas now by installing a simple soakaway or additional land drains if you’re dealing with heavy clay. Always ensure your excavation has a very slight fall, a gradient of about 1 in 100, to encourage water to move naturally away from your house and towards a drainage point. This prevents moisture from trapped against your home’s foundations and ensures your lawn remains usable even after a typical British downpour.
The Sub-Base: Creating a Stable, Free-Draining Surface
Once you’ve cleared the ground to the required 75mm depth, the focus shifts to building a foundation that stays flat for years. You wouldn’t lay expensive engineered wood flooring on a wonky subfloor, and your outdoor space deserves the same level of care. To get the best artificial grass for DIY, you need a dual-layer system that balances structural integrity with a perfectly smooth laying course. To be perfectly frank, this is the stage where most amateur installations fail because they underestimate the amount of compaction required to prevent future sagging.
MOT Type 1 vs Grit Sand: Which Layer Does What?
Your first layer should be 50mm of MOT Type 1. This crushed stone provides a load-bearing skeleton for your lawn, ensuring it doesn’t sink when the kids are playing or you’re moving garden furniture. Don’t just rake it out and hope for the best. You must use a petrol wacker plate, passing over the area at least three or four times in different directions. If the stone is dry, spray it lightly with a hose to help the particles bind together during compaction. If you can still see loose stones moving when you walk on it, it isn’t compacted enough.
The final 25mm layer is your laying course, made of grit sand or sharp sand. A common mistake is using building sand because it’s easier to find at local merchants. Building sand is too fine; it holds onto water and can turn into a soft mush that allows your grass to ripple. To achieve the best artificial grass for DIY results, stick to grit sand or granite dust. These materials provide excellent drainage and create a firm, level surface that won’t shift underfoot. Use a long piece of timber to “screed” the sand, pulling it across the area to remove any high spots or dips.
The Membrane Debate: One Layer or Two?
Weed membranes are essential, but where you place them matters. The primary geotextile membrane should go directly onto the soil before you add your MOT Type 1. This prevents your expensive stone from sinking into the mud over time. It also acts as the first line of defence against weeds. Secure the edges with galvanised pins to keep it taut. If the membrane bunches up during the stone application, it will create visible lumps in your finished lawn. While some installers suggest a second layer directly under the grass, this is usually optional unless you’re in an area prone to particularly aggressive weed growth.
Laying and Cutting Your Grass: Tips for a Seamless Look
You’ve done the heavy lifting with the MOT Type 1 and grit sand. Now it’s time for the reward. Just as you’d take time choosing a quality carpet for your interior, selecting the best artificial grass for DIY projects requires an eye for detail and a bit of patience. Once your rolls arrive, unroll them across your prepared base and let them “breathe” for at least 24 hours before you even pick up a knife. This allows the latex backing to relax and any creases from the transport roll to settle out. If you cut the grass immediately, it will likely contract as it acclimatises to the temperature, leaving you with unsightly gaps at your perimeter or joins that pull apart within weeks.
The Pile Direction Rule
This is the secret to a lawn that looks real rather than like a shiny plastic mat. Artificial grass has a grain or pile direction where the blades naturally lean. For the most natural aesthetic, the pile should always face your main viewing point. In most UK gardens, this is the back of your house or your main patio area. When the blades lean toward you, you see the depth of the colour rather than the light reflecting off the back of the fibres. If you’re using multiple rolls to cover a wider area, check that the pile direction is identical for every single piece. Even a slight deviation will make the two sections look like different shades of green once the sun hits them.
Precision Cutting for a Professional Finish
When it’s time to trim, forget what you’ve seen in some generic online videos. You must always cut from the back. Flipping the grass over allows you to cut through the latex backing between the stitch lines, which are the rows where the grass fibres are tufted. If you try to cut from the top, you’ll inadvertently slice the grass blades themselves, leaving a blunt, ragged edge that looks amateur. Use a high-quality utility knife and change the blade every 5 to 10 metres. A dull blade is your enemy; it will snag the backing and prevent the precision needed for a seamless finish.
Before you attempt to join two pieces, trim off the factory edge, also known as the selvedge, on both rolls. You should cut at least two or three “ribs” into the backing to ensure you’re working with a clean, tufted edge. This ensures the stitch spacing remains consistent across the join, making the seam virtually invisible to the naked eye. Ready to start your transformation? Explore our range of premium artificial grass to find the perfect match for your garden project.
Securing the Perimeter and Final Finishing Touches
Securing the perimeter is the final hurdle to ensure your lawn doesn’t shift or lift over time. For the best artificial grass for DIY, you have two main options for the edges: timber battens or galvanised U-pins. Timber battens provide a solid, permanent frame, which is ideal if your lawn borders a flower bed or a patio. If you’re pinning directly into the sub-base, use 6-inch galvanised U-pins every 150mm to 200mm. This keeps the edges taut and prevents the wind from getting underneath the latex backing. Be sure to tuck the grass edge neatly against any hard borders for a clean, professional transition.
Joining and Adhesion
If your garden is wider than 4m, you’ll likely have a join. Lay your joining tape with the rough side up and apply a high-strength adhesive in a steady zigzag pattern across the tape. The “zipper technique” is the professional way to merge the two pieces without a visible seam. Carefully fold back the edges, apply the glue, and then bring them together slowly, ensuring no grass fibres are trapped in the adhesive. Once the edges meet, walk along the join to press it firmly into the tape. Let the adhesive cure for a full 24 hours before you start grooming or letting the kids run around on the new surface.
The Kiln-Dried Sand Secret
Don’t skip the sand infill. It’s not just a suggestion; it’s a structural requirement for any long-lasting lawn. You need approximately 5kg of kiln-dried sand per square metre. This sand acts as a ballast, providing the necessary weight to prevent the grass from rippling during hot UK summers when the backing naturally expands. It also supports the base of the blades, keeping them upright and protecting the backing from UV degradation. Spread the sand evenly across the surface and use a stiff broom or a power brush to work it deep into the thatch layer. Always brush against the pile to encourage the blades to stand tall and proud.
To get that professional, just-mown look, a power brush is worth its weight in gold. It lifts the fibres more effectively than a manual broom and ensures the sand is perfectly distributed. Keeping your lawn frankly perfect for years to come is simple. Remove organic debris like leaves regularly to prevent weed growth in the pile, and give it a quick brush every few months to keep the blades from flattening. With these final touches, your project will look indistinguishable from a professional trade installation. You’ve successfully mastered the best artificial grass for DIY, creating a durable, green space that adds genuine character to your home.
Transforming Your Garden with Confidence
Installing a professional-grade lawn is a significant undertaking, but by following these technical steps, you’ve moved beyond guesswork. Success lies in the engineering beneath the surface; from the 75mm excavation to the multiple passes with a wacker plate. When you combine rigorous groundwork with the best artificial grass for DIY, you create a space that doesn’t just look good on day one, but remains flat and free-draining for years.
The final aesthetic is defined by the details: orienting the pile toward your home and ensuring your kiln-dried sand infill is correctly distributed. As a family-run UK business with over 20 years of flooring expertise, we pride ourselves on providing the materials and the straight-talking advice you need to get the job done right. We offer national delivery on our entire range to help you start your project without delay.
Browse our range of high-quality Artificial Grass at Frankly Flooring and take the first step toward a maintenance-free garden. You’ve got the knowledge; now it’s time to build a lawn you can truly be proud of.
Frequently Asked Questions
Can I lay artificial grass directly onto soil?
No, you cannot lay artificial grass directly onto soil if you want it to last. Soil is unstable and shifts with the weather, which will cause your lawn to ripple and sag. Without a proper sub-base of MOT Type 1 and grit sand, you’ll also face severe drainage problems. To get the best artificial grass for DIY results, you must excavate the area and build a solid foundation as detailed in our guide.
Do I really need a wacker plate for DIY installation?
Yes, a wacker plate is non-negotiable for a professional finish. Manual tamping or using a garden roller doesn’t provide the force needed to compact the MOT Type 1 sub-base properly. If the base isn’t fully compacted, the ground will inevitably settle over time, leaving you with a lumpy, uneven lawn. Hiring a plate compactor for a day is a small investment that frankly prevents your DIY project from failing within the first year.
How do I stop weeds from growing through my artificial grass?
A high-quality geotextile weed membrane is your best defence. You should install this layer directly onto the soil before you add your stone sub-base. This prevents weeds from pushing through while still allowing water to drain into the earth. For extra protection, some homeowners add a second membrane layer directly under the grass. It’s also vital to keep the surface clear of organic debris where surface weeds could potentially take root in the pile.
Is artificial grass pet-friendly and how does it handle dog urine?
Artificial grass is perfectly pet-friendly and highly durable for households with dogs. Most modern products feature a permeable backing that allows urine to drain through naturally into the sub-base. To keep the area fresh, simply rinse the spot with water or a mild disinfectant occasionally. Because our products are designed with quality in mind, they won’t discolour or die back like natural turf, making them a frankly excellent choice for active pets.
How long does it take for artificial grass to settle after laying?
You should allow your grass to settle for at least 24 hours after unrolling it. This period is crucial because the grass has been tightly rolled for transport and needs time for the latex backing to relax and expand. If you rush to cut and secure the edges immediately, you risk the material contracting later, which can create gaps at your borders. Patience at this stage ensures the best artificial grass for DIY looks seamless and professional.
Can I install artificial grass on top of an existing patio or decking?
You can install artificial grass on hard surfaces, but you must ensure there is adequate drainage. If the patio or decking is level and doesn’t pool water, you can lay the grass using a specialized outdoor adhesive. We often recommend using a foam shock pad underneath to provide a softer feel and to prevent the pattern of the paving or deck boards from showing through the grass over time. Check that water has a clear path to run off.
What is the best way to clean and maintain my new lawn?
Maintenance is straightforward and requires much less effort than a natural lawn. Regularly remove leaves and twigs with a plastic rake or leaf blower to prevent organic matter from breaking down into the pile. You should also brush the grass every few months with a stiff broom to keep the blades upright and redistribute the sand infill. If you notice any stubborn marks, a quick rinse with warm, soapy water is usually all that’s required.
How much does it cost to install artificial grass myself compared to a pro?
Installing the grass yourself can save you a significant amount on labour costs, which often account for more than half of a professional quote. While you’ll need to pay for materials and tool hire, the direct-to-consumer pricing we offer at Frankly Flooring makes the project much more affordable. You’ll need to budget for the grass, sub-base materials, skip hire, and equipment like a turf cutter. The trade-off is your time and effort for a high-value home improvement.