
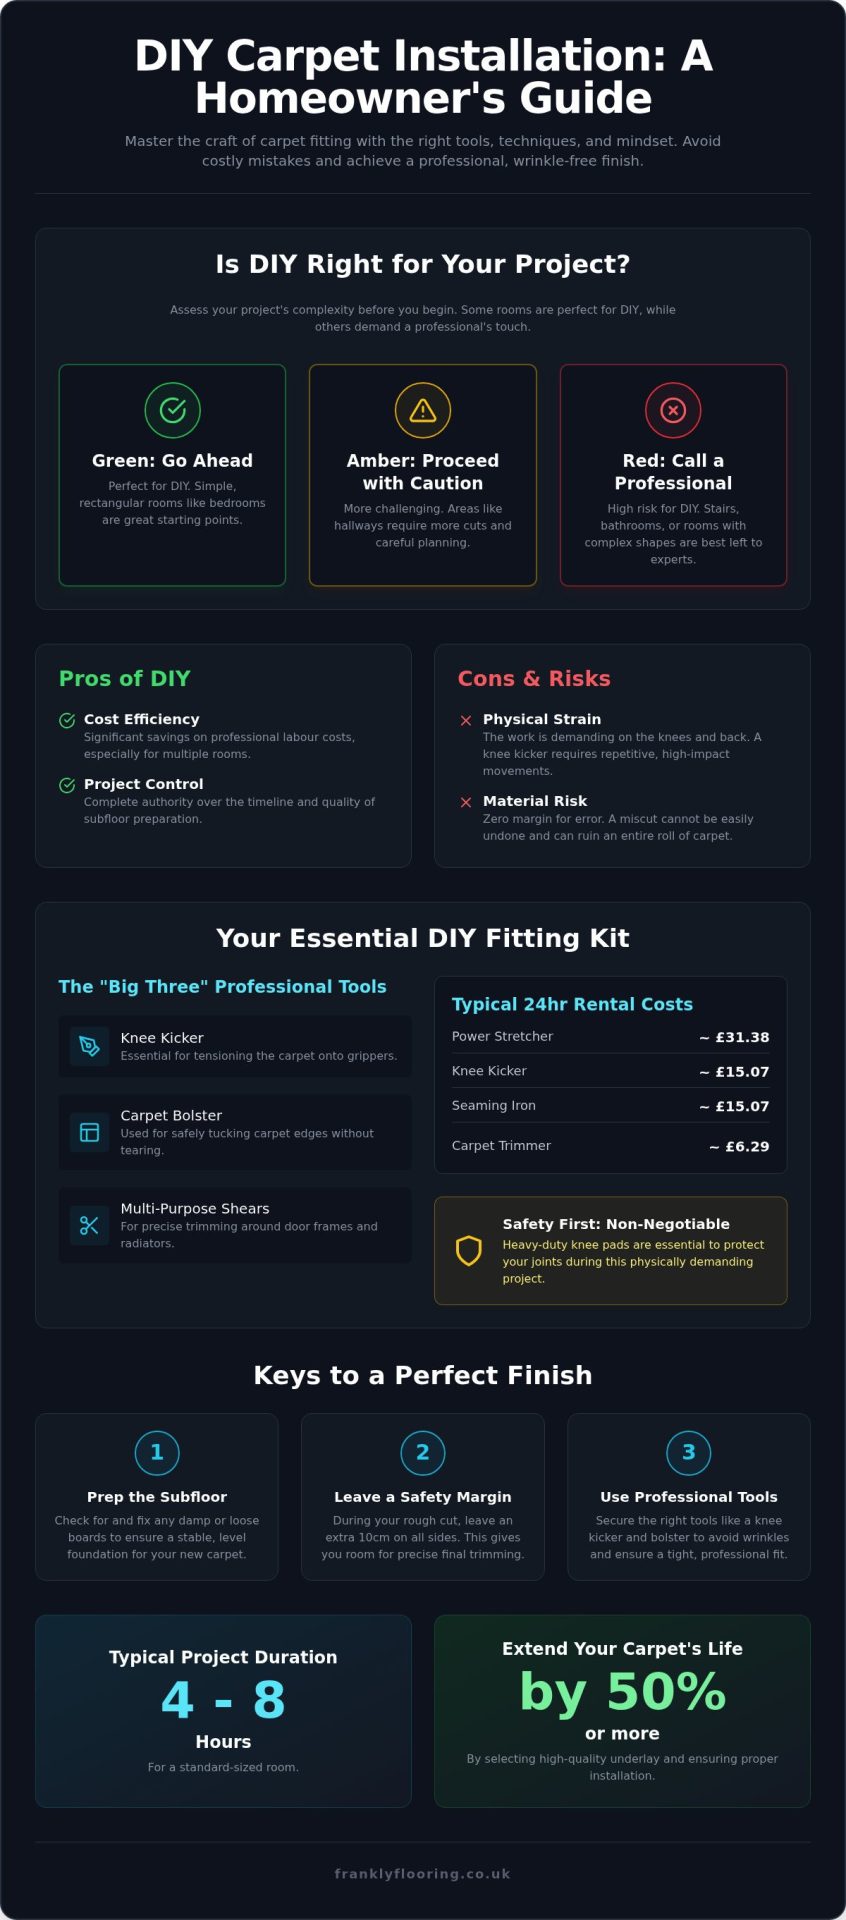
Cutting your own carpet is a one-way street; there’s no “undo” button once the blade meets the pile. It’s natural to feel a bit of trepidation when you’re standing over a fresh roll of British-made wool, especially with the fear of cutting a section too short or choosing the wrong underlay. While professional labour adds up quickly, the DIY route is entirely achievable if you have the right mindset and the specific tools needed to lay carpet. By renting a power stretcher for around £31.38 or a knee kicker for roughly £15.07, you can mirror the results of a pro while keeping your project costs firmly under control.
You likely agree that the physical strain of stretching or the risk of leaving unsightly wrinkles is a major deterrent for most homeowners. We promise to provide an honest, step-by-step breakdown that simplifies these technical hurdles and replaces confusion with craftsmanship. This guide covers the entire project lifecycle, from initial floor preparation to the final, satisfying trim. We’ll explain how to use a carpet bolster with precision and how to select materials that can extend your carpet’s life by 50%. You’ll finish this four to eight hour project with a wrinkle-free floor and the quiet confidence of a job well done.
Key Takeaways
- Assess your project’s difficulty level before you start; while rectangular bedrooms are perfect for a DIY approach, complex areas like stairs often require advanced experience.
- Secure the professional tools needed to lay carpet, including a knee kicker and carpet bolster, to avoid the physical strain and unsightly wrinkles of a poor fit.
- Prioritise subfloor preparation by checking for damp or loose boards, ensuring your new flooring has a stable and level foundation to rest on.
- Prevent costly mistakes by leaving a 10cm “safety margin” on all sides during your rough cut, giving you the necessary room for precise final trimming.
- Finish the job with the correct threshold bars and door adjustments to ensure smooth transitions and a professional-looking result throughout your home.
Is DIY Carpet Installation Right for Your Project?
Fitting a carpet isn’t just a weekend task; it’s a technical craft that requires precision and physical stamina. Before you unwrap a fresh roll of British wool, you need to be honest about your DIY capabilities. While many homeowners can manage a straightforward bedroom, the technical truths of stretching and trimming can quickly become overwhelming in more complex spaces. The Frankly Flooring approach is about giving you the straight facts so you can decide what’s best for your home without the sales fluff.
The Pros and Cons of Fitting Your Own Carpet
Taking the DIY route offers clear advantages, but they come with significant responsibilities. You should weigh these carefully before committing to the project.
- Pro: Cost Efficiency. You can see significant savings on labour costs, especially when tackling multiple rooms across the house.
- Pro: Project Control. You gain complete authority over the timeline and the quality of your subfloor preparation, which is often a stage contractors might rush.
- Con: Physical Strain. The work is demanding on the knees and back. Using a knee kicker requires repetitive, high-impact movements that can be exhausting for the uninitiated.
- Con: Material Risk. There is zero margin for error. If you miscut a corner or over-stretch the pile, you can’t simply “patch” the mistake without it being visible.
When to Call a Professional Instead
Some projects are simply too risky for a first-timer. If your room features curved walls, built-in pillars, or intricate alcoves, a professional’s eye is invaluable. High-end woven carpets like Axminster or Wilton require specialist tensioning that standard DIY setups might not achieve. Most importantly, stairs are the ultimate “boss level” of flooring. The precision required for tucking and securing treads and risers is immense; a mistake here can lead to a serious trip hazard. We recommend a “traffic light” system for difficulty: square bedrooms are Green, hallways are Amber, and stairs or bathrooms are firmly Red.
Budgeting for the project also means looking at the specific tools needed to lay carpet. In 2026, renting a power stretcher costs approximately £31.38 for 24 hours, while a knee kicker sits around £15.07. When you add the cost of a seaming iron (£15.07) and a carpet trimmer (£6.29), your daily rental total can reach nearly £70. Compare this against the cost of your carpet material. There’s also a frank truth about warranties: many UK manufacturers stipulate that their wear guarantees are only valid if the carpet is installed by a certified professional. If you’re investing in a premium range, the labour cost might be worth it just to protect your long-term investment.
The Essential DIY Carpet Fitting Kit and Materials
Many big-box retailers suggest you can get by with a standard utility knife and a hammer. That’s a shortcut to a frayed finish and a lot of frustration. To achieve a professional look, the specific tools needed to lay carpet involve more than just sharp blades. You need a dedicated carpet knife for cleaner cuts through heavy backing, but even that is just the start of a proper kit. Without the right equipment, you’re likely to end up with loose edges or visible seams that no amount of furniture can hide.
The “Big Three” tools are the backbone of any successful installation. First is the knee kicker, which allows you to tension the carpet onto the grippers. Second is the carpet bolster. Unlike a flat-head screwdriver, which can tear the backing, a proper bolster has a wide, blunt edge designed specifically for tucking the pile into the gully between the gripper and the skirting. Finally, multi-purpose shears are essential for precise trimming around door frames and radiators. You’ll also need a consumables checklist including adhesive spray for the underlay and heat-seam tape for any joins.
Safety is often an afterthought, but heavy-duty knee pads are non-negotiable. You’ll be spending hours putting weight on your joints while using the knee kicker. Don’t risk long-term injury for the sake of a £15 accessory. It’s a small price to pay for comfort and protection during a physically demanding shift.
Choosing the Right Carpet Grippers and Underlay
Not all grippers are equal. You must choose between wood floor pins, which are shorter and sharper, or concrete floor pins that use masonry-style nails to ensure a secure anchor. For the foundation, high-density underlay remains a favourite for DIYers because it offers excellent foot-feel and meets 2026 UK building regulations for fire safety. To calculate how much carpet gripper you need, measure the perimeter of your room and subtract the width of any doorways. This ensures you aren’t paying for material that will just end up in the bin.
Where to Source Professional-Grade Materials
Buying from an online carpet specialist ensures you receive trade-quality components rather than the flimsy alternatives often found in generic hardware stores. Budget grippers tend to snap under the tension of a power stretcher or lose their pins entirely, ruining your stretch. We always recommend the “10% rule” for beginners. Order 10% more underlay and gripper than your measurements suggest to account for waste and cutting errors. If you’re looking for reliable components, you can find professional-grade accessories here to ensure your foundation is built to last.
Preparing Your Space: Subfloors and Foundations
Skipping subfloor preparation is the fastest way to ruin a premium carpet. While you might be eager to start stretching, your foundation determines whether your floor feels like a luxury hotel or a bouncy castle. Beyond the specialised tools needed to lay carpet, you will need a few household basics like a vacuum and a screwdriver to ensure the surface is pristine. Start by clearing the deck entirely. If you can, remove the doors and skirting boards. It might seem like extra work, but it provides a much cleaner finish and makes the final trimming significantly easier. At Frankly Flooring, we believe a job is only worth doing if the foundation is right.
Conduct a thorough subfloor integrity test before you even think about unwrapping the roll. For wooden floors, walk the entire room to identify squeaks or rot. For concrete, check for damp patches or white efflorescence. If you are dealing with an older UK property, installing floor lining paper is a smart move. It provides an extra barrier against dust and draughts rising through the floorboards. Once the floor is solid, install your grippers using the 7mm rule. Leave a gap exactly the width of your thumb between the gripper and the skirting board. This creates the “gully” where the carpet edges will eventually be tucked with your bolster.
Subfloor Fixes for Wood and Concrete
Don’t ignore a loose floorboard. Secure it with twin-thread woodscrews rather than nails to prevent post-installation movement. If your concrete floor is uneven, use a self-levelling compound to create a perfectly flat finish. Once the repairs are done, clean the floor thoroughly. A dust-free surface is vital because adhesive spray won’t bond to grit. If the floor is particularly porous, a quick coat of primer will ensure the underlay stays exactly where you put it. Having the right tools needed to lay carpet won’t help if your subfloor is crumbling beneath the pile.
Installing Your Underlay Like a Pro
When laying underlay, orientation is everything. Lay it at a 90-degree angle to the direction you intend to lay the carpet. This cross-laying technique prevents the seams of the underlay and carpet from overlapping, which can cause visible ridges in the final finish. Use heavy-duty tape to join the sections, ensuring there are no gaps or overlaps that could create lumps. Finally, trim the underlay so it sits flush against the inside edge of your grippers. It shouldn’t overlap the pins. If the underlay covers the gripper, the carpet won’t have anything to “bite” into, and your stretch will fail during the next stage of the project.
The Step-by-Step Guide to Laying and Stretching
Once your underlay is secured, it’s time to roll out the main event. Start by performing a rough cut, ensuring you leave at least 10cm of excess material on every wall. This safety margin is vital because walls are rarely perfectly straight; cutting too close early on is a mistake you can’t undo. When you encounter corners, use a precise V-cut technique to relieve tension. This prevents the carpet from bunching or tearing as you begin the stretching process. Having the right tools needed to lay carpet makes this stage manageable rather than a struggle against the material.
The knee kicker is your primary weapon for achieving a professional finish. Position the head of the kicker about 5cm from the gripper and strike the padded end with the area just above your kneecap. You aren’t trying to kick through the wall; you’re simply nudging the carpet onto the gripper pins. This repetitive motion provides the uniform tension required to prevent future ripples. If you’re unsure about which tensioning equipment to trust, you can find professional-grade carpet accessories here to ensure a secure fit.
Stretching Sequence for a Wrinkle-Free Finish
Success depends on your order of operations. Always start at the longest wall to create a solid anchor point. Hook the carpet onto the grippers along this entire side before moving to the opposite wall. From there, use a diagonal stretching pattern to move any slack toward the corners. You’re essentially pushing a “bubble” of air and excess material out of the room. Once the carpet is taut, use your bolster to drive the backing firmly into the gripper teeth, creating a permanent bond.
Dealing with Difficult Shapes and Obstacles
Obstacles like radiator pipes require the keyhole cut method. Slice from the edge of the carpet directly to the pipe, then cut a small circle at the base so the pile sits flush. For doorway transitions, you must fit the carpet tightly to a door bar. This transition strip hides the raw edge and prevents the carpet from lifting in high-traffic areas. If your room is wider than the roll, use heat-seaming tape and a seaming iron to join sections. Keep the iron moving to avoid scorching the pile, and always follow the manufacturer’s heat settings for the specific tools needed to lay carpet.
The final trim is the moment of truth. You can use a dedicated wall trimmer, which sets the height automatically, or a sharp hook blade for more control. Trim the carpet so it’s flush with the floor, then use your bolster to tuck the remaining millimetres into the gully between the gripper and the skirting. This creates that crisp, professional edge that separates a DIY job from a master installation.
Finishing Touches and Common DIY Pitfalls
The final hour of your project is where a good job becomes a great one. Once the main body of the carpet is secured and tucked, you must address the transitions between rooms. This stage often requires a few supplementary tools needed to lay carpet, such as a hacksaw for cutting metal bars and a drill for securing them into the subfloor. Don’t rush these final details. A poorly fitted threshold is more than an eyesore; it’s a trip hazard that can cause the carpet to fray prematurely at the most vulnerable points in your home.
After the bars are down, perform a thorough post-fit vacuum. This isn’t just for tidiness; it helps to pull up loose fibres from the cutting process and allows you to inspect the entire floor for subtle puckering. If you notice a small ridge, use your bolster to re-tuck the edge before the carpet fully settles. To ensure your DIY work lasts a decade, avoid heavy furniture dragging for the first 24 hours. This allows the backing to relax into its new tensioned position without being pulled off the gripper pins.
Thresholds and Door Bars
Choosing the right transition strip depends on your floor heights. Z-bars are ideal for transitioning from carpet to a thinner material, while cover strips work best for carpet-to-carpet joins. If you’re moving from a plush pile to LVT flooring, a dual-grip bar is your best option to ensure a flush, professional finish. For concrete subfloors, you’ll need to use a masonry bit and rawlplugs to secure the bar. On wooden floors, simple wood screws will suffice. Always ensure the bar is centred under the door leaf so it remains hidden when the door is closed.
Door clearance is another technical truth many beginners overlook. A thick new pile often prevents doors from swinging freely. Instead of forcing the door and scuffing your new investment, take the door off its hinges and trim the bottom by 5mm to 10mm using a circular saw or a hand plane. It’s a small extra step that preserves both the door and the carpet fibres.
5 Common Mistakes That Scream DIY Job
Even with the right tools needed to lay carpet, certain errors can betray an amateur hand. Avoid these frequent pitfalls to keep your finish looking sharp:
- Over-trimming: Cutting the carpet too short leaves a “shame gap” between the pile and the skirting. If this happens, you may need to use a wider scotia bead to hide the error.
- Insufficient stretching: If you don’t use the knee kicker with enough force, wrinkles will appear within three months as the carpet naturally relaxes.
- Poor gripper placement: Setting grippers too far from the wall makes it impossible to tuck the carpet, while setting them too close causes the pins to “spike” through the pile and catch on bare feet.
- Incorrect underlay trimming: Allowing underlay to overlap the grippers prevents the carpet from biting into the pins, leading to a loose, baggy fit.
- Misaligned seams: Failing to keep the pile direction consistent across a seam creates a visible line that looks like two different colours of carpet.
Step Into Your Next DIY Project with Confidence
Fitting your own carpet is a journey from precise measurements to the final, satisfying tuck. You’ve learned that success isn’t just about the physical stretch; it’s about the technical truths of subfloor preparation and the 7mm rule for gripper placement. By securing the correct tools needed to lay carpet, such as a knee kicker and a professional bolster, you can bypass the common pitfalls that lead to unsightly wrinkles or frayed edges.
At Frankly Flooring, we provide the transparent, frank advice you need to handle every stage of your project. We’re a family-run UK business with over 20 years of industry expertise, offering direct national delivery on everything from premium wool rolls to high-density underlay. We believe in providing the materials and the knowledge to help you achieve a finish that looks professional and lasts for years.
Ready to transform your home? Browse our range of carpets and essential fitting accessories today. With the right foundation and a bit of patience, you’ll create a space you can be truly proud of.
Frequently Asked Questions
Do I really need a knee kicker to install a carpet myself?
Yes, a knee kicker is an essential part of the tools needed to lay carpet correctly. It provides the necessary tension to hook the backing onto the gripper pins. Without one, the carpet will remain loose, leading to unsightly wrinkles and premature wear within a few months. While you can rent one for around £15.07, attempting to fit a carpet by hand won’t achieve the taut, professional finish required for a long-lasting floor.
Can I lay new carpet over an old underlay to save money?
You should always replace the underlay when installing a new carpet. Underlay loses its density and elasticity over time, especially in high-traffic areas. Reusing an old foundation often causes the new carpet to ridge or feel uneven underfoot. Investing in new, high-quality underlay can extend the life of your carpet by up to 50% and ensures you meet current 2026 UK building regulations for fire safety and thermal insulation.
How much extra carpet should I order for DIY fitting waste?
We recommend ordering at least 10% more material than your room measurements suggest. This “safety margin” accounts for walls that aren’t perfectly square and provides the 10cm excess needed on every side for a safe rough cut. Beginners often find that having extra material reduces the stress of cutting around alcoves or doorways. It’s better to have a small remnant left over than to find yourself a few centimetres short during the final stretch.
How do I fit carpet around a radiator pipe without it looking messy?
Use the “keyhole cut” method to achieve a clean finish around radiator pipes. Cut a straight line from the edge of the carpet to the centre of the pipe. At the end of this slit, cut a small circular hole roughly the diameter of the pipe. This allows the carpet to wrap neatly around the obstacle. Once the carpet is tucked, the slit will be virtually invisible within the pile, especially if you use a carpet bolster to press it down.
Is it possible to install carpet without using grippers at all?
It’s possible only if you’re using felt-backed carpet, which can be adhered with heavy-duty double-sided tape or spray adhesive. However, for most secondary-backed carpets, grippers are non-negotiable. They provide the tension that prevents the carpet from shifting and buckling. Without grippers, you lose the ability to use a knee kicker effectively. This makes it almost impossible to get a professional, wrinkle-free result that stays flat over time and handles heavy foot traffic.
What is the best way to cut carpet for a perfect fit against the wall?
A sharp hook blade or a dedicated wall trimmer is the best way to ensure a crisp edge. After you’ve tensioned the carpet onto the grippers, use your tools needed to lay carpet to press the backing into the gully. Cut the excess material at a slight angle toward the wall. This leaves just enough carpet to be tucked behind the gripper with a bolster, creating a seamless transition that looks like it was fitted by a pro.
How do I stop my new DIY carpet from fraying at the edges?
Preventing fraying starts with using a brand-new, sharp blade for every cut. Dull blades tear the fibres rather than slicing them, which leads to immediate unravelling. Once cut, always tuck the raw edge into the gully between the gripper and the skirting board using a bolster. For doorway transitions, secure the edges under a metal threshold bar. This protects the exposed pile from foot traffic and ensures the backing remains firmly in place.
Can I install carpet over a concrete floor without a professional?
Yes, you can certainly install carpet over concrete yourself. The process is similar to wooden floors, but you must use masonry-specific carpet grippers that feature sturdier nails. If the concrete is uneven or damp, you may need to apply a self-levelling compound or a damp-proof membrane first. Ensure the surface is completely dust-free before applying any adhesive spray for the underlay, as grit will prevent a secure bond and may cause crunching sounds later.