Choosing a new kitchen floor can feel like a minefield. You worry about splashes from the dishwasher causing damage, wonder if vinyl can ever truly escape that ‘cheap’ reputation, and get tangled in the debate between click-lock and glue-down systems. It’s enough to make you want to put the whole project on hold.
Frankly, it shouldn’t be this complicated. The right luxury vinyl tile for kitchens is a game-changer-offering a waterproof, durable, and genuinely beautiful foundation for the heart of your home. But the key is knowing precisely what to look for, beyond the glossy brochures and high-pressure sales talk. This guide is our honest attempt to cut through the noise and give you the straightforward advice you need.
We’ll walk you through the essential details, from understanding wear layers for a floor that will last 20+ years, to choosing a fitting method that guarantees a seamless, lasting finish. By the end, you will have the confidence to select a floor that is both a practical and stylish investment for your home.
Key Takeaways
- Get a frank comparison of LVT against ceramic and laminate to understand why it’s the practical choice for a modern UK kitchen.
- Determine whether a click-lock or glue-down system is the right fit, based on your kitchen’s specific layout and subfloor condition.
- Cut through the sales talk and learn which technical specs, like wear layer thickness, genuinely matter when selecting a durable luxury vinyl tile for kitchens.
- Discover how simple layout techniques, such as the direction of the planks, can make your kitchen feel significantly more spacious.
Why LVT is the Superior Choice for Modern UK Kitchens
When we talk about flooring for the modern home, we look for a solution that balances aesthetics, practicality, and longevity. Luxury Vinyl Tile (LVT) is precisely that. It’s a highly engineered, multi-layered flooring that has evolved far beyond its predecessors. For a detailed technical overview, you can read about What is Luxury Vinyl Tile?, but in simple terms, it’s designed for the demands of real life.
Frankly, while ceramic tiles and laminate have their places, we consistently recommend LVT for kitchens. Why? Because it delivers the sophisticated look of natural materials like oak or slate, but without their inherent drawbacks. It possesses a natural warmth and a subtle ‘give’ underfoot, making it far more comfortable for those long periods spent standing while cooking or socialising. This combination of robust performance and user comfort is what makes it a superior choice.
LVT vs. Traditional Stone Tiles
The practical differences between LVT and traditional materials like ceramic or stone are stark, especially in a kitchen setting. Here’s a straightforward comparison:
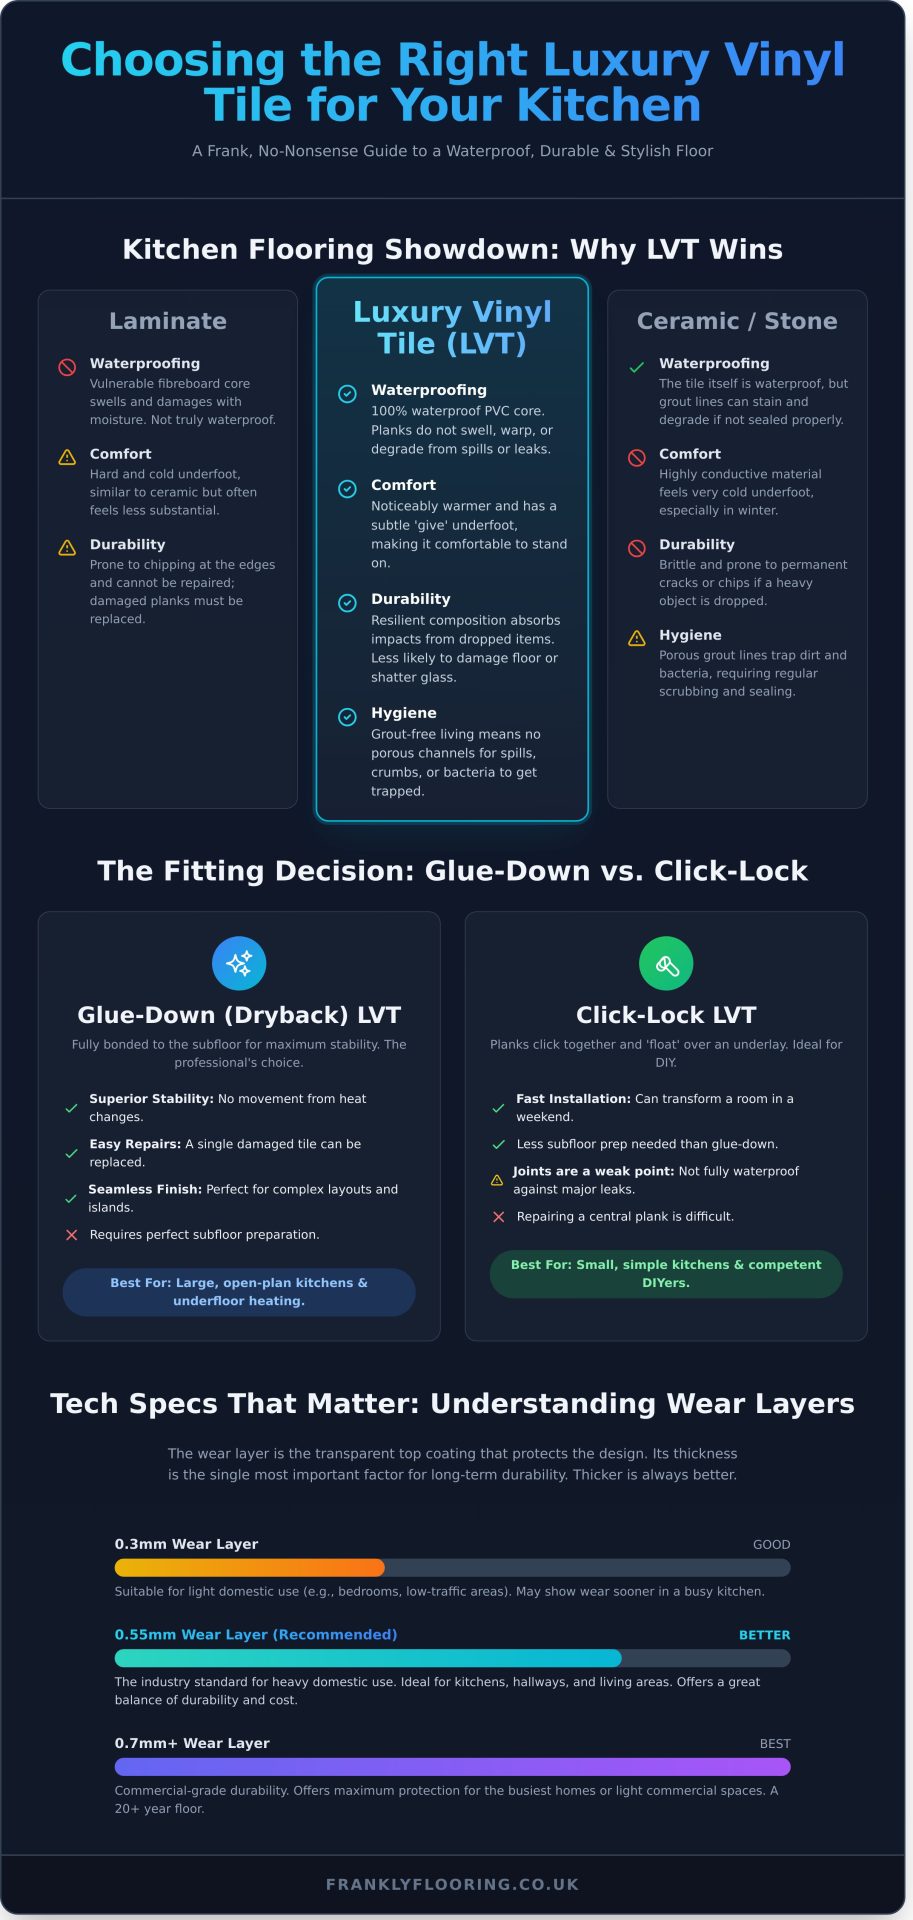
- Thermal Comfort: Stone and ceramic are highly conductive, which means they feel cold to the touch, particularly on a chilly UK winter morning. LVT retains warmth far more effectively, providing a noticeably more pleasant surface to walk on.
- Impact Resistance: If you drop a heavy pan on a ceramic tile, the likely result is a permanent crack or chip. LVT, with its resilient composition, is far more forgiving and can absorb the impact without damage. A dropped glass is also less likely to shatter.
- Grout-Free Living: The absence of grout lines is a significant hygienic advantage. There are no porous channels for spills, food crumbs, and bacteria to become trapped, making the floor easier to clean and maintain.
Waterproofing and Spill Resistance Explained
This is where using luxury vinyl tile for kitchens becomes a non-negotiable advantage. At its heart, LVT has a core made from PVC, which is 100% waterproof. This isn’t just ‘water-resistant’; it is completely impervious to water. From a rogue splash from the sink to a more serious appliance leak, the LVT planks or tiles themselves will not swell, warp, or degrade.
This quality provides an essential protective barrier for your subfloor. It’s a crucial feature that standard laminate flooring simply cannot match, as its fibreboard core is vulnerable to moisture damage. In the high-moisture environment of a kitchen, LVT offers complete peace of mind.
Choosing the Right Format: Click-Lock vs. Glue-Down LVT
Once you’ve settled on LVT, the next practical question is how it will be fitted. This choice isn’t just about cost or convenience; it’s about ensuring your floor performs flawlessly for years to come. The two primary formats are click-lock (a ‘floating’ floor) and glue-down (also known as dryback). Frankly, the right choice for your kitchen depends entirely on the room’s size, layout, and how it’s used. Before we compare fitting methods, it’s reassuring to know that modern manufacturers have made significant strides in the health and safety of vinyl flooring, ensuring the material itself is a sound choice for your home.
The fundamental difference lies in stability. A click-lock floor clicks together and ‘floats’ over an underlay, while a glue-down floor is fully bonded to a perfectly prepared subfloor with adhesive. In a kitchen, this matters. Temperature fluctuations from ovens, dishwashers, and direct sunlight can cause flooring to expand and contract. A fully bonded glue-down floor offers superior dimensional stability, making it the more robust choice for areas with significant heat sources or underfloor heating.
When to Choose Glue-Down (Dryback) LVT
For large, open-plan kitchen-diners, glue-down is almost always our professional recommendation. Its stability prevents movement across a wide area. A significant, often overlooked, benefit is the ability to replace a single damaged tile-a lifesaver if a heavy pan is dropped. This is why professional fitters prefer using glue-down luxury vinyl tile for kitchens, especially when navigating intricate layouts around islands, kickboards, and cabinetry for a truly seamless finish.
The DIY Appeal of Click-Lock LVT
Click-lock LVT has surged in popularity, largely thanks to the “Direct to Consumer” market and its DIY-friendly nature. Its main appeal is the speed of fitting; you can genuinely transform a small, straightforward kitchen over a weekend. Many modern click systems also feature an integrated underlay, simplifying the process further. But are the joints truly waterproof? Let’s be frank: while the vinyl tile itself is impervious to water, the click-lock joints are a weak point. A quick clean-up of a spill is fine, but a significant leak left unattended could seep through to the subfloor.
Technical Specs That Actually Matter: Wear Layers and R-Ratings
The term “luxury” gets thrown around a lot in the flooring world, but what does it actually mean? Frankly, it’s not just about a beautiful wood or stone effect. The real quality of luxury vinyl tile for kitchens is found in its technical specifications-the numbers that dictate how it will perform day in, day out. While marketing can be vague, a product’s true performance characteristics are defined by clear industry benchmarks, like the ASTM F1700-20 technical standard, which sets the bar for durability and composition. Two of the most crucial specs for your kitchen are the wear layer and the slip-resistance rating.
Decoding the Wear Layer for High-Traffic Zones
The wear layer is the transparent protective coating that determines the floor’s longevity and resistance to daily life. This thin but mighty shield is what stands between the printed design and the constant traffic of a busy kitchen-from your pet’s claws to the scraping of dining chairs. For a typical home, you’ll generally see options from 0.3mm to 0.7mm. While 0.3mm is perfectly adequate for a bedroom, we recommend a minimum of 0.55mm for a kitchen. This provides a robust defence against scuffs and scratches, ensuring your floor looks great for years. And the 0.7mm option? Frankly, it’s commercial-grade and usually overkill for a residential kitchen unless you plan on running a café from your home.
Slip Resistance and Safety in Wet Areas
In an area prone to splashes and spills, safety is paramount. This is where R-Ratings (or Ramp Test ratings) come in. They measure a floor’s slip resistance, and for a kitchen, you should look for a rating of R10 or higher. An R10 rating provides excellent grip underfoot, even when wet, making it a safe and sensible choice for the area around the sink or dishwasher. Many high-quality LVT products also feature a subtle, textured surface that enhances this grip without feeling rough. A common concern is that textured floors are difficult to clean, but modern luxury vinyl tile for kitchens is non-porous. This means it offers fantastic slip resistance without trapping dirt, making maintenance a straightforward job with a simple mop.
Designing Your Kitchen: 2026 Trends and Layout Considerations
A kitchen floor is no longer just a functional surface; it’s a core design element. The beauty of luxury vinyl tile for kitchens is its ability to adapt to your vision, whether you’re aiming for a timeless classic or embracing the latest trends. For 2026, the focus is on hyper-realistic natural textures. Think wood grains so convincing you can almost feel the knots, and stone effects that mimic the cool, subtle variations of slate or marble without the coldness underfoot.
Beyond the finish, the layout of your LVT can transform the room. In smaller UK kitchens, a simple but effective technique is to lay planks parallel to the longest wall. This draws the eye along the length of the room, creating an illusion of greater space. For open-plan living, LVT is brilliant for “zoning.” You can use a stone-effect tile in the cooking area and seamlessly transition to a warm wood plank in the dining space, defining each zone without needing walls.
Creating these distinct zones helps build an atmosphere perfect for entertaining. A beautifully defined dining area invites gatherings, where the quality of the space is matched by the quality of the food served. For those looking to bring an authentic taste of continental Europe to their table, specialist online purveyors like Jambons Oliveras can provide the kind of artisanal charcuterie that completes a sophisticated social event.
This versatility extends to colour palettes. The trend for bold, deep cabinetry in shades like forest green and navy blue finds a perfect partner in LVT. A lighter, natural oak-effect floor can provide a beautiful contrast, preventing these rich colours from overwhelming the space.
Completing this cohesive look involves managing the natural light that showcases your new floors and cabinetry. The right window treatments are essential for both style and practicality, and for those looking for custom-made solutions, specialist suppliers like Aussie Online Blinds offer a great source of inspiration and high-quality products.
The Herringbone Kitchen Trend
Frankly, nothing says “premium kitchen” quite like a herringbone pattern. It’s the gold standard for adding depth and character. For a flawless finish, fitting should begin from the centre line of the room, ensuring the pattern is symmetrical around key features like an island or Aga. While traditional blocks are timeless, we’re seeing a move towards larger parquet planks for a bolder, more contemporary statement in modern kitchens.
Matching Flooring to Worktops and Units
Creating a cohesive design is about balancing your core elements. The right flooring choice will tie everything together. Here are a few combinations that work beautifully:
- Light Oak LVT: Pairs exceptionally well with dark, dramatic “Anthracite” or navy kitchen units, creating a warm and sophisticated contrast.
- Stone-Effect LVT: The perfect companion for quartz or granite worktops. A slate or travertine-style LVT complements the natural stone, delivering a high-end look with far more warmth and practicality.
Remember, lighting changes everything. We always recommend getting samples to see how your chosen floor looks in your kitchen’s natural and artificial light throughout the day. To find your perfect match, you can explore our LVT collections and arrange for samples to be sent directly to your home.
The Frank Truth About Subfloor Prep and Maintenance
A beautiful LVT floor can transform a kitchen, but the secret to a flawless, long-lasting finish isn’t the tile itself-it’s what lies beneath. Frankly, many flooring problems stem from a poorly prepared subfloor. Getting this foundation right is the single most important step in ensuring your new floor performs perfectly for decades.
Subfloor Prep: The Foundation of Success
Before any LVT is laid, the subfloor must be clean, dry, and perfectly flat. In kitchens, we commonly encounter two scenarios. For uneven concrete or screed, a self-levelling compound is used to create a glass-smooth surface. If you have original floorboards, we overlay them with a minimum of 6mm flooring-grade plywood to eliminate any bounce and bridge the gaps.
Two non-negotiable checks we always perform are for damp and levelness:
- Damp Proof Membrane (DPM): If your kitchen is on the ground floor with a concrete subfloor, a liquid DPM is essential. It creates an impermeable barrier that stops moisture from rising and damaging the adhesive and your LVT.
- The Levelness Test: We use a straightedge to ensure the floor is flat to within a 3mm tolerance over a 2-metre span. Any dips or bumps beyond this will show through the final floor, so they must be rectified.
One final, crucial step before fitting is acclimatisation. Your LVT planks must be left in the kitchen for at least 48 hours to adjust to the room’s temperature and humidity. Skipping this can cause the vinyl to expand or contract after fitting, leading to unsightly gaps or lifting.
Cleaning and Long-Term Care
Maintaining your luxury vinyl tile for kitchens is refreshingly straightforward. A regular sweep or vacuum followed by a mop with a pH-neutral cleaner is all it takes. It’s vital to avoid harsh chemicals like bleach or abrasive cleaners, as these can dull the finish and strip the protective wear layer over time.
To prevent dents and scratches from heavy appliances like your fridge-freezer or washing machine, we recommend placing them on floor protectors or furniture cups. This simple step helps distribute the weight and keeps your floor looking impeccable.
With the right preparation and a simple care routine, your LVT floor will be a durable and stunning centrepiece in your home. Ready to find the perfect style? Browse our full Kitchen LVT range and start your project today.
The Frank Verdict: A Foundation for Your Perfect Kitchen
As we’ve explored, selecting the right flooring goes far beyond aesthetics. It’s about making informed choices on the practical matters-from the crucial wear layer thickness that dictates durability to the non-negotiable step of subfloor preparation. Getting these fundamentals right is the difference between a floor that simply looks good and a luxury vinyl tile for kitchens that performs beautifully for years to come.
Just as a great floor provides the foundation for your kitchen, looking after your personal health provides the foundation for everything else. For those also considering a new approach to their well-being, you can visit foundry to learn about their clinician-supported programs.
At Frankly Flooring, we believe in making this process straightforward. With over 20 years of family-run flooring expertise, we skip the inflated showroom costs and offer direct-to-consumer pricing. You’ll find transparent, honest advice on every product page because we’re committed to helping you find the right foundation for your home, not just making a quick sale.
When you’re ready to see the difference that quality and integrity make, we invite you to Browse Frankly Flooring’s Collection of Kitchen LVT. Your perfect kitchen floor is well within reach, and we’re here to help you lay the groundwork for it.
Frequently Asked Questions About LVT in Kitchens
Is LVT flooring good for kitchens?
Absolutely. LVT is exceptionally well-suited for kitchens due to its inherent water resistance and durability. Unlike some materials, it handles spills and high foot traffic with ease, making it a practical, long-lasting choice. It’s also much warmer and more comfortable underfoot than traditional ceramic tiles, which is a real benefit when you’re standing for long periods. Frankly, it combines the aesthetic appeal of natural materials with the robust performance a modern kitchen demands.
Can you put LVT under kitchen units and appliances?
This depends on the type of LVT. For a glue-down installation, fitting the LVT across the entire subfloor before the units are installed can create a seamless finish. However, for a ‘floating’ click system, this is not recommended. Heavy units and appliances can pin the floor down, preventing the natural expansion it needs. This can lead to buckling or damage, so we typically advise fitting floating LVT up to the kitchen plinths for the best long-term result.
Do I need underlay for LVT in a kitchen?
For glue-down LVT, an underlay is not used; the tiles are bonded directly to a perfectly smooth and prepared subfloor. For click LVT, an underlay is often required, though some products now come with a pre-attached backing. It’s crucial to use an underlay specifically designed for LVT, as this provides the right level of support without being too soft. Proper subfloor preparation is, frankly, the most critical step for a quality finish, regardless of underlay.
How much does it cost to fit LVT in a UK kitchen?
The cost can vary, but as a guide, you can expect to pay between £25 to £50 per square metre for good quality LVT. Professional fitting costs typically range from £20 to £30 per square metre. This figure can be influenced by the amount of subfloor preparation required-such as screeding or plying-and the complexity of the layout. For an average UK kitchen, a fully fitted LVT floor often falls in the £800 – £2,000 range.
Funding a renovation like this is a key consideration for many homeowners. While services vary by country, looking at how different platforms operate can be insightful; for example, you can learn more about Finlat, a loan comparison service in Latvia, to see one approach to financing home projects.
Can LVT be used with underfloor heating in the kitchen?
Yes, most high-quality LVT products are perfectly compatible with water-based underfloor heating systems. It’s an excellent pairing, creating a floor that is both durable and comfortably warm. However, it is essential to ensure the floor temperature does not exceed the manufacturer’s recommendation, which is typically 27°C. The heating should also be brought up to temperature gradually to allow the flooring to acclimatise properly, ensuring a stable and long-lasting installation.
Is click LVT better than glue-down for a DIY kitchen project?
For a straightforward DIY project, click LVT is often the more accessible option. The locking mechanism removes the need for specialist adhesives, making the fitting process cleaner and quicker for a novice. That said, achieving a professional finish with luxury vinyl tile for kitchens still hinges on immaculate subfloor preparation. Glue-down LVT, while requiring more skill to fit, can offer greater stability in high-traffic areas and is often preferred by professional fitters for its permanence.
How do I clean LVT flooring in a kitchen without damaging it?
Maintaining your LVT is straightforward. Start by sweeping or vacuuming to remove loose dirt and grit. For cleaning, use a damp mop with a pH-neutral cleaning solution specifically formulated for vinyl floors. It’s important to avoid using harsh chemicals, bleach, or abrasive scouring pads as these can damage the protective wear layer. We also advise against using steam mops, as the intense heat and moisture can weaken the adhesive and cause damage over time.
What happens if I spill water on my LVT floor?
One of the primary benefits of LVT is its excellent water resistance. If you spill water, food, or drinks, there is no need to panic as the surface is non-porous and the liquid will simply sit on top. Just wipe it up with a cloth or paper towel in a timely manner. While the tiles themselves are waterproof, it’s always best practice to clean spills promptly to prevent any potential for moisture to find its way through the seams to the subfloor.