Your engineered wood floor is designed to last up to 50 years, but it won’t reach that milestone if you treat it like a standard laminate or a solid oak plank. Most damage happens because of well-intentioned mistakes rather than genuine neglect. Whether you’re worried about a spilled drink causing permanent warping or you’re tired of seeing micro-scratches from pets, the confusion ends here. You deserve to know exactly how to care for engineered wood floors without the guesswork or the high-pressure sales pitch for expensive, unnecessary chemicals.
We understand that your home is a reflection of your character, and a dull or damaged floor is a constant source of annoyance. This guide provides a direct, transparent look at the professional secrets required to maintain that showroom finish for decades. This is the Frank approach: honest advice that prioritizes the longevity of your home over a quick win. We’ll walk you through a simple, repeatable cleaning schedule, the specific tools that actually work, and the environmental factors you must control to prevent your boards from shifting. By the end, you’ll have the confidence to manage your flooring like an expert, ensuring it remains a beautiful, foundational element of your home for 25 years or more.
Key Takeaways
- Identify whether your floor has a lacquered or oiled finish to ensure you don’t accidentally strip the protective layer with the wrong chemicals.
- Learn how to care for engineered wood floors by prioritizing dry cleaning over damp mopping to prevent moisture from compromising the natural timber layers.
- Implement the “First Line of Defence” strategy using high-quality rugs and mats to stop grit from causing micro-scratches before they start.
- Upgrade your toolkit with a flat-head microfibre mop and simple felt pads to protect your investment from heavy furniture and outdated cleaning methods.
- Master the professional “Blot, Don’t Rub” technique for accidental spills to avoid forcing liquid deep into the wood’s grain.
Understanding Engineered Wood: Why Care Differs from Solid Timber
Engineered wood isn’t a synthetic substitute; it’s a high-performance evolution of traditional timber. To understand how to care for engineered wood floors, you first need to understand what you’re actually walking on. Unlike solid timber, which is one consistent block of wood, Engineered wood is a sophisticated composite. It’s built in layers to provide better structural integrity, but it remains a natural product that breathes and reacts to its environment just like a solid oak plank would.
The Frank reality of maintenance is quite simple: when you mop or sweep, you aren’t actually touching the wood. You are interacting with the finish, usually a UV lacquer or a natural oil. If you use the wrong chemicals, you strip that finish away, leaving the raw timber vulnerable to moisture and dirt. Improper care doesn’t just make the floor look dull; it can lead to delamination, where the layers physically separate, or permanent staining of the core materials that no amount of sanding can fix. Knowing how to care for engineered wood floors is essentially about protecting that top barrier to keep the layers beneath it dry and stable.
The Anatomy of Your Floor
Your engineered wood flooring consists of a top “wear layer” of real hardwood bonded to a core of plywood or high-density fibreboard (HDF). This construction is what separates it from cheaper laminates, which use a printed photograph of wood rather than the real thing. The thickness of this wear layer is vital; it determines whether you can refinish the floor in twenty years or if it’s a “one-life” product. A quality wear layer allows for professional sanding and resealing, effectively resetting the clock on your floor’s lifespan. Beneath this, the backing layer provides the necessary tension to prevent the boards from cupping or bowing over time.
Stability vs. Invincibility
Many retailers claim engineered wood is “more stable” than solid wood, which is true, but that doesn’t mean it’s invincible. While the cross-grain construction limits shrinking and swelling, the core still reacts to extreme temperature shifts and humidity. It is a common misconception that these floors are waterproof. They aren’t. The “danger zone” is always the tongue-and-groove joints. If water sits on the surface, it seeps into these gaps, reaching the absorbent core layers. Once the core absorbs enough moisture, it expands, causing the top layer to lift or “peak” at the edges. Maintaining a consistent indoor climate is just as important as the cleaning products you choose.
Lacquered vs. Oiled Finishes: Tailoring Your Maintenance Routine
The most dangerous mistake you can make when learning how to care for engineered wood floors is assuming every plank requires the same treatment. We’ll be Frank with you: if you don’t know which finish is on your floor, you can’t clean it safely. Using a lacquer-specific polish on an oiled floor will create a sticky, smeared mess, while using an oil soap on a lacquered floor is a waste of money and effort. In 2026, most homeowners choose between UV Lacquer and Natural Oil, and each demands a completely different strategy.
If you’re unsure what you have, perform the “water bead test.” Place a single drop of water on an inconspicuous area of the floor. If the water sits on the surface in a tight bead, you likely have a lacquered finish. If the water begins to soak into the grain or leaves a dark spot after a few minutes, your floor is oiled. Understanding this distinction is the foundation of long-term floor health, as highlighted in professional resources like Mohawk Hardwood Care & Maintenance guides.
Caring for Lacquered (Satin or Matt) Floors
Lacquered floors are the low-effort choice for busy households. The lacquer acts as a sealed, plastic-like barrier that sits on top of the wood, preventing liquids and dirt from reaching the timber itself. However, this shield is susceptible to scratching. You must avoid abrasive pads or stiff-bristled brushes that “cloud” the finish over time with thousands of tiny micro-scratches. Instead, use a pH-neutral cleaner. If the floor begins to look tired, a dedicated wood floor polish can restore the shine without the need for professional sanding.
Caring for Oiled and UV-Oiled Floors
Oiled floors are a high-reward option because they look and feel more natural. Unlike lacquer, the oil penetrates deep into the wood grain. This means the wood is protected from within, but the surface remains “open.” To keep these floors looking their best, you must use specialized “oil soaps” that replenish the protective oils during every clean. Without this, the wood will eventually dry out and become brittle. Most oiled floors require a professional “re-oil” every 12 to 24 months to maintain their water resistance and rich colour. If you’re currently choosing between these finishes, browse our range of engineered wood products to see which fits your lifestyle best.
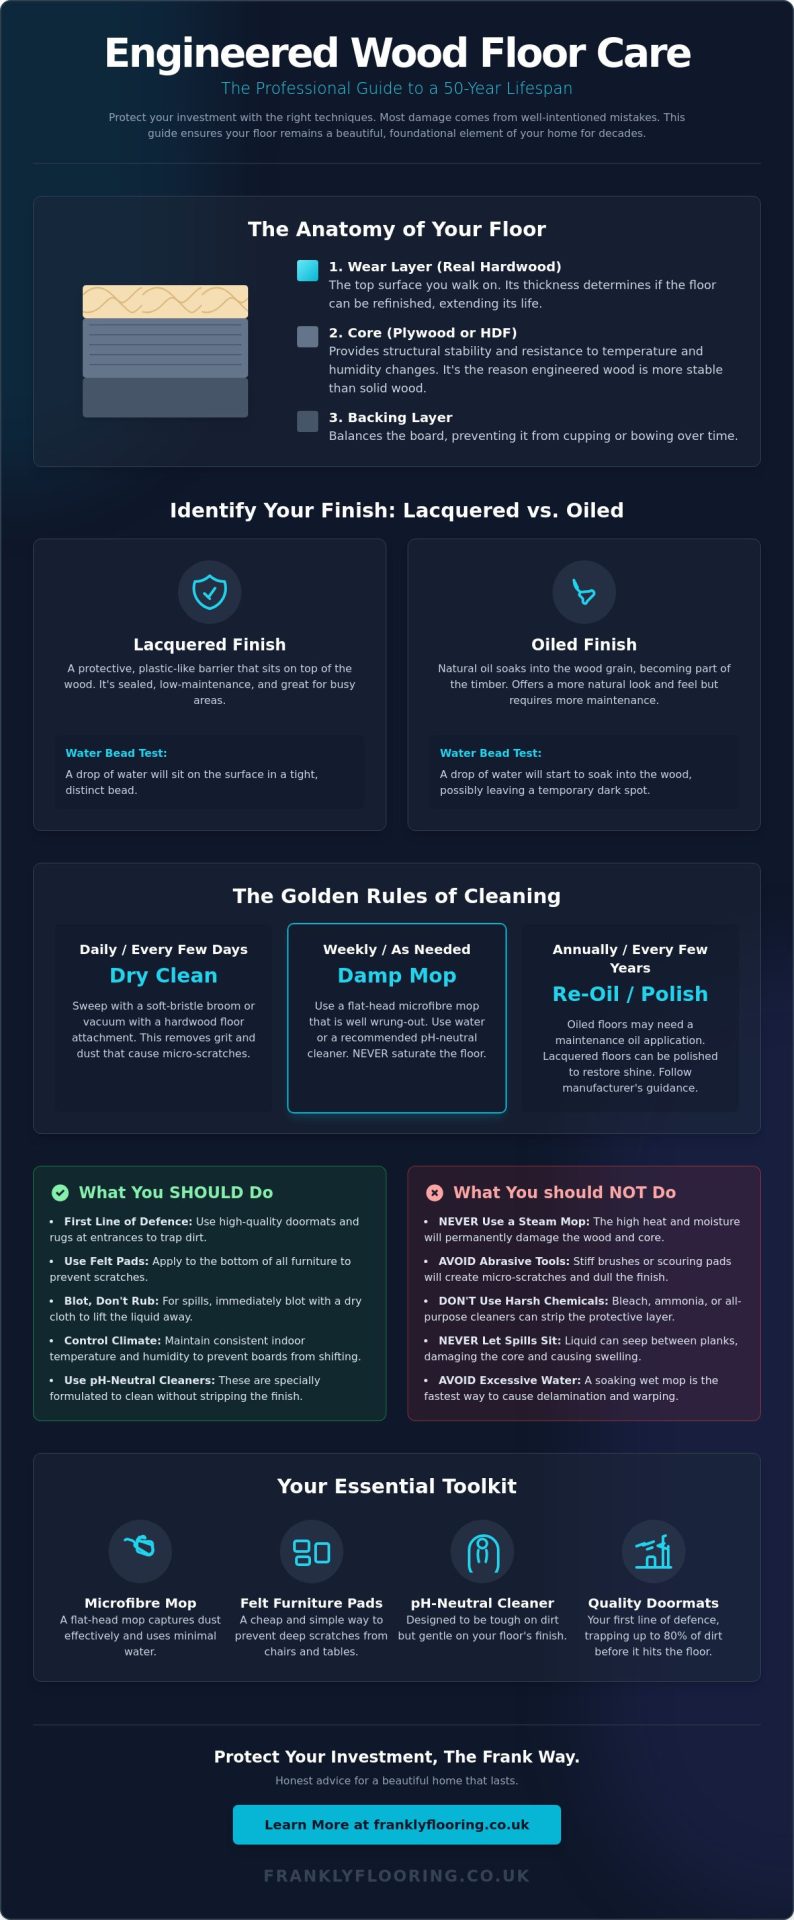
The Golden Rules of Cleaning: Daily, Weekly, and Monthly Habits
Maintenance isn’t about deep scrubbing; it’s about consistency. If you want to master how to care for engineered wood floors, you need to think of prevention as your primary tool. Your “First Line of Defence” is a high-quality mat at every entrance. These mats trap grit and moisture before they ever touch your boards. We recommend using breathable rugs in high-traffic areas, but avoid rubber-backed versions as they can trap moisture and discolour the wood over time.
The golden ratio of floor care is 10:1. You should be dry cleaning your floor ten times for every one time you use a damp mop. Moisture is the natural enemy of any timber product, and even the most stable engineered boards can suffer if subjected to excessive water. Follow the “Well-Wrung” rule: if your floor takes more than two minutes to dry after mopping, you’ve used too much water. It’s a simple test that saves your core layers from unnecessary stress.
There are three things you must banish from your cleaning cupboard immediately: bleach, vinegar, and steam mops. Bleach and vinegar are far too acidic; they will eat through your finish and dull the wood. Steam mops are even worse. They force high-pressure moisture deep into the joints, which is the fastest way to cause delamination. For a more detailed breakdown of these risks, you can consult a professional engineered wood flooring maintenance guide to see why heat and wood never mix.
The Daily Dust-Up
Micro-grit is essentially sandpaper for your floor. Every time you walk across a dusty room, you’re grinding those tiny particles into the finish. A soft-bristle broom is your best friend here. While vacuums are convenient, ensure yours has a dedicated “hard floor” setting that disengages the beater bar. A spinning brush designed for carpets will leave nasty swirl marks on your wood. Focus your daily efforts on “pivot points”, those areas like the kitchen sink or the doorway where people frequently turn and shuffle their feet.
The Weekly Damp Mop
Once a week, or whenever the floor looks hazy, it’s time for a damp clean using a pH-neutral wood cleaner. Use the “Two-Bucket” method: one bucket for your cleaning solution and one for rinsing your mop. This prevents you from simply pushing grey, gritty water back onto the floor. If your home has mixed surfaces, remember that while laminate flooring can handle slightly more robust cleaning, your engineered wood needs a gentler touch to protect the real timber wear layer. Always work in the direction of the wood grain to avoid streaks.
Dealing with Mishaps: Scratches, Spills, and the British Climate
Life happens on your floors. Whether it’s a dropped glass of wine or a muddy paw print, your reaction time matters. The absolute rule for spills is to blot, never rub. Rubbing a liquid spreads it across the surface and, more importantly, forces it down into the micro-gaps between the planks. Once moisture reaches that HDF or plywood core we discussed earlier, the risk of permanent swelling increases significantly. Use an absorbent paper towel or a dry microfibre cloth to lift the liquid straight up. This simple change in habit is the most effective way to prevent long-term water damage.
Being Frank about scratches is also essential. You will get them. It’s a natural floor, not a sheet of steel. Most surface scratches only affect the lacquer or oil layer and can be managed with the right routine. However, deep gouges that penetrate the wear layer require more attention. To prevent your wood from reacting poorly to the environment, we recommend keeping a hygrometer in the room. It’s a small, inexpensive device that monitors humidity. If your air is too dry or too damp, your floor will tell you by creaking or gapping. Monitoring the air is a professional secret that ensures you know how to care for engineered wood floors through every season.
The Scratch Repair Kit
For lacquered floors, deep scratches often need a wax filler stick that matches your wood’s tone. You melt the wax into the gouge, level it off, and it becomes almost invisible. Oiled floors offer a massive advantage here. You can lightly sand the specific area of the scratch and apply a small amount of maintenance oil to “heal” the spot. This avoids the need for a full room treatment. If the damage covers a significant portion of the room, it’s usually more practical to call a professional for a full sand and seal rather than attempting a DIY fix on every board.
The British Climate Factor
In the UK, our homes go through a brutal cycle of damp summers and bone-dry winters when the central heating kicks in. Your engineered floor wants to stay in the “sweet spot” of 40 to 60 percent humidity. If it drops below this in January, you might notice small gaps appearing between boards. This is normal timber behaviour. To minimize this, ensure your underfloor heating is never turned on “full blast” suddenly; always increase the temperature gradually over several days. Also, use rugs or curtains to protect south-facing rooms from UV bleaching, which can change the wood’s colour in just one season. If your current floor is beyond repair, you can find durable replacements in our latest engineered wood bargains.
Essential Kit: The Tools You Actually Need for Long-Lasting Floors
Mastering how to care for engineered wood floors is 50% technique and 50% having the right gear in your cupboard. You don’t need a professional-grade van full of equipment. You just need a few specific, high-quality items that respect the delicate balance of the timber’s wear layer. Most floor failures aren’t caused by a lack of effort; they’re caused by using tools designed for tiles or stone on a natural wood surface. All-purpose cleaners are a recipe for disaster because they often contain harsh degreasers that strip away the protective oils or lacquer, leaving your floor looking dull and “thirsty” within months.
We’ll be Frank with you: quality over quantity is the rule here. A small investment in the right kit today prevents a very expensive replacement project ten years down the line. Specialized cleaning products for wooden floors typically range from £5 to £15, which is a tiny price to pay for protecting an asset that defines the character of your home. If you keep your toolkit simple and focused, maintenance becomes a quick habit rather than a weekend chore.
Selecting the Right Mop
Ditch the old-fashioned string mop and bucket. String mops hold far too much water, which leads to the pooling and moisture damage we’ve discussed in previous sections. A flat-head microfibre mop is the gold standard for engineered timber. These mops use electrostatic action to pick up dust when dry and require only a fine mist when damp. We recommend spray mops with a built-in reservoir; they allow for controlled misting so you never over-saturate the wood. Ensure the pads are removable and machine-washable. This ensures you’re actually removing dirt rather than just moving last week’s grime around the room. Whatever you do, stay away from steam mops. The combination of high heat and forced moisture is the fastest way to ruin the adhesive bonds in your floor’s core.
Furniture and Protection
Your furniture is a constant threat to your floor’s finish. Installing heavy-duty felt pads on the legs of every chair, table, and sofa is the cheapest insurance policy you’ll ever buy. For particularly heavy items like sideboards or pianos, use castor cups to distribute the weight and prevent deep indentations. Always follow the “Lift, Don’t Slide” rule. Even with felt pads, sliding a heavy piece of furniture can trap a stray piece of grit underneath, creating a deep gouge. If you’re moving house or rearranging a room, take the extra thirty seconds to lift the item completely.
The Final Word on Value
When you compare the cost of a £20 repair kit to a £2,000 floor replacement, the logic of proper maintenance is clear. Consistency is always more effective than intensity. A quick five-minute sweep every evening will do more for your floor’s lifespan than a three-hour deep clean once a month. If you’re ready to upgrade your home with a surface that’s built to last for decades, explore our engineered wood flooring collection to find the perfect match for your style and budget.
Protect Your Investment for Decades to Come
Maintaining a beautiful home shouldn’t be a source of constant stress. By identifying your floor’s specific finish and controlling your indoor climate, you’ve already mastered the most difficult aspects of how to care for engineered wood floors. Remember that consistency always beats intensity; a quick daily sweep and the use of the right microfibre tools will do more for your floor’s longevity than any expensive “deep clean” ever could. You now have the professional secrets needed to keep your boards stable, vibrant, and protected against the unique challenges of the British seasons.
At Frank, we believe in providing honest, no-nonsense advice backed by over 20 years of flooring expertise. As a family-run business, we prioritize the long-term satisfaction of our customers over high-pressure sales tactics. Whether you need a specific accessory or you’re looking for a complete room transformation, we offer national UK delivery on our entire range of products. If you’re ready to find a floor that stands the test of time, you can browse our range of high-quality Engineered Wood Flooring today. With the right routine in place, your floor will remain a foundational element of your home’s character for many years to come.
Frequently Asked Questions
Can I use a steam mop on engineered wood floors?
No, you should never use a steam mop on engineered timber. The high-pressure steam forces moisture deep into the joints and between the layers of the wood. This leads to delamination, where the real wood top layer peels away from the core, and causes the boards to swell or buckle. Stick to a microfibre mop and a controlled spray of pH-neutral cleaner for a safe, effective result.
How often should I clean my engineered wood flooring?
You should sweep or dry-mop your floor daily to remove micro-grit and dust. These tiny particles act like sandpaper underfoot and will eventually dull your finish. A damp mop is only necessary once a week or every fortnight, depending on the level of foot traffic in your home. Over-cleaning with water is a common mistake; keeping the surface dry is the best way to ensure longevity.
What is the best cleaner for engineered wood floors?
The best cleaner is a pH-neutral, water-based solution specifically formulated for real wood. Avoid “all-purpose” household cleaners, as they often contain harsh chemicals or degreasers that strip away the protective finish. If your floor has an oiled finish, ensure you use a specialized oil soap. This replenishes the natural oils while you clean, preventing the timber from becoming brittle or dry over time.
Can you sand and refinish engineered wood floors?
Yes, most engineered floors can be sanded and refinished at least once. The number of times you can do this depends entirely on the thickness of the real hardwood wear layer. A floor with a 4mm wear layer can usually handle two or three professional sands. However, if the wear layer is thin, sanding too deeply will expose the plywood or HDF core, which cannot be repaired.
Is vinegar safe for cleaning engineered wood?
No, vinegar is far too acidic for modern wood finishes. While it is often suggested as a “natural” alternative, the acid will slowly eat through the lacquer or oil over time. This leaves the wood looking cloudy and leaves the grain vulnerable to moisture and stains. When learning how to care for engineered wood floors, it’s best to stick to professional products that are chemically balanced for timber.
How do I fix a scratch on my engineered wood floor?
Surface scratches can often be hidden with a touch-up pen or a small amount of maintenance oil if the floor is oiled. For deeper gouges in lacquered wood, use a wax filler stick that matches your floor’s colour. You melt the wax into the hole, level it off, and buff it once dry. This is a vital skill for anyone wanting to know how to care for engineered wood floors without hiring a professional for minor mishaps.
What happens if I spill water on my engineered wood floor?
If you spill water, you must blot it up immediately with an absorbent cloth. If liquid is left to sit, it will seep into the tongue-and-groove joints and reach the absorbent core layers. This causes the boards to swell, leading to “peaking” at the edges or permanent warping. Never leave your floor to air-dry after a major spill; always ensure the surface is completely dry to the touch.
Do I need to wax my engineered wood floor?
Most modern engineered floors are finished with lacquer or UV-oil and do not require traditional waxing. In fact, applying wax to a lacquered floor will create a slippery, smeary mess that is difficult to remove. If your floor is oiled, you should apply a fresh coat of maintenance oil every 12 to 24 months. This keeps the wood protected from within without the need for thick, outdated wax build-up.