Let’s be frank: there is a world of difference between a floor that looks good on day one and one that stays perfect for years. If you are planning a click lvt flooring installation, you are likely weighing up the significant cost savings against the nagging fear of gaps appearing or planks shifting underfoot. Whether you are staring at an uneven subfloor or scratching your head over underlay requirements, the uncertainty can be enough to make any homeowner hesitate. We know the common worries: the dread of cutting around tricky radiator pipes and the concern that a DIY job might fail in just a few months.
At Frankly Flooring, we believe in straightforward advice and professional-grade results. This guide is designed to strip away the jargon and give you the quiet confidence to tackle the fitting yourself. We will walk you through every essential step from meticulous subfloor preparation to those final, seamless finishing touches. Our goal is to ensure you achieve a professional-looking floor without the professional price tag, giving you a foundational element of your home’s character that is built to last. Let’s get started on fitting a floor you can truly take pride in.
Key Takeaways
- Understand why click LVT is the superior choice for a DIY project and how its interlocking system provides a professional finish without the mess of glue.
- Learn the “Golden Rule” of subfloor preparation, including why using a builders level is the only way to ensure your floor stays flat for years to come.
- Master the click lvt flooring installation process with a frank step-by-step guide that covers everything from laying underlay to setting the perfect first row.
- Avoid common amateur mistakes by planning your layout like a professional, ensuring you never start with a full plank width or skip vital expansion gaps.
- Discover how to achieve a seamless look across your home by choosing the right door bars and fitting scotia to hide necessary movement gaps.
The Reality of Click LVT Flooring Installation: Is It Really DIY-Friendly?
Let’s be honest: not every home renovation project is as straightforward as the glossy brochures suggest. However, when it comes to click lvt flooring installation, the industry hype is largely justified. Click Luxury Vinyl Tile (LVT) is a floating floor system that utilizes specially engineered interlocking joints to create a seamless, glue-free finish. While its predecessor, Vinyl composition tile (VCT), often required complex adhesives and rigorous industrial preparation, modern click systems are designed specifically with the homeowner in mind.
Frankly, it is the best choice for DIYers. Unlike glue-down LVT, which is notoriously unforgiving once the tile hits the adhesive, click systems allow you to ‘unclick’ and adjust if a joint isn’t sitting perfectly. You don’t need the raw strength of a site labourer; you simply need the patience of a craftsman and a sharp utility knife. It is a game of precision rather than power.
Why Click LVT is the 2026 Standard for Home Reno
By 2026, click LVT has firmly established itself as the UK standard for modern renovations. The primary appeal lies in its efficiency and resilience:
- Speed of fitting: A standard 15sqm lounge can be transformed in a single weekend, including the final sweep-up.
- Durability: Modern ‘rigid core’ technology is more forgiving of minor subfloor imperfections, meaning you won’t see every tiny bump mirrored on the surface.
- Cost-efficiency: By handling the click lvt flooring installation yourself, you can save significantly on labour costs-typically between £15 and £25 per square metre in the UK market.
The ‘Frankly’ Reality Check: When to Call a Pro
We believe in being straight with you: not every room is a DIY candidate. While a square bedroom is a perfect starter project, certain scenarios require a professional eye:
- Complex layouts: If you are planning a continuous run through multiple rooms or attempting a bespoke herringbone pattern, the geometry can get complicated very quickly.
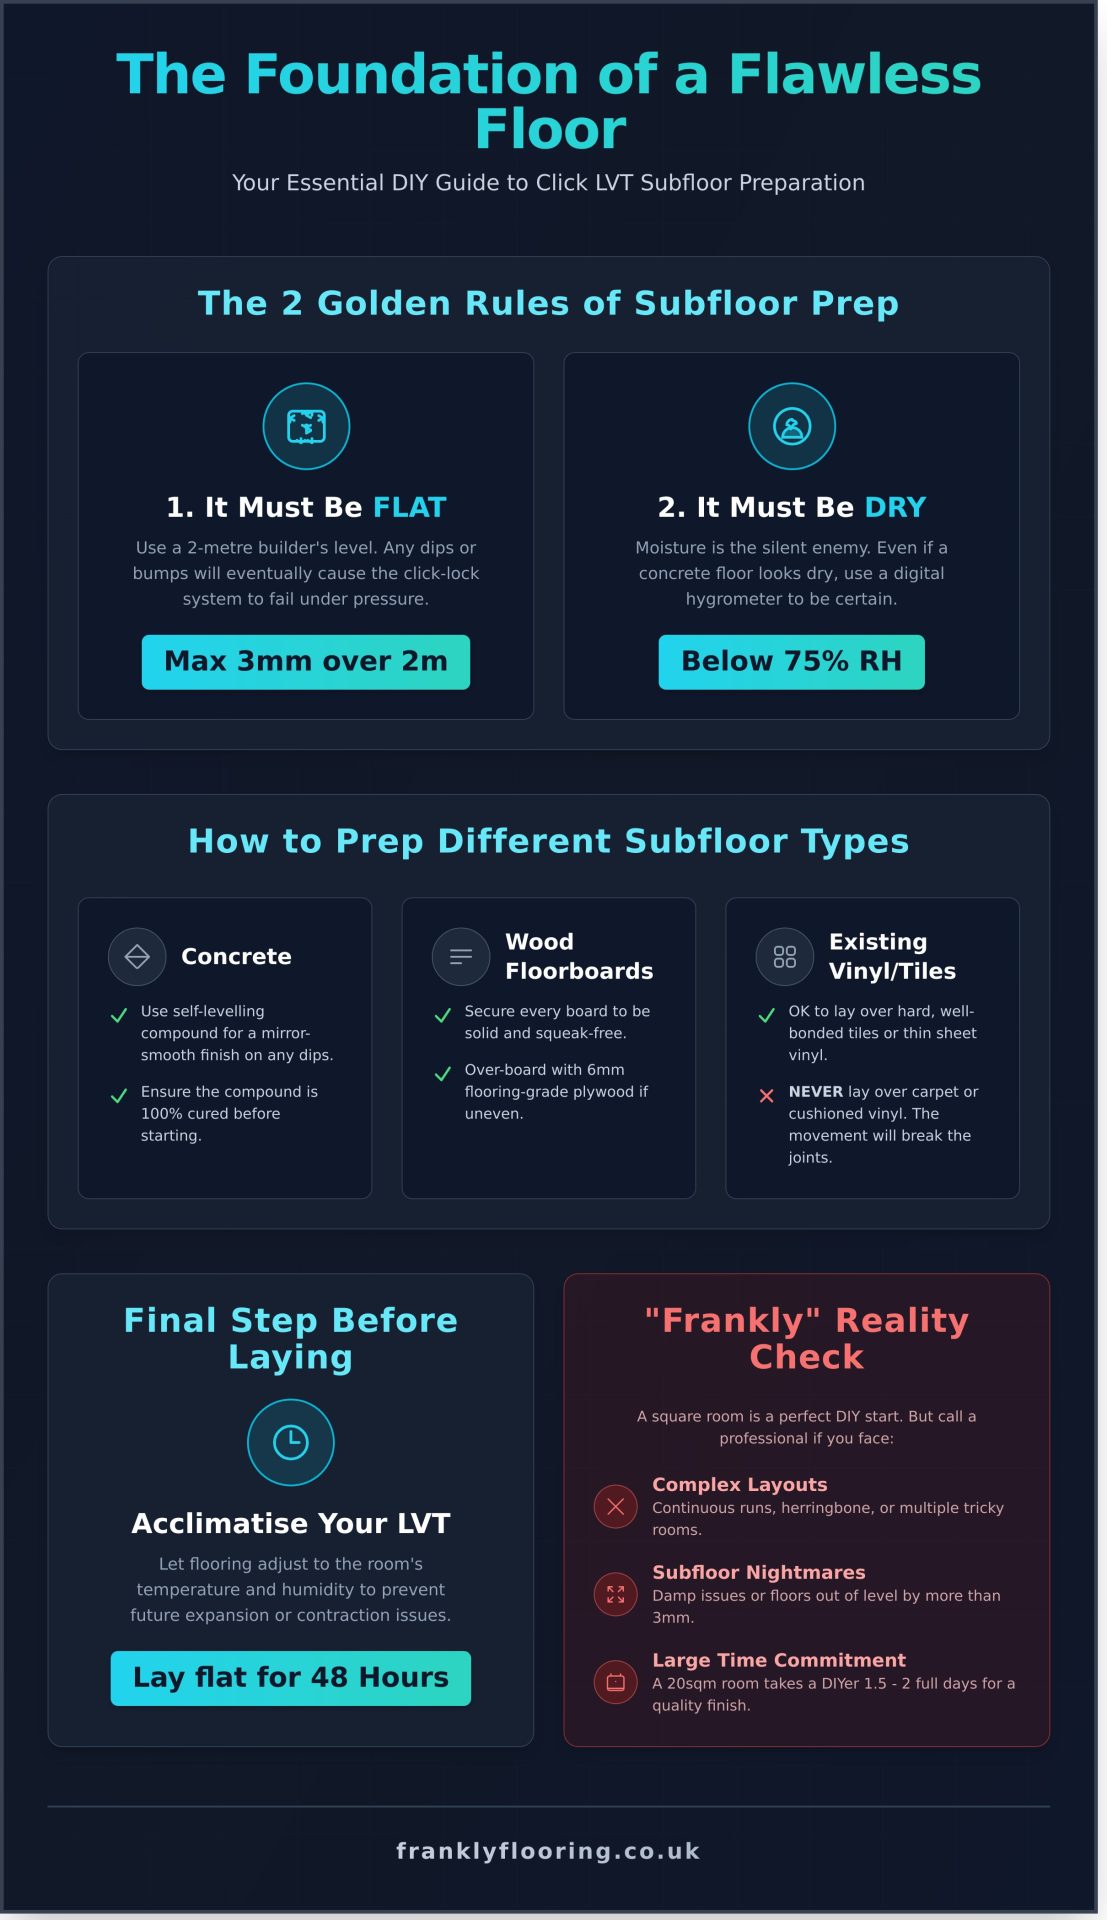
- Subfloor nightmares: If your subfloor has damp issues or a variance of more than 3mm over a 2-metre span, you need professional levelling before you begin.
- Time commitment: Be realistic. For a 20sqm room, a DIYer should budget 1.5 to 2 full days to ensure a high-quality, professional-looking finish.
The Foundation of Success: Subfloor Preparation and Acclimatisation
To be perfectly frank, your new floor is only as good as what lies beneath it. Skipping the preparation stage is the fastest way to ruin a high-quality click lvt flooring installation. Before you even think about clicking the first plank into place, you must ensure your subfloor is flat, dry, and structurally sound. Any imperfection below will eventually telegraph through to the surface or, worse, cause the click-lock system to fail under pressure.
When testing for level, put away the small DIY spirit level. You need a 2-metre builders level or a straight edge to get an accurate reading across the entire room. If you find a deviation greater than 3mm over a 2-metre span, the floor requires attention. Furthermore, moisture is the silent enemy of any renovation. Even if a concrete floor looks dry, it may still hold residual dampness. We recommend using a digital hygrometer to ensure moisture levels are below 75% Relative Humidity (RH). Following these industry-accepted standards for flooring installation ensures your investment remains stable for years to come.
Prepping Different Subfloor Types
- Concrete floors: Most new-build or ground-floor slabs have minor dips. Use a high-quality self-levelling compound to create a mirror-smooth finish. Ensure the compound is fully cured before proceeding.
- Wooden floorboards: Every board must be secure and squeak-free. If boards are uneven, you may need to over-board the area with 6mm flooring-grade plywood to create a uniform surface.
- Existing vinyl or tiles: You can often fit LVT directly over hard, well-bonded tiles or thin vinyl. However, never lay it over carpet or “cushioned” vinyl, as the movement will break the LVT joints.
The Science of Acclimatisation
LVT is a stable material, but it is still subject to the laws of physics. In the British climate, temperature fluctuations can cause the core of the plank to expand or contract. To prevent your floor from buckling or gapping after it’s been fitted, you must acclimatise the boxes in the room where they will be installed for a minimum of 48 hours.
Don’t just lean the boxes against a cold radiator or damp wall. They should be stacked flat on the floor, ideally in small piles no more than three or four boxes high to allow air to circulate. During this wait, maintain a steady ‘lived-in’ temperature-ideally between 18°C and 22°C. This ensures the material reaches its natural equilibrium before the click lvt flooring installation begins.
Essential Tools and Planning Your Layout Like a Professional
To be frank, the success of your click lvt flooring installation depends more on the thirty minutes spent planning than the hours spent fitting. Rushing into the first row without a strategy often leads to awkward, thin strips at the far wall or joints that fail to align correctly. A professional finish is all about symmetry and structural stability.
Before you begin, ensure your tool kit is ready. At a minimum, you will need a sharp Stanley knife, a rubber mallet, and a set of expansion spacers. To ensure a professional-grade finish, we recommend following Resilient Floor Covering Institute (RFCI) standards regarding subfloor tolerances and expansion gaps. For the best aesthetic, planks should typically run parallel to the primary light source in the room, as this helps to minimise the visibility of seams and creates a more seamless sense of space.
The Frankly Flooring Tool Checklist
- Cutting tools: A heavy-duty Stanley knife is perfect for straight “score and snap” cuts. However, for intricate U-shaped cuts around door frames, a jigsaw with a fine-toothed blade is much more efficient.
- Installation aids: Never hit the planks directly with a hammer. Use a tapping block and a pull bar to snug the joints together without damaging the delicate click mechanism.
- Safety gear: Knee pads are the most underrated tool in the kit. Fitting a floor is hard on the joints; your future self will thank you for the extra cushioning during a long day on the floor.
Mapping the Room for a Seamless Finish
A “dry lay” is a vital step in any click lvt flooring installation. Lay out a few rows of planks across the room without clicking them together to visualise the pattern. This allows you to calculate the width of the final row; if the remaining gap is less than 50mm, you must trim the width of your first row to ensure the floor looks balanced once finished.
Finally, plan for structural integrity by ensuring your “stagger”-the distance between end joints in adjacent rows-is at least 150mm to 300mm. This prevents weak spots and ensures the floor remains stable underfoot. Take note of obstacles like radiator pipes or fireplace hearths now, so you can plan your relief cuts before you reach them, avoiding wasted material and frustration.
How to Fit Click LVT Flooring: The Step-by-Step Process
To be frank, the success of your click lvt flooring installation depends entirely on your patience during the first few rows. Follow these steps for a professional finish:
- Step 1: Lay your underlay across the subfloor, taping joins to prevent overlapping (skip this if your LVT has a pre-attached acoustic backing).
- Step 2: Set the first row, ensuring you leave a consistent expansion gap against every wall.
- Step 3: Use the ‘Angle and Click’ technique to lock planks together, ensuring the long side is fully engaged before clicking the short side.
- Step 4: Measure and cut the final row and any awkward corners using a sharp utility knife.
- Step 5: Remove all spacers and check the ‘float’ of the floor; it should move slightly as a single unit without binding against walls.
Mastering the First Row
The first row is your foundation. Use 7-10mm spacers against the walls to allow for natural seasonal expansion. To ensure the row is perfectly straight, we recommend the ‘string line’ trick: stretch a taut line from one end of the room to the other to guide your placement. When locking the short ends, use a rubber mallet with a gentle touch to seat the joints without damaging the clicking mechanism.
The Rhythm of the Fit
Standard click lvt flooring installation usually moves from left to right. Most modern systems use a ‘drop-lock’ or ‘angle-angle’ mechanism; listen for the audible ‘click’ that signifies a secure bond. Always check for debris before joining planks; even a tiny stone or piece of grit trapped in the groove can ruin a joint’s seal and cause the floor to fail over time.
Cutting Around Obstacles
For radiator pipes, create a paper template to mark the exact hole location on your plank. When meeting doorways, undercutting the architraves with a flush-cut saw allows the LVT to slide underneath for a professional, ‘tucked-under’ look rather than a messy cut around the frame. The ‘score and snap’ method involves using a utility knife to deeply cut the wear layer of the LVT before applying pressure to cleanly break the plank along the line.
If you find the process daunting or simply want a guaranteed finish, Frankly Flooring is always here to provide expert advice or a full, stress-free fitting service.
Finishing Touches and Long-Term Care for Your New Floor
Successfully completing your click lvt flooring installation is a significant milestone, but the job isn’t finished until the details are addressed. The expansion gap you left around the perimeter is vital for the floor’s health, but it needs a professional finish to look the part. To be frank, it is these final touches that separate a DIY project from a high-end fitting.
Accessories that Make the Difference
To hide the expansion gap, you can either install new skirting boards or use scotia (beading). Matching the scotia to your flooring creates a seamless, expansive look, whereas white skirting often provides a crisp, modern frame for the room. Beyond the walls, transitions between rooms are equally important. Choosing the correct door bars ensures a smooth flow between different floor heights and types, effectively eliminating trip hazards.
In “wet zones” like kitchens and bathrooms, we recommend a small bead of flexible silicone around the edge. This provides an extra layer of protection, preventing surface spills from seeping into the subfloor and causing long-term issues.
Frank Advice on LVT Aftercare
LVT is incredibly durable, but it isn’t indestructible. To keep your floor looking as good as the day it was fitted, follow these straightforward maintenance rules:
- The First Clean: Avoid the temptation to soak the floor. Use a broom or vacuum to remove construction dust, followed by a well-wrung damp mop.
- Chemicals to Avoid: Never use bleach or abrasive “shiny” cleaners. These can degrade the wear layer. Stick to pH-neutral cleaners specifically designed for LVT.
- Furniture Protection: Attach heavy-duty felt pads to the legs of chairs and tables. This is the simplest way to prevent surface scratches during daily use.
- Steam Mops: Frankly, you should leave the steam mop in the cupboard. The intense heat can compromise the click-lock joints over time.
If a single plank does suffer significant damage, the beauty of this system is its modularity. Because no adhesive was used during the click lvt flooring installation, a professional can unclick the boards to the wall and replace the damaged piece. At Frankly Flooring, we always suggest keeping half a pack of offcuts in the loft for this exact reason. With the right care, your new floor will remain a foundational element of your home’s character for decades.
Mastering Your Click LVT Project: Final Thoughts
Successfully completing a click lvt flooring installation isn’t just about snapping the final plank into place; it is about the honest graft you put in before the first row even begins. As we have covered, the secret to a professional finish lies in meticulous subfloor preparation and ensuring your planks have ample time to acclimatise to your home’s environment. By following a methodical layout plan and using the correct tools, you can achieve a seamless result that rivals any professional fitting.
The confidence gained from mastering a home improvement project often inspires people to tackle other rewarding challenges. If the satisfaction of this DIY project has you thinking about other ways to build value with your skills, you can discover Living the Hustle to explore the world of creating and selling digital products online.
At Frankly Flooring, we pride ourselves on being a family-run business with over 20 years of experience. We cut out the corporate fluff to provide direct-to-consumer prices on premium LVT, backed by honest advice on every single product page. We believe in providing you with the transparency and quality you need to transform your space with confidence.
Frankly, we have the best LVT range in the UK-explore it here.
With the right preparation and a bit of patience, your new floor will serve as a durable, stylish foundation for your home for many years to come. Happy fitting!
Frequently Asked Questions
Do I really need underlay for click LVT flooring?
Frankly, it depends on your specific product. Many modern planks come with a pre-attached acoustic backing, meaning you won’t need extra. However, if your LVT doesn’t have this, a high-density underlay is essential to smooth out minor subfloor imperfections and provide sound insulation. Using the wrong underlay can cause the click joints to fail, so always check the manufacturer’s guidelines before you begin fitting.
Can I lay click LVT over underfloor heating?
Yes, click LVT is perfectly suited for underfloor heating, provided the system is embedded into the screed. Most manufacturers specify that the floor surface temperature should not exceed 27°C. It is a highly efficient material for heat transfer, but you must ensure the heating is turned off 48 hours before and after the fitting process to allow the material to settle properly without thermal shock.
How big should the expansion gap be for LVT?
You should typically leave an expansion gap of 5mm to 8mm around the entire perimeter of the room, including doorways and radiator pipes. This gap allows the floor to naturally expand and contract with temperature changes. While LVT is more stable than wood, skipping this step is a common mistake that leads to buckling. You can easily hide these gaps afterward using colour-matched scotia or skirting boards.
Can I install click LVT in a bathroom?
Absolutely. One of the biggest benefits of click LVT is that it is 100% waterproof, making it an ideal choice for bathrooms and kitchens. Unlike laminate, which can swell when exposed to moisture, LVT remains stable. Just ensure your subfloor is level and dry before you start, and you’ll have a durable, stylish floor that handles splashes and humidity without any fuss or long-term damage.
What is the best way to cut LVT planks without a saw?
You don’t need a bulky power saw for a clean finish. The most effective method is the “score and snap” technique. Simply use a sharp utility knife and a heavy-duty metal rule to score the top wear layer of the plank. Once scored, apply firm pressure to snap the board along the line. For more intricate cuts around door frames, a pair of heavy-duty shears or a jigsaw can be used.
How long does it take to walk on a click LVT floor after installation?
One of the best things about a click system is that you can walk on it immediately. Because there is no adhesive involved in a floating click lvt flooring installation, there is no drying time required. You can move your furniture back into the room and get on with your day as soon as the final plank is clicked into place and the perimeter trim is fitted.
What happens if I don’t acclimatise my LVT flooring?
If you skip the 48-hour acclimatisation period, you risk the floor warping or gapping shortly after fitting. LVT reacts to the ambient temperature of your home; if it’s fitted straight from a cold delivery van into a warm room, it will expand. We always advise laying the boxes flat in the centre of the room to ensure the planks reach a stable room temperature before the work begins.
Is click LVT better than laminate for a DIY project?
For most DIYers, click LVT is the superior choice. It is generally easier to handle, requires fewer specialist tools, and is far more forgiving in damp environments like utility rooms. While laminate is a classic option, the waterproof nature and durability of a click lvt flooring installation offer better long-term value. It’s a straightforward, honest solution for a home makeover that truly stands the test of time.