
DIY floor fitting can cost less upfront, but it isn’t always cheaper once you include preparation, tools and the cost of mistakes. The right choice depends on the flooring, the subfloor’s condition and how confidently you can handle each stage.
It’s natural to focus on saving the fitting cost. Click flooring can be manageable in a simple room with a sound, level subfloor. This guide compares DIY vs professional floor fitting in terms of total cost, preparation, moisture control and the work involved, so you can judge whether the savings are realistic. It also explains what professional fitting involves, from subfloor preparation to setting out the floor, and how to choose the right approach for your project.
Key Takeaways
- DIY can suit straightforward click flooring in a simple room, provided the subfloor is sound and level.
- Compare the full DIY cost, including tools, waste and possible replacement materials, with the fitting labour you could save.
- Subfloor flatness and moisture control matter: problems beneath a new floor can lead to movement, damage or a costly refit.
- Choose a professional for complex layouts or preparation concerns; a hybrid approach can leave simpler tasks in your hands.
What is DIY Flooring Installation?
DIY flooring installation means preparing the room and fitting the floor yourself instead of paying for professional labour. The right choice depends on the flooring system, the subfloor and the room’s complexity.
Flooring, Adhesive and Underlay Choices
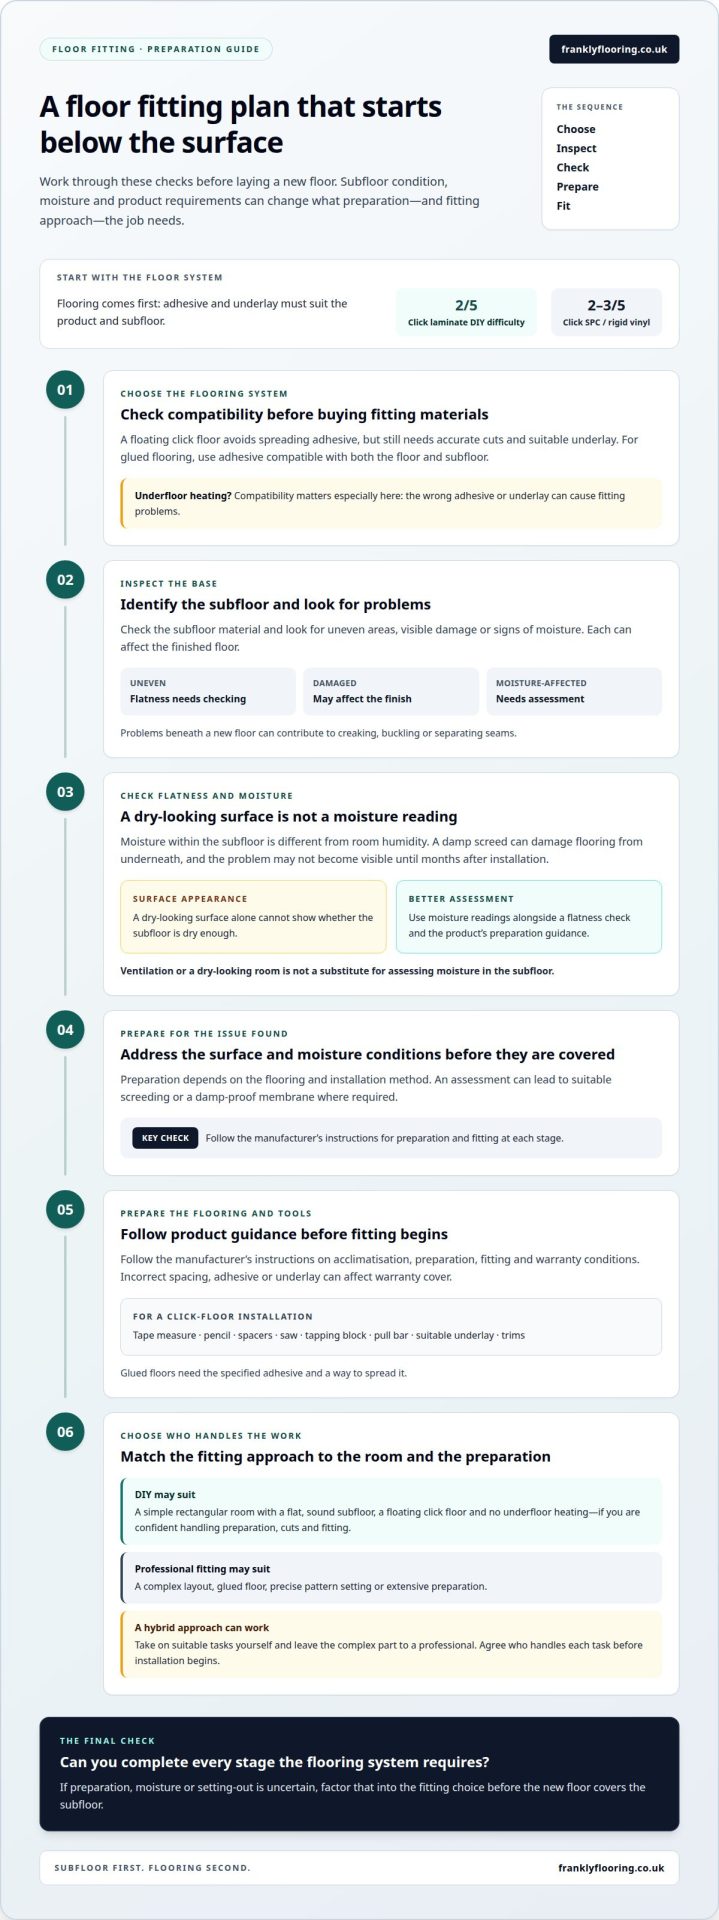
Choose the floor before buying adhesive or underlay, because each product has specific fitting requirements. Straight click laminate and click SPC or rigid vinyl are rated 2/5 and 2-3/5 for DIY difficulty respectively. A floating click floor avoids spreading adhesive, but still needs accurate cuts and suitable underlay. Glued flooring needs an adhesive compatible with both the floor and subfloor. Underfloor heating makes compatibility especially important: the wrong adhesive or underlay can cause fitting problems.
Tools, Materials and Applicable Rules
For a click-floor installation, gather a tape measure, pencil, spacers, saw, tapping block and pull bar. You’ll also need the flooring, suitable underlay and trims. Glued floors require the specified adhesive and a way to spread it. Read the manufacturer’s instructions before starting, especially the guidance on preparation, fitting and warranty conditions. Incorrect spacing, adhesive or underlay can affect warranty cover.
For a straightforward floor replacement, follow the product’s installation instructions. If the work changes the floor construction or affects other building elements, applicable requirements may depend on the project.
| Option | Room and floor | Work and preparation | Best suited to |
|---|---|---|---|
| DIY | Simple room, floating click floor | You handle preparation, cuts and fitting | Confident hands-on work |
| Professional | Complex layout or glued floor | Fitting handled by an installer | Specialist setting-out or preparation |
| Hybrid | Straightforward floor with a tricky task | You take on suitable work; a professional handles the complex part | Sharing the work |
DIY is a better fit for a simple rectangular room with a flat, sound subfloor and no underfloor heating. Professional fitting may suit a project that requires precise pattern setting or extensive preparation. You can also split the work, but agree who handles each task before installation begins. The key question is whether you can complete every stage required by the flooring system.
Comparing DIY and professional fitting costs
A DIY vs professional floor fitting comparison should cover the whole job, not just the fitting charge. Include materials, preparation, tools, waste and the time required to finish the work.
DIY Fitting Costs
DIY avoids paying for fitting labour, but you still need to account for the work and materials involved. Include tools you need to buy or hire, as well as adhesive, underlay and replacement flooring in case cuts go wrong. Awkward corners, for example, can create more offcuts than a simple rectangular room. Factor in removal of the old floor and preparation, too.
Professional Fitting Costs
Professional fitting adds a labour charge, while the flooring and preparation materials remain part of the project cost. A straightforward room requires different work from one needing extensive preparation or complex cuts. Compare quotes using the same measurements and scope, including removal, preparation, fitting and waste handling. That makes it easier to see what each price covers.
Risks and Hidden DIY Costs
Your DIY vs professional floor fitting calculation should include possible problems as well as planned costs. Poor setting-out can waste material, while tool hire or extra adhesive can reduce the saving. If an error means lifting and replacing part of the floor, you’ll also spend more on materials and time. Manufacturers may require you to follow their installation guidelines for warranty cover.
DIY can take longer than expected because you’re responsible for removal, cutting and unexpected problems. A professional crew can often complete flooring installation in one or two days.
To compare fitter quotes, give each one the same measurements and task list. Check whether removal of the old floor, subfloor preparation and fitting are included, so you’re comparing the same scope of work.
As you plan the materials for your project, explore flooring options alongside the fitting approach that suits your room.
Subfloor preparation and moisture control
Identify the subfloor material and inspect its condition before laying flooring. Look for uneven areas, visible damage or signs of moisture, as each can affect the finished floor. An uneven, damaged or moisture-affected subfloor can contribute to creaking, buckling or separating seams. Checking flatness helps identify where preparation is needed before fitting.
Moisture needs particular attention over a screed. A damp screed can damage flooring from underneath, and the problem may not become visible until months after installation. Surface appearance alone cannot show whether a subfloor is dry enough for the flooring. Moisture readings offer a more useful assessment, alongside the manufacturer’s preparation instructions.
Room humidity and moisture within the subfloor are related but distinct considerations. Moisture can affect flooring from below even when the room appears dry. Don’t treat ventilation or a dry-looking surface as a substitute for assessing the subfloor. Follow the product guidance on acclimatisation, so the flooring is prepared before fitting rather than laid immediately after delivery.
Match the preparation to the problem you find. An assessment can include moisture readings and a flatness check, followed by suitable screeding or a damp-proof membrane where required. These steps address surface and moisture conditions before the new floor covers them. The right preparation depends on the flooring and installation method, so follow the manufacturer’s guidance at each stage.
Ignoring a problem underneath can turn a small preparation task into a larger repair. If flooring goes over a problematic subfloor, fixing the resulting damage may mean removing the floor and starting again. Shifting boards, moisture-related warping and peeling edges can also develop over time after improper installation. Address moisture and unevenness first, rather than hiding a problem that may become harder to reach.
What professional flooring installation includes
Professional fitting involves more than laying boards or spreading adhesive. It starts with assessing the room and subfloor, then follows the flooring manufacturer’s instructions for preparation, installation and finishing.
Before fitting, the installer checks the subfloor’s condition and flatness, and takes moisture readings where needed. The results guide preparation, which may include flattening, screeding or a damp-proof membrane. The flooring is acclimatised according to its product guidance before installation. These steps help avoid trapping problems beneath the finished surface.
Next comes setting out. The fitter plans the starting position, joins and cuts around room edges or fixed features. This is especially important for herringbone and chevron, where accurate alignment matters and adhesive can grip before a drifting layout is corrected. With floating floors, the fitter also leaves the required expansion gap. Without it, flooring can peak in the middle or lift near the skirting.
The fitting method depends on the flooring system. A glued floor needs the correct adhesive and careful placement; a floating floor needs secure joins and suitable spacing. Trims and transitions finish the edges between rooms or floor surfaces. A final walkthrough can cover the finish, visible details and aftercare instructions.
Do professional fitters offer guarantees? Terms vary, so don’t assume a guarantee is included. A written quote should say whether workmanship cover is offered and explain its scope, alongside the included work, preparation, removal and any exclusions. Keep this separate from the flooring manufacturer’s product warranty, which may depend on following its installation instructions.
For a professional installation, agree the flooring and work scope before fitting begins. Explore flooring materials to consider how the selected product affects preparation, adhesive and finish.
Frankly Flooring
Frankly Flooring offers flooring materials to suit different fitting plans. If you’re installing the floor yourself, consider the product’s fitting instructions and preparation requirements before you decide. If you’re using a professional fitter, choosing the flooring first helps define the work involved. You can also consider carpet to meet the room’s practical needs, then add furniture to complete the space.
Take time to compare the flooring choice with your room, subfloor and installation plan. Contact Frankly Flooring to discuss your flooring options.
Choose the fitting route that suits your next step
Choosing between DIY vs professional floor fitting is also about how you want to manage the project. Be realistic about the tasks you’re ready to take on, then choose flooring that suits the room and your preferred approach. A clear plan helps you consider installation requirements before settling on a product.
Frankly Flooring offers LVT, wood and carpet, giving you different options to consider as you plan. Think about how the room is used, the finish you want and whether the product’s fitting requirements suit your skills or a professional fitting route. Furniture can help complete the room once you’ve chosen the flooring.
You don’t need to rush the choice. Start with the floor that works for your space, then decide how best to fit it. For help considering your flooring options, speak with Frankly Flooring. A well-matched floor and fitting plan is a practical foundation for your next home update.
Frequently Asked Questions
Can you fix a DIY floor that’s gone wrong?
Often, you can lift and refit the affected area, but first identify what caused the fault. A loose click joint may need a local repair, while repeated movement, buckling or dampness can point to a subfloor problem. Don’t cover the defect with another layer. Check whether the issue is a damaged plank, a fitting error or moisture before choosing a repair.
DIY, Professional or Hybrid?
DIY suits projects where you can manage measuring, cutting and fitting. Professional installation can cover the fitting work, while a hybrid approach splits the tasks. For example, you could clear the room and leave difficult cuts or a complex pattern to a fitter. Agree who handles preparation, materials and finishing before work starts to avoid overlap.
Is a patterned floor ever a DIY job?
Yes, a patterned floor can be a DIY project if you can set it out and maintain alignment across the room. Herringbone and chevron need particular care: once adhesive grips, you can’t simply shift a drifting pattern back into line. Practise the layout before applying adhesive, and plan the starting position around focal points, doorways and edges.
What Does Professional Installation Include?
Professional installation generally covers the fitting work, but the agreed scope matters. Taking up existing flooring, moving furniture and preparing the subfloor may be separate tasks. A useful written scope identifies what happens before fitting, which materials are included and how edges and transitions will be finished. This helps you understand what the installation price covers.
What could DIY save on a simple laminate room?
DIY may save the fitting labour for a simple laminate room, but the amount depends on the room’s area and the work involved. Weigh that potential saving against tools, hired equipment, extra materials and waste. Poor cuts or replacement planks can reduce the difference. Compare the labour saved with the full additional cost of doing the fitting yourself.
When Should You Definitely Consider a Professional Floor Fitter?
Consider professional fitting if the subfloor is uneven, damaged or showing signs of moisture, or if the layout needs precise setting-out. A glued floor over underfloor heating also requires careful attention to product compatibility. If you’re unsure how to prepare the subfloor or follow the manufacturer’s fitting instructions, professional input can help address those technical demands before installation.