The success of your new floor isn’t actually decided by the “click” at all; it’s determined by the 48 hours of preparation you put in before the first plank touches the ground. It’s a bold claim, but in our experience, it’s the honest truth. You’ve likely invested a fair amount in your luxury vinyl tiles, and the fear of wasting expensive materials on a jagged cut or a poorly prepped subfloor is enough to make anyone hesitate. We understand that confusion over underlay requirements and moisture levels can turn a weekend project into a source of stress.
We believe in a bit of candor when it comes to home improvement. You don’t need a degree in joinery to get a flawless finish, but you do need a reliable plan. This guide offers a straightforward, professional walkthrough on how to lay lvt click flooring with total confidence. We will walk you through the essential ASTM F710 subfloor standards, explain why acclimatization is non-negotiable, and show you exactly how to handle those intimidating corners. By the time you’ve finished reading, you’ll have the technical depth and the practical steps needed to ensure your floor is a foundational element of your home’s character for years to come.
Key Takeaways
- Understand the 2mm levelness rule and why subfloor preparation is the most critical step for a floor that doesn’t bounce or creak.
- Discover why the 48-hour acclimatization period is non-negotiable for preventing gaps and buckling after your floor is installed.
- Master the “score and snap” technique to make precise cuts and learn how to lay lvt click flooring without wasting expensive planks.
- Learn the professional secret of undercutting door architraves to achieve a seamless, high-end finish around complex joinery.
- Get clear advice on post-installation care, including when it’s safe to move furniture and how to maintain the matte finish of your new tiles.
Essential Tools and Site Preparation: The Frank Foundation
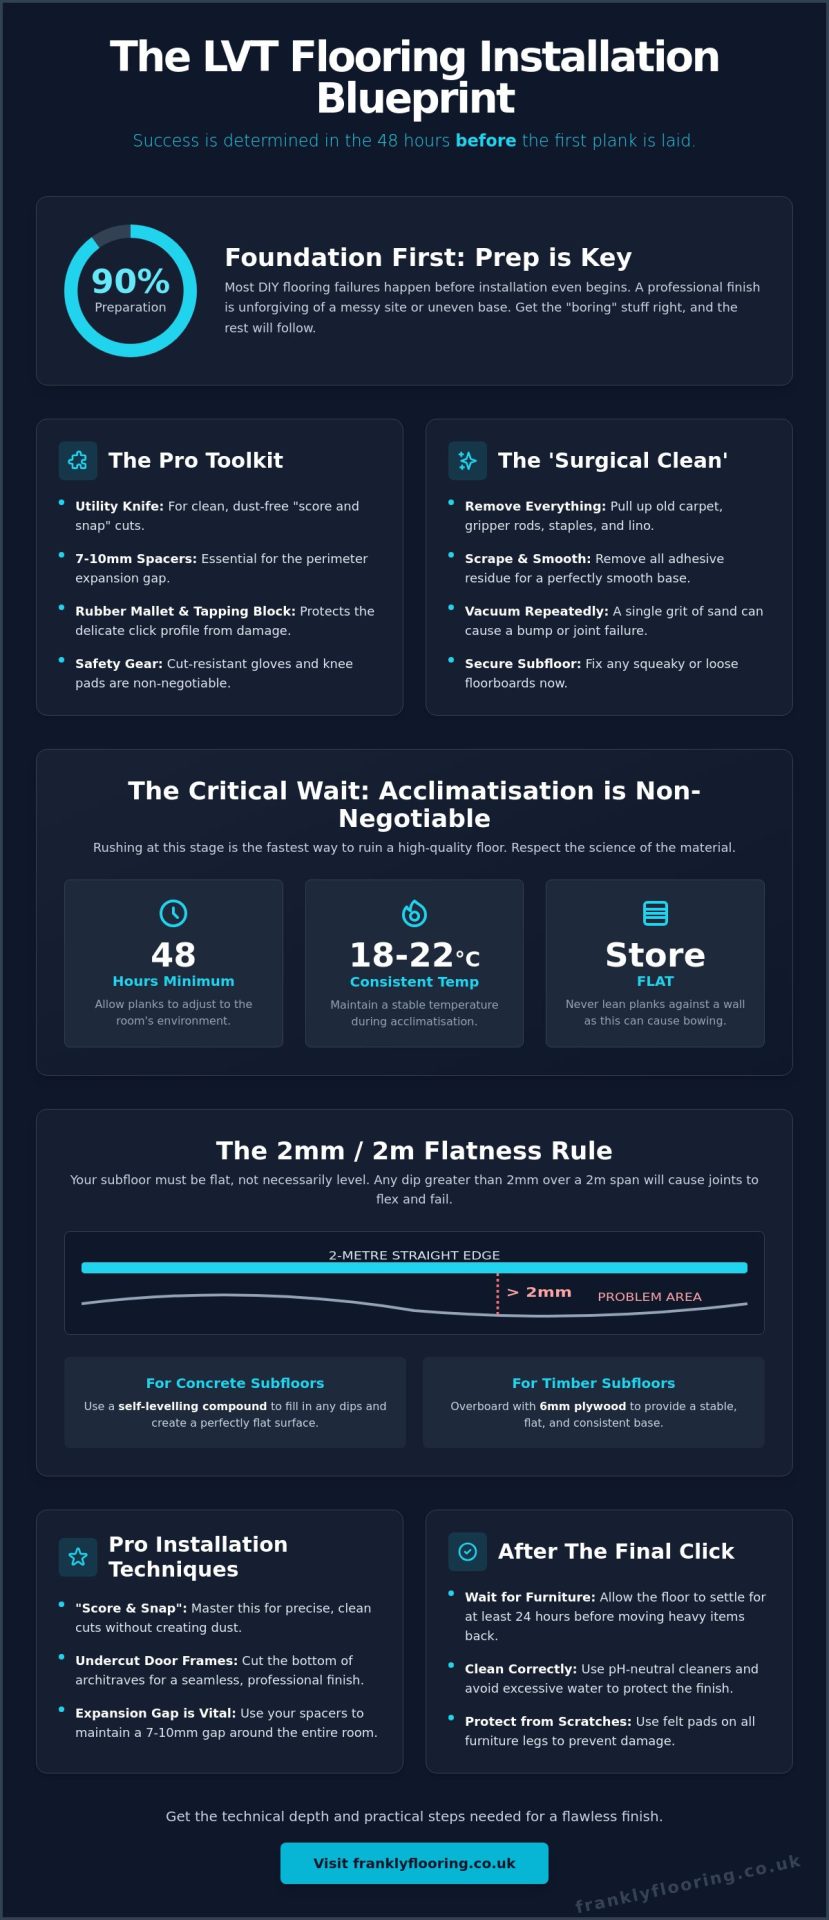
Most DIY disasters don’t happen while clicking planks together; they happen days before. If you want a professional finish, you have to accept that preparation is roughly 90% of the job. Learning how to lay lvt click flooring effectively starts with a commitment to the “boring” stuff. While the click-fit mechanism is designed for speed, it is completely unforgiving of a messy site or an uneven base. A single grit of sand or a protruding nail head can telegraph through the tile over time, creating a visible bump or even snapping the locking joint. We believe in getting it right the first time, which means starting with a clean slate and the correct equipment.
The No-Nonsense Tool List
You don’t need a workshop full of power tools to install Luxury Vinyl Tile (LVT), but you do need the right ones. A high quality, heavy duty utility knife is actually superior to a saw for most cuts. Using a “score and snap” method keeps your workspace free of fine dust and ensures a cleaner edge. You will also need a dedicated set of 7mm to 10mm spacers. These are vital for maintaining an expansion gap around the perimeter of the room. Without this gap, your floor will likely buckle when the temperature rises in the summer. Finally, invest in a proper rubber mallet and a tapping block. Never hit the planks directly with a hammer, as you’ll crush the delicate click profile and ruin the plank before it’s even laid.
Clearing and Cleaning the Workspace
The first physical step is the total removal of existing floor coverings. If you’re coming off a carpeted floor, you must pull up every single gripper rod and staple. Adhesive residue from old vinyl or lino must be scraped away until the subfloor is smooth. We often talk about a “surgical clean” because it’s that important. Once the old floor is gone, vacuum the entire area twice. Then, do it again. If you’re working on a timber subfloor, check every square inch for loose floorboards or protruding screws. A squeaky subfloor will lead to a squeaky LVT floor, so fix those structural issues now while they’re still accessible. It’s much easier to drive a screw into a joist today than it is to pull up your finished floor next month.
Safety is the final piece of the foundation. LVT can be surprisingly heavy, and utility knives are sharp enough to do real damage if they slip. Always cut away from your body and wear cut-resistant gloves when handling the score and snap process. Since you’ll be spending several hours on the floor, a decent pair of knee pads isn’t a luxury; it’s an essential part of the kit that will keep you focused on the precision of the job rather than your own discomfort. This grounded approach to how to lay lvt click flooring ensures you aren’t just rushing to the finish line, but building something that lasts.
Subfloor Checks and Acclimatisation: Don’t Skip the Wait
Once you’ve cleared the room and gathered your tools, the hardest part begins: waiting. It’s tempting to start clicking planks together the moment they arrive, but rushing now is the fastest way to ruin a high-quality floor. The “Frank” truth is that your environment dictates the longevity of your installation. If you want to know how to lay lvt click flooring that stays put, you have to respect the science of the material. Rushing the process often results in planks that shift or buckle within the first few months.
Why Acclimatisation is Non-Negotiable
Luxury vinyl tiles are sensitive to temperature changes. They expand and contract. If you take them from a cold delivery van and install them immediately in a warm kitchen, they will shift as they reach room temperature. This is why a 48-hour acclimatisation period is the golden rule. During this time, store your planks flat; never prop them against a wall, as this can cause them to bow. Keep the room temperature consistent, ideally between 18°C and 22°C. Skipping this step leads to buckling or unsightly gaps that no amount of tapping can fix later.
Testing for Levelness and Moisture
While the floor is resting, you should be testing. A subfloor doesn’t need to be perfectly level in the sense of being “plumb,” but it must be flat. We use the 2mm rule: any undulation greater than 2mm over a 2-metre span is a problem. You can check this easily with a long straight edge or a spirit level. If you find a dip, the click joints will eventually flex and snap under the weight of foot traffic. For concrete floors with minor dips, a self-levelling compound is your best friend. For timber floors, overboarding with 6mm plywood provides the stable, flat base required for a professional result.
Moisture is the silent killer of flooring. Even if a concrete floor looks dry, it can still hold residual dampness that will cause issues later. A simple DIY test involves taping a piece of plastic sheet to the floor for 24 hours; if beads of water appear underneath, you need a damp-proof membrane (DPM). You can find more technical details in this LVT click flooring installation guide. If you aren’t sure about your subfloor’s condition, it’s always better to over-prepare than to risk a failure.
Getting these basics right ensures your project starts on solid ground. Once you’re confident in your subfloor, you can focus on the fun part: picking the perfect style. Feel free to browse our latest LVT collections to find the right look for your space before you move on to the actual layout planning.
Step-by-Step: Installing Your Click LVT Flooring
With the subfloor prepped and the planks acclimated, it’s time for the actual installation. If you’ve been wondering what is LVT flooring and why it has become the go-to choice for modern UK homes, the answer lies in its structural simplicity. However, success depends on a logical layout. Before you open a single pack, measure the width of your room and divide it by the width of a plank. If the remainder is less than 50mm, you’ll end up with a tiny, unstable sliver at the far wall. To avoid this, trim your first row slightly so that both the first and last rows have a substantial, balanced width. This small bit of foresight separates a DIY job from a professional finish.
The “score and snap” technique is your primary method for making precise cuts. Use a heavy-duty utility knife and a metal straight edge to score the top wear layer of the tile. Once you’ve made a deep enough mark, apply firm pressure to snap the plank along the line. It’s clean, fast, and far more precise than using a jigsaw for straight cuts. For more technical details on handling specific materials, these LVT Click Flooring Installation Instructions provide a reliable reference for different locking profiles.
Laying the First Row
Start in the corner of the room, working from left to right with the tongue side facing the wall. Place your 7mm to 10mm spacers every 30cm to maintain that vital expansion gap. Don’t assume your walls are perfectly straight. Run a string line across the length of the room to ensure your first row is a true straight line. If the first row is even slightly crooked, the error will magnify as you work across the room, eventually causing the click joints to fail. When you reach the end of the row, measure the remaining gap, remembering to subtract the width of your spacer, and snap your final plank to fit.
Mastering the Click and Stagger
This is where you learn exactly how to lay lvt click flooring for maximum strength. To engage the next plank, hold it at roughly a 30-degree angle to the previous row. Slot the long tongue into the groove and lower it flat. You should hear or feel a distinct click as the mechanism engages. Use your tapping block and mallet gently to ensure the joint is tight. Never hit the plank edge directly, as the click profile is easily damaged.
Structural integrity comes from the stagger. Never align the end joints of adjacent rows. You must stagger these joints by at least 30cm. A simple way to do this is to use the off-cut from the end of your first row to start your second row, provided it is at least 30cm long. This creates a natural, “random” wood-look pattern and locks the entire floor together as a single, floating unit. This method isn’t just about aesthetics; it distributes the load across the floor, preventing the joints from opening up under the weight of furniture or heavy foot traffic.
Navigating Obstacles: Radiators, Door Bars, and Edges
The straight runs of a room are the easy part. The real test of your craftsmanship comes when you hit the door frames and pipework. Knowing how to lay lvt click flooring around these obstacles is what prevents your DIY project from looking like an amateur effort. We believe in doing things the right way, which means avoiding messy gaps and visible sealant. A professional finish is about making the floor look like it was built into the room, not just laid on top of it.
If you’re concerned about tackling these trickier areas yourself, engaging a professional service like RB Floor Coverings can guarantee that seamless, high-end finish throughout your home.
The most common mistake beginners make is trying to cut the LVT to fit the shape of a door architrave. This is nearly impossible to get right and usually leaves a jagged gap. Instead, you should undercut the architrave. Lay an off-cut of your plank against the frame and use a pull saw to cut into the wood, using the plank as a height guide. Remove the waste wood and slide your new flooring underneath. This creates a seamless look and allows the floor to expand and contract freely without hitting the door frame.
Cutting Around Pipes and Pedestals
Radiator pipes require a bit of patience. Measure the distance from the wall to the centre of the pipe and mark this on your plank. You should drill a hole that is at least 10mm wider than the pipe itself. This extra space is vital for the expansion gap we discussed in the preparation section. Once the hole is drilled, make a “keyhole” cut by slicing from the edge of the plank to the hole. Slide the plank into position around the pipe and glue the small off-cut back into place behind it. To hide the gap, use a matching pipe rose that sits flush against the new floor.
The Finishing Touches
Once the main floor is down, you’ll still have a 7mm to 10mm gap around the perimeter. Never fill this gap with silicone or caulk. Doing so restricts the floor’s movement and will eventually cause the click joints to fail. Instead, cover the gap by installing new skirting boards or a matching scotia bead. These should be fixed to the wall, never to the flooring itself, to maintain the “floating” nature of the installation.
Transitions between rooms are equally important. If your LVT meets a different floor type, like a plush carpet, you’ll need a suitable door bar. If you are renovating multiple rooms at once, you might find our guide on choosing and fitting carpet grippers helpful for those adjacent carpeted areas. The goal is a flush, trip-free transition that looks intentional. For a truly cohesive finish, make sure you have the right materials on hand by browsing our selection of flooring accessories before you start the final row.
Post-Installation Care and the Frankly Flooring Advantage
The final plank is in, the spacers are gone, and the skirting boards are fixed. It is a satisfying moment, but your responsibility to the floor doesn’t end when the tools are packed away. Even though you now know how to lay lvt click flooring like a professional, the longevity of your work depends on how you treat the floor in its first few days. While a floating click system is technically ready for light foot traffic immediately, we recommend waiting 24 hours before moving heavy furniture back into the room. This short window allows the floor to settle into its final position across the subfloor without being pinned down prematurely by extreme weight.
Maintenance for Longevity
Luxury vinyl is famous for being hard-wearing, but it is not indestructible. The biggest threat to your new floor isn’t actually dirt; it is heat and moisture. We have a very firm rule here: never use a steam mop on LVT. The high-temperature steam can penetrate the click joints, causing the core to swell or the wear layer to delaminate. Instead, use a simple damp mop with a pH-neutral cleaner. Avoid “mop and shine” products that leave a waxy residue, as these will eventually dull the matte finish of your tiles.
Protection is just as important as cleaning. Attach high-quality felt pads to the legs of all chairs, tables, and sofas. This prevents the “micro-scratching” that occurs when furniture is shifted during daily use. If you have heavy appliances, consider using a sheet of thin plywood to protect the floor when sliding them into place. These small habits ensure the time you spent learning how to lay lvt click flooring results in a surface that looks pristine for decades rather than just a few years.
Why Frankly Flooring?
We believe that a successful DIY project starts with a reliable partner. At Frankly Flooring, we don’t just sell boxes of planks; we provide the technical depth you need to transform your home with confidence. Our team brings over 20 years of industry experience to the table, and we use that knowledge to filter out low-quality products that are prone to joint failure. When you browse our range of LVT flooring, you are looking at materials we would be happy to install in our own homes.
Our commitment to candor means we will always tell you the truth about a project. If your subfloor is in such a state that a DIY approach might fail, we will say so. We value your long-term satisfaction over a quick sale. By choosing quality materials and following a grounded, step-by-step process, you aren’t just changing a floor. You are building the foundational character of your home. If you ever feel overwhelmed by the technical nuances, our experts are here to provide the straight-talking advice you need to get back on track.
Ready to Transform Your Home?
You now have a professional-grade roadmap for your installation. Success isn’t about rushing to the finish line; it’s about that surgical clean of your subfloor and the non-negotiable 48-hour wait for your planks to settle. By mastering the score-and-snap technique and undercutting your architraves, you’ve moved past the common DIY pitfalls that lead to buckling and gaps. Knowing how to lay lvt click flooring is a practical skill that adds genuine character and value to your property when executed with precision.
We take pride in being a family-run business with over 20 years of flooring expertise. We don’t believe in high-pressure tactics; we offer no-nonsense, transparent pricing and quality materials delivered direct to your door across the UK. If you’re ready to start your project, you can browse our full range of high-quality LVT flooring at Frankly Flooring today. With the right tiles and a bit of patience, your new floor will be a foundational element of your home’s character for years to come.
Frequently Asked Questions
Do I need underlay for click LVT flooring?
It depends entirely on the specific product you’ve purchased. Many modern luxury vinyl tiles come with an integrated underlay already attached to the base. If yours doesn’t, you must use a high-density underlay specifically designed for LVT. Never use carpet underlay or thick foam; these are too soft and will cause the click joints to flex and eventually snap under foot traffic.
Can I lay click LVT over existing tiles or laminate?
You can lay LVT over ceramic or porcelain tiles if they are flat and the grout lines are narrower than 3mm. If the grout lines are wider, they must be filled with a smoothing compound first. You should never lay LVT over existing laminate or other floating floors. These layers are unstable and provide too much movement, which will ruin the locking mechanism of your new floor.
How big should the expansion gap be for LVT click flooring?
You should maintain a consistent expansion gap of 7mm to 10mm around the entire perimeter of the room. This includes gaps around radiator pipes, door frames, and fixed kitchen cabinetry. Vinyl is a natural material that expands and contracts as the temperature in your home changes. Without this gap, the floor has nowhere to go and will eventually buckle or lift.
Is click LVT waterproof enough for bathrooms and kitchens?
Yes, LVT is an excellent choice for wet areas because the vinyl itself is waterproof and won’t swell like laminate. However, while the planks are waterproof, the click joints are not always airtight. You should still wipe up standing water quickly to prevent moisture from seeping through to the subfloor, which can lead to mould or adhesive failure over time.
Can I use a steam mop on my new click LVT floor?
No, you should never use a steam mop on LVT flooring. The intense heat and pressurised moisture can force their way into the click joints, causing the planks to delaminate or the core to warp. To keep your floor in top condition, use a simple damp mop with a pH-neutral cleaner. This is safer and more effective for maintaining the factory wear layer.
What should I do if my subfloor isn’t perfectly level?
You must fix any major unevenness before you start learning how to lay lvt click flooring. If you find dips or peaks greater than 2mm over a 2-metre span, the floor will feel bouncy and the joints will eventually fail. Use a self-levelling compound on concrete or 6mm plywood overboarding on timber to create the flat, stable base required for a professional finish.
How do I replace a damaged LVT plank in the middle of the room?
Replacing a single plank doesn’t require pulling up the whole floor. You can carefully cut out the damaged plank using a utility knife and a heat gun to soften the glue if necessary. You then trim the tongues off a new plank, apply a specific vinyl joint adhesive to the edges, and drop it into the space. Place a heavy weight on it for 24 hours to ensure it sets flush.
Can I install click LVT over underfloor heating?
Yes, LVT is compatible with most underfloor heating systems, provided the surface temperature doesn’t exceed 27°C. It’s vital to turn the heating off 48 hours before you begin the installation and keep it off for 48 hours after you’ve finished. When you turn it back on, increase the temperature gradually by 1°C per day to allow the planks to adapt without shocking the material.