Most DIY flooring disasters don’t happen because of a shaky hand with a utility knife; they happen because of a missing item on the initial shopping list. It is a common frustration to get halfway through a room only to realize the subfloor isn’t level or that you’ve forgotten the specific moisture barrier needed for a concrete base. If you are wondering exactly what do you need to lay vinyl flooring to avoid these pitfalls, you aren’t alone. The confusion between requirements for sheet vinyl versus luxury vinyl tiles often leads to hidden costs and avoidable mistakes that can compromise the longevity of your project.
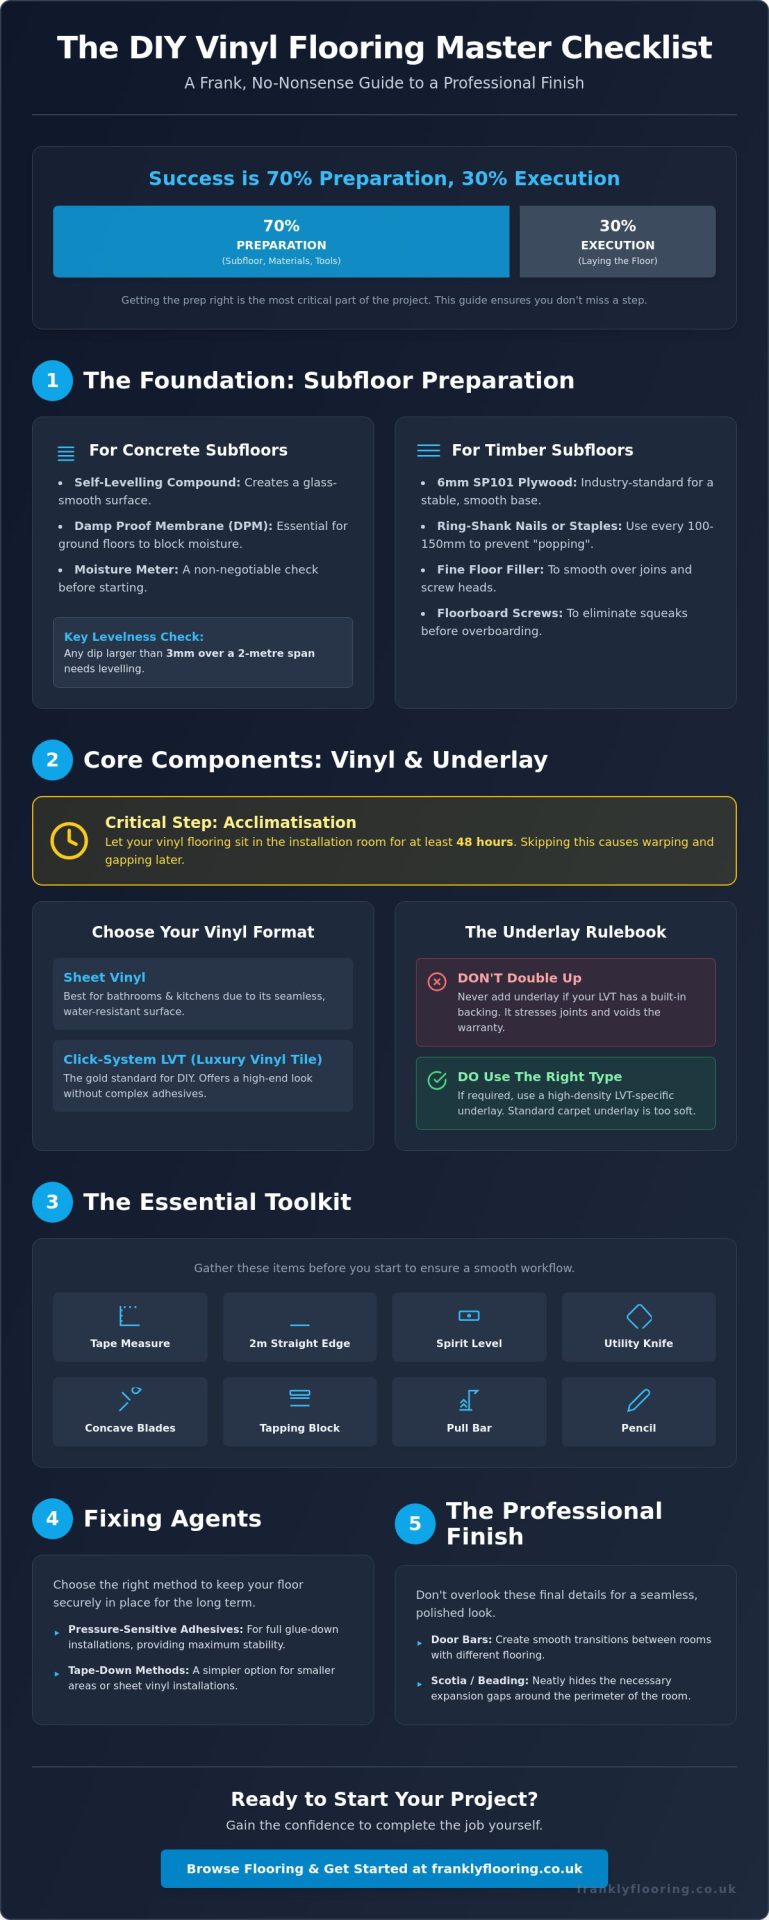
We believe that a successful installation is 70 percent preparation and 30 percent execution. This guide provides a frank, no-nonsense checklist of every tool and material essential for a professional finish. We will walk you through the definitive shopping list, explain how to correctly assess your subfloor, and detail the accessories like door bars that are often overlooked. You’ll gain the confidence to complete the project yourself, ensuring your new floor remains a reliable and beautiful part of your home for years to come without the need for an expensive fitter.
Key Takeaways
- Successful flooring starts with the foundation; we’ll show you how to use self-levelling compounds to ensure your subfloor is perfectly prepared for installation.
- Clarify exactly what do you need to lay vinyl flooring by identifying the specific material requirements for sheet vinyl, click systems, and LVT variations.
- Master the essential toolkit, including the “Big Three” measuring instruments and the specific concave blades needed for precise, waste-free cuts.
- Navigate the complexities of fixing agents, from pressure-sensitive adhesives to tape-down methods, to ensure your floor stays securely in place for the long term.
- Achieve a professional finish by learning how to properly select door bars and scotia to hide expansion gaps and create seamless transitions between rooms.
The Foundation: Subfloor Preparation Materials
If you ask a professional fitter what do you need to lay vinyl flooring, they won’t start by talking about the finish. They’ll talk about the subfloor. Vinyl is a thin, flexible material. Whether you choose LVT or Sheet vinyl flooring, the material will eventually “telegraph” every lump, bump, and screw head underneath it. If your subfloor isn’t flat, your new floor will fail. Preparation is the most critical part of your checklist because it determines the longevity of your investment.
For concrete bases, a self-levelling compound is essential. This screed flows into low spots to create a glass-smooth surface. If you’re working on a ground floor, you must also consider a Damp Proof Membrane (DPM). Moisture rising through concrete is a leading cause of adhesive failure and bubbling. On timber floors, the industry standard is 6mm SP101 grade plywood. This specific grade is engineered for flooring; it lacks the knots and voids found in cheaper exterior ply that can cause soft spots or staining over time.
Assessing Your Existing Floor
Before buying materials, you need to know exactly how much repair work is required. Don’t guess the levelness of your floor. Use a 2-metre straight edge or a long spirit level to check for dips. Any gap larger than 3mm over a 2-metre span needs attention. On concrete, using a moisture meter is a non-negotiable step. If the reading is high, you’ll need a liquid DPM before proceeding. For wooden floors, walk the room and listen for squeaks. Use floorboard screws to secure any loose planks before you even think about overboarding.
The Overboarding Checklist
When you’re ready to prep a timber floor, the overboarding process requires precision. Start by calculating your plywood quantities to ensure full coverage with minimal joins. You’ll need specific fixings too. Standard nails often work loose and “pop up” over time, creating visible bumps under your vinyl. Instead, use ring-shank nails or specialized flooring staples every 100mm to 150mm across the board. Once the ply is down, use a fine floor filler or rapid-set compound to smooth over the joins and screw heads. A quick pass with sandpaper ensures the surface is perfectly keyed and ready for the next stage of your project.
The Core Components: Vinyl Types and Underlay
Once your subfloor is ready, the focus shifts to the materials themselves. Determining exactly what do you need to lay vinyl flooring depends heavily on the specific format you choose. You cannot treat sheet vinyl the same way you treat a click-system plank. Before you even open a box, you need patience. Acclimatisation is non-negotiable. Your flooring needs to sit in the room where it will be installed for at least 48 hours. This allows the material to adjust to the temperature and humidity of your home. Skipping this step often leads to planks warping or seams opening up weeks later.
The choice between materials is about more than just aesthetics. For a deeper dive into the technical details, you can read our guide on what is lvt flooring. While you decide, consult a Consumer Reports flooring buying guide to understand how different wear layers impact durability. This knowledge helps you select a product that matches the foot traffic in your specific room.
Underlay is another area where mistakes are costly. Many modern click-system LVTs come with a built-in acoustic backing. If your flooring already has this, adding a second layer of underlay is a bad idea. It creates too much movement in the floor, which puts stress on the locking joints and will likely void your warranty. However, if your vinyl requires a separate layer, you must match the density to the product. A standard carpet underlay is far too soft; you need a high-density version designed to support the weight of furniture without compressing.
Choosing Your Vinyl Material
Sheet vinyl remains a top contender for bathrooms and kitchens. Its ability to be installed in one continuous piece makes it exceptionally water-resistant. Click-system LVT, on the other hand, is the gold standard for DIY projects. It offers the high-end look of wood or stone without the need for complex adhesives. If you are looking for the best value, you might want to browse our latest vinyl bargains to find a style that fits your budget.
The Underlay Shopping List
If your chosen floor doesn’t have an integrated pad, your shopping list needs to be specific. High-density underlay is essential for LVT to protect the click-system joints from breaking under pressure. Acoustic underlay is often a requirement for upstairs flats to meet building regulations regarding sound transfer. For ground floors that feel cold to the touch, thermal underlay options provide a necessary barrier to keep the room comfortable. Always check the manufacturer’s specification to ensure your choice doesn’t compromise the floor’s stability.
The Essential Tool Kit for Vinyl Installation
Once you have prepped your subfloor and selected your material, your focus shifts to the physical execution. If you are planning a DIY project, knowing exactly what do you need to lay vinyl flooring before you start will save you multiple trips to the hardware shop. While vinyl is famously DIY-friendly, the difference between a professional-looking finish and a messy amateur job often comes down to having the correct specialist tools on hand. Before you pick up a single plank, invest in a pair of high-quality knee pads. You’ll spend hours on the floor; your joints will thank you for the protection, and it allows you to focus on the precision of the job rather than your own discomfort.
The “Big Three” measuring tools are your tape measure, a chalk line, and a sharp pencil. A chalk line is far superior to a standard straight edge for marking long, perfectly straight guide lines across a room. For cutting, a heavy-duty utility knife is your primary weapon, but the secret lies in the blades you choose. Concave blades are far superior for vinyl because they hook into the material and prevent the knife from slipping across the surface. If you are installing a click-system floor, you will also need a rubber mallet and a tapping block. These allow you to snug the planks together without damaging the delicate locking joints.
Measuring and Marking Tools
Precision starts with your layout. A combination square is essential for marking perfect 90-degree cuts at the end of rows. If your walls aren’t perfectly straight, which is common in older homes, a scribing tool or a simple compass will help you trace the wall’s profile onto your vinyl for a tight fit. Remember the golden rule: measure twice and cut once. Mistakes with a utility knife are permanent, so taking an extra thirty seconds to verify your marks is time well spent.
Specialist Fitting Tools
Understanding what do you need to lay vinyl flooring involves looking at the edges of the room. Pull bars are vital for tightening the final row of planks against the wall where a tapping block won’t fit. You must also use expansion spacers to maintain a consistent 5-10mm gap around the perimeter. This gap allows the floor to expand and contract with temperature changes without buckling. For complex areas, such as cutting around door architraves, a jigsaw with a fine-toothed blade or a multi-tool will provide the clean, intricate cuts that a manual knife cannot achieve.
Adhesives, Tapes, and Fixing Agents
The method you use to secure your floor depends entirely on the room’s size and the material’s format. Loose-lay installation is often sufficient for small rooms under 12 square metres using sheet vinyl, where the weight of the material and skirting boards hold it in place. However, for larger areas or when using LVT, you’ll need to decide between a tape-down approach or a full-bond method. When people ask what do you need to lay vinyl flooring in a high-traffic hallway, the answer is almost always a full-bond adhesive to prevent any shifting or “creeping” over time.
Pressure-sensitive adhesives (PSA) are the industry standard for Luxury Vinyl Tile. Unlike traditional glues that you bond while wet, PSA requires a “flash-off” period. You apply the glue, wait for it to turn from white to clear and become incredibly tacky, and then lay your tiles. This tackiness is what allows for a strong grip while still giving you a tiny bit of wiggle room to adjust the placement. If you rush this and lay the floor into wet glue, you risk the tiles sliding or the adhesive oozing through the joints.
For smaller sheet vinyl projects, high-quality double-sided vinyl tape is your best friend. It is easy to apply around the perimeter and at any seams. In more intricate areas, such as around toilet bases or on vertical plinths, a heavy-duty spray adhesive provides a quick, strong bond that won’t sag. Choosing the right fixing agent is just as important as the floor itself. You can find professional-grade accessories to match your specific vinyl type right here.
Selecting the Right Glue
Environmental factors dictate your glue choice. If your room has large south-facing windows or bifold doors, you need a high-temperature adhesive. Standard glues can soften under direct sunlight, causing the vinyl to bubble or the gaps to open. Similarly, wet zones like bathrooms require water-resistant adhesives to ensure the bond doesn’t degrade when exposed to humidity. Don’t overlook the trowel. Using the correct notch size, typically an A1 or A2 for vinyl, is the only way to ensure even coverage without wasting product or creating lumps.
Tapes and Sealants
Finishing a sheet vinyl installation properly requires more than just tape. If you have a seam, a cold-weld joint sealant is necessary to chemically bond the two pieces together, making them waterproof and nearly invisible. Around the perimeter of bathrooms or kitchens, a bead of high-quality silicone sealant prevents water from seeping under the edges and damaging your subfloor. Cheap, unbranded double-sided tapes often lose their grip within months, leading to unsightly bubbling and potentially ruining your entire installation.
Finishing Touches: The Professional Polish
The main floor might be down, but the difference between a DIY project and a professional-grade installation lies in the final five percent of the work. Many homeowners reach this stage and realize they haven’t actually considered what do you need to lay vinyl flooring at the thresholds or around the radiator pipes. These finishing touches aren’t just about aesthetics; they protect the edges of your new floor from fraying, lifting, or moisture ingress. Skipping these details now will lead to premature wear and a floor that looks unfinished against your existing décor.
One of the most common oversights is the treatment of radiator pipes. Cutting a circular hole in vinyl often leaves a messy gap that is difficult to fill with sealant. Radiator pipe roses are the simplest and most effective solution. These small, decorative collars clip around the base of the pipe, instantly hiding any rough cuts and providing a clean, intentional look. Similarly, your choice of cleaning equipment matters. Don’t reach for a steam mop; the intense heat can delaminate the layers of your vinyl. Invest in a pH-neutral cleaning kit specifically designed for LVT or sheet vinyl to maintain the wear layer’s integrity.
Transitions and Edgings
Connecting your new vinyl to other rooms requires the right transition strip. If you are moving from vinyl to a carpeted room, a Z-bar is usually required to tuck the carpet edge neatly while holding the vinyl in place. When you are transitioning to a room where you’ve recently fitted a new carpet gripper, ensure the bar is high enough to accommodate the height difference. For floors of the same height, a simple cover strip works best. You can choose between sleek aluminum finishes for a modern look or wood-effect strips that blend seamlessly with your plank design.
Hiding the Gaps
Because you left a 5-10mm expansion gap around the perimeter, you now need to hide it. If you didn’t remove your skirting boards before starting, scotia beading is your best option. It’s a small, decorative molding that pins to the skirting, not the floor, allowing the vinyl to move naturally underneath. Use a mitre box to cut clean 45-degree angles for the corners; sloppy butt-joints will ruin the look of the room. For tiny gaps in internal corners where beading won’t fit, a color-matched flexible caulking provides a tidy finish. Finally, use a specialist solvent cleaner to remove any stray adhesive residue from the surface before the glue fully cures.
Take the First Step Toward a Professional Finish
Laying a new floor is a significant investment in your home’s character, and success depends on the details you handle before the first plank is ever laid. From ensuring your subfloor is glass-smooth to selecting the exact adhesive for your environment, preparation is the foundation of a lasting result. By now, you should have a firm grasp of what do you need to lay vinyl flooring to avoid mid-project delays and achieve that high-end look without the expense of a professional fitter. Precision in your measurements and patience during the acclimatisation process are the quiet heroes of any successful DIY project.
As a family-run business with over 20 years of experience, we take pride in providing no-nonsense expert advice that skips the corporate jargon. We don’t just sell materials; we provide the technical knowledge you need to complete your project with quiet confidence. Whether you require specific underlays, specialist cutting tools, or transition bars, we offer direct UK delivery on everything required to get the job done right the first time. Browse our full range of Vinyl and LVT Flooring accessories today and start your renovation with the right kit in hand. Your home deserves a foundation built on quality and integrity.
Frequently Asked Questions
Do I need to remove my old flooring before laying vinyl?
Yes, you should almost always remove old floor coverings before starting your project. While it’s tempting to lay over existing vinyl or tiles, doing so can trap moisture or cause the old floor’s texture to show through the new surface. Removing the old material allows you to inspect the subfloor for damage or dampness. This ensures you have the clean, level foundation required for a professional-looking result that lasts for years.
Can I lay vinyl flooring directly over floorboards?
No, you should never lay vinyl directly onto bare floorboards. The gaps between the boards and the slight unevenness of the timber will eventually appear as visible lines or ridges on your new floor surface. To fix this, you must overboard the timber with 6mm flooring-grade plywood. This creates the flat, uniform surface that is essential when considering what do you need to lay vinyl flooring for a high-quality, long-lasting finish.
How much extra vinyl should I order for wastage?
You should typically order 10 percent more than your measured floor area to account for cuts, patterns, and mistakes. If your room has an unusual shape, many alcoves, or complex doorways, increasing this to 15 percent is a much safer bet. Having a few spare planks or a leftover roll of sheet vinyl is also helpful if you ever need to perform a repair in the future due to accidental damage.
Is underlay mandatory for all types of vinyl flooring?
Underlay isn’t mandatory for every installation, as it depends entirely on the specific product you’ve chosen. Many modern click-system LVT planks come with a built-in acoustic backing, making additional underlay unnecessary and potentially harmful to the locking joints. Sheet vinyl is often laid directly onto a prepared subfloor with adhesive. Always check the manufacturer’s instructions to ensure you don’t void your warranty by using an incompatible or redundant underlayment.
What is the best way to cut vinyl planks without breaking them?
The most effective method for a clean cut is the “score and snap” technique using a heavy-duty utility knife. Use a straight edge to guide your knife, making a deep score through the top wear layer and into the core of the plank. Once scored, apply firm pressure to snap the plank cleanly along the line. For more complex shapes around door frames, a jigsaw or a multi-tool with a fine-toothed blade provides the precision you need.
Do I need to acclimatise vinyl flooring in the room before fitting?
Yes, acclimatisation is a vital step that you cannot afford to skip. You must leave your vinyl in the room where it will be installed for at least 48 hours before fitting. This allows the material to expand or contract to the room’s specific temperature and humidity levels. If you install it immediately after delivery, the floor may buckle or develop gaps as it adjusts to its new environment over the following weeks.
Can I use a steam mop on my newly laid vinyl floor?
No, you should avoid using steam mops on any vinyl floor. The intense heat and moisture can penetrate the seams, potentially weakening the adhesive or causing the layers of the plank to delaminate and peel. Instead, use a damp mop with a pH-neutral cleaner specifically formulated for vinyl. This ensures you protect the wear layer and keep the floor looking new without risking structural damage from high temperatures or excessive water.
How do I hide the expansion gap around the edge of the room?
You can hide the mandatory expansion gap using scotia beading or by installing new skirting boards over the top of the flooring. Scotia is a small, decorative molding that pins directly to your existing skirting boards, covering the gap while allowing the floor to move naturally underneath. When figuring out what do you need to lay vinyl flooring, remember that beading should match either your flooring or your skirting for a cohesive and professional look.