
Most DIY flooring failures have nothing to do with the quality of the tile and everything to do with the subfloor you ignored. It is a hard truth to hear when you have spent weeks browsing samples, but even the most expensive luxury vinyl won’t hide a damp or uneven base. We understand that choosing lvt flooring for diy projects often feels like a minefield of conflicting advice. You might be torn between the simplicity of click-lock and the permanence of glue-down, or perhaps you’re losing sleep over the fear of planks shifting and gapping underfoot.
At Frankly Flooring, we believe in being direct about what it takes to get the job done right. We have spent over 20 years seeing exactly where DIYers thrive and where they stumble. This guide promises to master the selection and installation process with a transparent, step-by-step approach that prioritises integrity over high-pressure sales. We will walk you through the non-negotiable prep work, including checking that your subfloor meets the 75% RH moisture limit, and provide the technical confidence you need to finish your project over a single weekend. By the end, you will have a floor that doesn’t just look professional, but stays silent and secure for years to come.
Key Takeaways
- Understand why click-lock systems are the superior choice for home projects compared to more complex glue-down alternatives.
- Learn how to apply the 3mm rule and verify subfloor moisture levels to prevent the common pitfalls of gapping or lifting.
- Master the process of choosing lvt flooring for diy by balancing aesthetic preferences with the technical requirements of your specific room.
- Discover the essential toolkit for a professional result, including the score and snap cutting technique that eliminates the need for heavy machinery.
- Gain the confidence to plan a dry run layout that avoids awkward slivers of tile and ensures a balanced, symmetrical finish across the entire floor.
The Frank Truth: Can You Really Install LVT Yourself?
Let’s be honest about the DIY dream. While many retailers claim that anyone can lay a floor, the reality depends entirely on the system you choose and the room you’re tackling. Most homeowners can successfully install luxury vinyl, but the gap between a floor that looks professional and one that fails within six months is often down to preparation and realistic self-assessment. When you’re choosing lvt flooring for diy, the first decision isn’t the colour or the pattern; it’s the installation method.
Installing it yourself can save you hundreds of pounds in labour costs, which is a significant win for any home renovation budget. There is a trade-off, though. If you make a fundamental error, you risk voiding the manufacturer’s warranty. This is why we advocate for a slow, methodical approach rather than a race to finish by Sunday evening.
Click-Lock vs. Glue-Down Systems
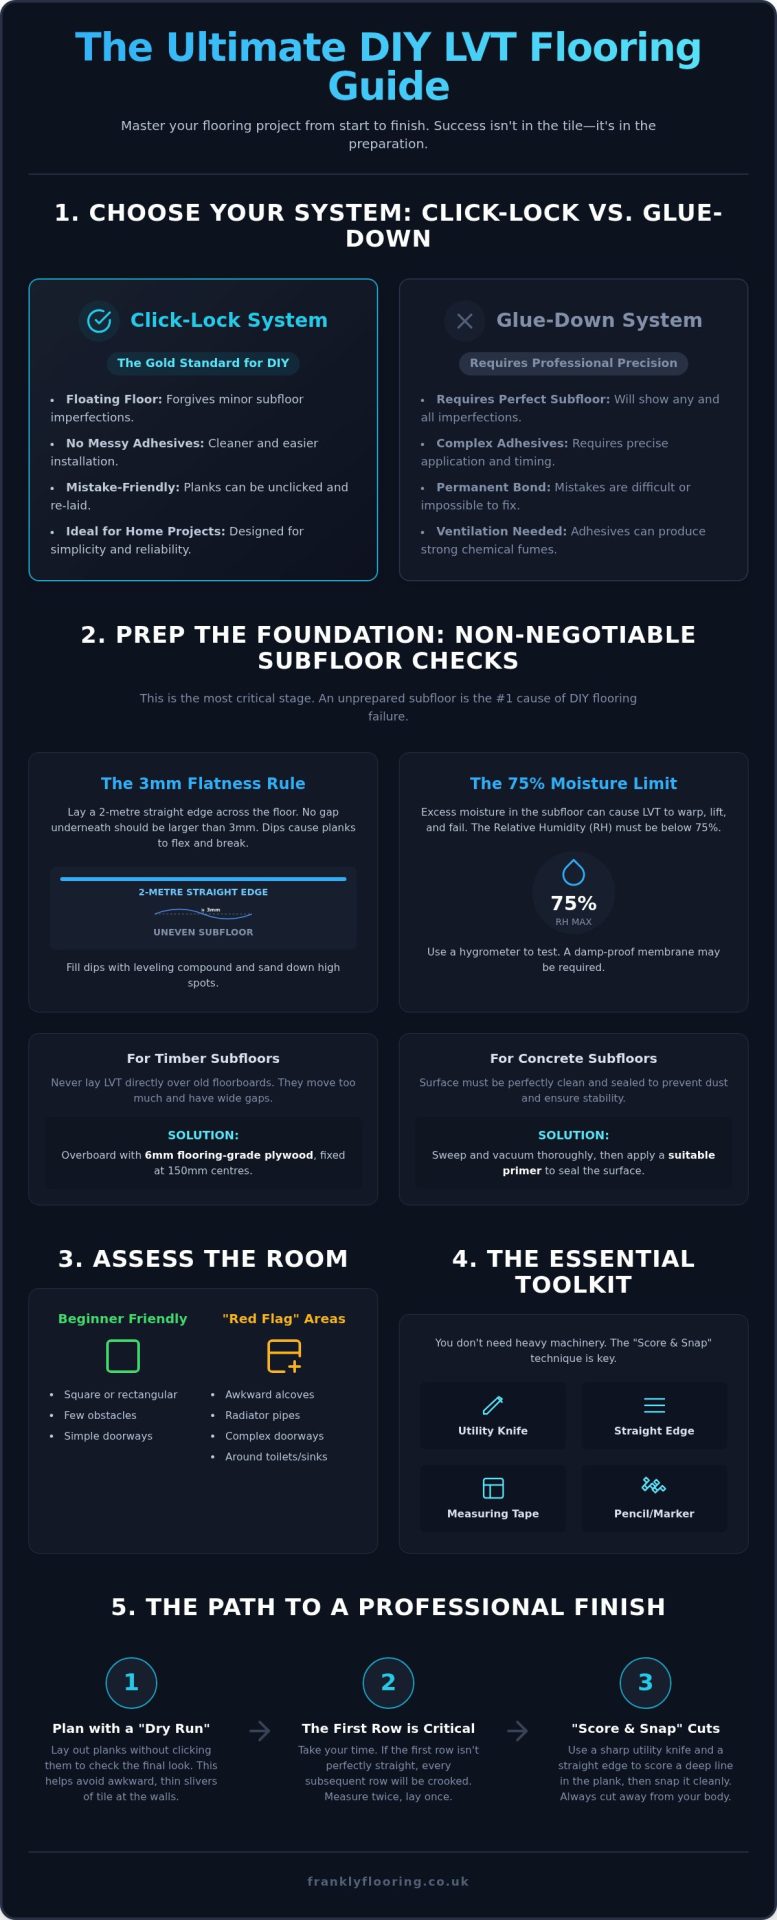
Luxury vinyl has evolved significantly from the traditional Vinyl composition tile (VCT) used in commercial settings. Today, the market is split between click-lock and glue-down systems. Click-lock is the gold standard for UK DIY projects for a simple reason: it’s a floating floor. It doesn’t require messy adhesives, and the planks literally click together, which helps forgive minor subfloor imperfections. If you make a mistake, you can usually unclick the planks and try again.
Glue-down LVT is a different beast entirely. It requires a perfectly flat subfloor and a precise application of pressure-sensitive adhesive. If you get the timing wrong, the tiles won’t bond; if you get it right, they are stuck for good. For most people choosing lvt flooring for diy, we recommend sticking to click-lock systems to avoid the technical headaches of professional-grade adhesives.
Evaluating Your Room Complexity
A square bedroom is the perfect starting point for a beginner. However, rooms with multiple radiator pipes, awkward alcoves, or doorways that lead into three different directions are “red flag” areas. These require intricate cuts and a high level of patience. If your project involves a cramped bathroom with a pedestal sink and a toilet to work around, you might find the frustration outweighs the savings.
- The Patience Factor: Rushing the first row is the fastest way to ruin the entire floor. If the first row isn’t perfectly straight, every subsequent row will be crooked.
- Safety Essentials: You’ll be using heavy-duty utility knives for the “score and snap” method. Always cut away from your body and keep a first aid kit nearby.
- Adhesive Fumes: If you do attempt a glue-down installation, ensure the room is well-ventilated to handle the chemical odours.
Ultimately, if you have a steady hand and a weekend to spare, a click-lock floor is well within your reach. Just don’t let a “simple” project turn into a bodge job by underestimating the prep work required.
Preparing the Foundation: Why Subfloor Readiness is Non-Negotiable
If your subfloor isn’t right, your new floor won’t be either. Luxury vinyl is flexible, which is both a blessing and a curse. This flexibility leads to a phenomenon called “telegraphing.” Every small pebble, screw head, or ridge in your subfloor will eventually show through to the surface of your tiles. It doesn’t happen instantly, but over a few months, the pressure of foot traffic moulds the LVT around the imperfection. This is why choosing lvt flooring for diy requires a commitment to the invisible work that happens before the first plank is laid.
To avoid a finish that looks like a topographical map, you must follow the 3mm rule. Take a 2-metre straight edge and lay it across your floor in several directions. If you find any gaps larger than 3mm beneath the edge, the floor is too uneven for a stable installation. These dips must be filled, and peaks must be sanded down to meet industry installation standards. Ignoring a 4mm dip might seem minor, but it’s enough to cause the click-lock joints to flex and eventually snap under the weight of furniture.
For timber floors, don’t try to lay LVT directly over old floorboards. They move too much and the gaps between boards are too wide. You should overboard the entire area with 6mm flooring-grade plywood, fixed at 150mm centres with ring-shank nails. On concrete, the priority is cleanliness. Sweep and vacuum until no dust remains. A simple primer can then help seal the surface and provide a better bond for your chosen underlay. While you wait for the primer to dry, you can browse our professional-grade underlays to ensure your foundation is truly complete.
Moisture Testing and Levelling
In the UK, dampness is a common floor killer, especially in ground-floor extensions or older properties. You must check that your subfloor moisture is below the 75% Relative Humidity (RH) threshold using a hygrometer. If it’s higher, you’ll need a liquid damp-proof membrane to protect your investment. If the floor fails the 3mm rule, a self-levelling compound can create a glass-flat finish, though it requires a steady hand and quick work to ensure the mixture doesn’t set before it’s smooth.
Acclimatisation: The Step You Cannot Skip
LVT is sensitive to temperature and will expand or contract based on its environment. Your tiles must sit in the room where they’ll be installed for at least 48 hours before you start. Stack the boxes flat and no more than five high to allow even airflow. Skipping this leads to thermal shock, where planks expand or contract rapidly after being laid, causing the very gapping you’re trying to avoid. When choosing lvt flooring for diy, plan your delivery so the product has ample time to settle into your home’s climate.
The LVT Toolkit: What You Actually Need for DIY Success
One of the biggest mistakes DIYers make is over-investing in specialised machinery that they will only use once. You might see retailers pushing expensive LVT guillotines, but for most residential projects, these are an unnecessary expense. A heavy-duty utility knife is often more than enough to achieve a clean finish. When you are choosing lvt flooring for diy, your budget is better spent on high-quality installation aids rather than bulky cutting tools that take up space in your shed. Success is found in the precision of your measurements and the stability of your foundation.
Your basic kit should include a reliable steel tape measure, a sharp pencil, and a sturdy T-square. The T-square is non-negotiable; it ensures your “score and snap” cuts are perfectly perpendicular to the plank edge. Beyond cutting, you will need a white rubber mallet and a professional tapping block to seat the click-lock joints without damaging the delicate tongues. Don’t forget expansion spacers. These small plastic wedges maintain a consistent gap around the perimeter of the room, allowing the floor to breathe as temperatures fluctuate throughout the year.
Precision Cutting Equipment
The “score and snap” method is the industry standard for a reason. You simply draw your blade across the wear layer using the T-square as a guide, then apply pressure to snap the plank cleanly. To make this effortless, keep a fresh supply of concave blades. These curved blades offer better control and stay sharper for longer than standard straight versions when slicing through tough vinyl. For those tricky areas around radiator pipes or alcoves, a profile gauge is a lifesaver. It allows you to trace the exact shape of an obstruction onto your tile. If you want a truly professional look, use a multi-tool or a hand saw to undercut your door architraves. Sliding the LVT underneath the wood looks far better than trying to cut the tile around the frame.
Adhesives and Underlay Selection
Selecting the right underlay is just as vital as choosing lvt flooring for diy in the first place. You must match the density of the underlay to your specific click-lock system. An underlay that is too soft will allow the floor to bounce, which eventually snaps the joints. If you are still weighing up your options, reading What Is LVT Flooring? A Frank Guide will help you understand how different materials interact with your subfloor. While click-lock floors are usually floating, certain environments like south-facing conservatories may require high-temperature adhesive or specialised underlays to prevent the tiles from lifting under intense solar heat. Always check the room’s maximum temperature before deciding on your final fixing method.
The Installation Process: A Step-by-Step Guide to a Professional Finish
Success in flooring isn’t just about the physical act of clicking planks together; it’s about the maths you do before you start. Many guides suggest starting in a corner and working across, but this often leaves you with a tiny, unstable sliver of vinyl at the far wall. When you are choosing lvt flooring for diy, you need to plan for symmetry. Measure the width of your room and divide it by the width of a single plank. If the remainder is less than 50mm, you should trim your starting row to ensure the final row is wide enough to be structurally sound.
Structural integrity also depends on how you stagger your joints. We recommend the “rule of thirds.” This means the short-end joints of adjacent rows should be at least one-third of a plank’s length apart. This staggered pattern prevents weak spots and creates a more natural, wood-like appearance. Throughout the process, you must maintain an expansion gap of 5 to 10mm around the entire perimeter. LVT is a living product that expands with heat. If you pin it against the walls, the floor will eventually peak or buckle in the centre.
Setting the First Row and Managing Expansion
The first row is your anchor. Even if your walls are wonky, the first row must be perfectly straight. Use your spacers to set the expansion gap and pull a chalk line or use a laser level to guide your placement. When engaging the click mechanisms, insert the tongue into the groove at a slight angle and press down. You should hear a satisfying click. If the joint feels spongy, don’t force it with the mallet. Pull it apart, check for debris in the groove, and try again. Protecting those delicate tongues is essential for a waterproof seal.
Navigating Obstacles: Door Frames and Radiator Pipes
To get a professional finish, you need to master the “undercut” trick. Don’t cut the LVT to fit the shape of your door architrave. Instead, use a scrap piece of flooring as a height guide and saw into the bottom of the wood frame. This allows you to slide the tile underneath, making the floor look like it was installed before the house was built. For radiator pipes, use a spade bit to drill a hole approximately 10mm wider than the pipe. Cut a discreet “V” notch from the hole to the edge of the plank so you can slide it around the pipe, then glue the small piece back into place behind it.
The final row is always the hardest because you lack the space to swing a mallet. This is where your pull bar becomes your best friend, allowing you to hook the edge of the tile and tension the joint from the wall side. If you’re ready to start your project, you can view our full range of LVT accessories to find the spacers and pull bars that make this process manageable.
The Final 5%: Finishing Touches and Long-Term Care
The final 5% is what separates a DIY bodge from a professional-standard finish. Once you’ve clicked that final row into place, your first task is to remove every expansion spacer. Leaving even one in place can cause the floor to buckle later. If you’ve kept your original skirting boards, you’ll need to install colour-matched scotia or quadrant beading to hide the expansion gap. If you’re fitting new skirting, nail it strictly to the wall; pinning the floor down with nails will prevent it from moving as temperatures change, leading to gaps or peaks. A quick post-install clean with a soft brush and a damp cloth will remove construction dust, but avoid soaking the floor until the joints have fully settled.
Transition Strips and Skirting
Transitions between rooms require the correct door bars. If you’re moving from LVT to a carpeted area, you’ll need a transition strip that handles the height difference safely without pinning the vinyl down. While you’re finalising these details, our Carpet Gripper Guide offers a deep dive into securing adjacent carpets like a pro. In wet areas like kitchens or bathrooms, use a high-quality, colour-matched silicone in the perimeter gaps. This creates a waterproof barrier that protects your subfloor while allowing the LVT the necessary flexibility to expand and contract.
Maintenance: Keeping Your Floor Frankly Beautiful
When choosing lvt flooring for diy, you should also think about long-term protection. Felt pads on the bottom of furniture are your best friend; they prevent the deep scratches that occur when heavy chairs or sofas are moved. For cleaning, keep it simple. Use a vacuum with a hard-floor setting and a microfibre mop with a pH-neutral cleaner. We cannot stress this enough: stay away from steam mops. The extreme heat and moisture can lead to delamination, where the wear layer separates from the core, and this will void your warranty immediately.
If you do manage to scratch a plank, the click-lock system makes it possible to replace a single tile by unclicking the floor from the nearest wall, though it’s a job you’ll want to avoid by simply using the right protection from day one. By choosing lvt flooring for diy and following these maintenance rules, you ensure your weekend of hard work results in a floor that stays silent, secure, and beautiful for decades.
Take the Next Step Toward Your New Floor
Successfully installing luxury vinyl is a significant achievement that transforms the character of your home. By now, you understand that a professional-standard finish isn’t down to luck; it’s the result of honest preparation and the right materials. Choosing lvt flooring for diy becomes a straightforward process once you prioritise subfloor levelness and allow for proper acclimatisation. These technical details are what ensure your floor remains a foundational element of your home’s character for decades.
At Frankly Flooring, we draw on 20+ years of expertise to provide the straight-talking advice you need. As a family-run business, we take pride in supporting your project with integrity and technical confidence. We offer direct UK national delivery on all the essential accessories that make a difference underfoot, from professional underlays to precision spacers. If you’re ready to start your project with confidence, you can browse our full range of DIY-friendly LVT and professional accessories today. You’ve got the knowledge to do it right; now it’s time to get to work.
Frequently Asked Questions
Do I need underlay for LVT flooring?
Most click-lock LVT requires a specific high-density underlay to support the joints, unless the planks come with an integrated backing. Using the wrong underlay, such as one designed for carpet, is a common mistake when choosing lvt flooring for diy. A dedicated LVT underlay is much thinner and denser, preventing the floor from bouncing and ensuring the locking mechanisms don’t snap under the weight of your heavy furniture.
Can I lay LVT over existing tiles or laminate?
You can’t lay LVT over laminate because the double-floating floor system creates too much movement, which will eventually break the vinyl joints. While you can technically lay it over ceramic tiles, the grout lines must be filled with a smoothing compound first. Any texture or dip in the old floor will eventually telegraph through the vinyl, ruining the professional finish you’re aiming for with your project.
How long does LVT adhesive take to dry?
Drying times vary based on the specific adhesive used and the room’s ventilation. Pressure-sensitive adhesives usually require 20 to 40 minutes to become tacky before you can lay the tiles. Once the floor is complete, you should wait at least 24 hours before moving heavy furniture back into the room. This allows the bond to fully cure and prevents tiles from shifting or lifting during the initial setting.
Why do I need a 10mm expansion gap for LVT?
Luxury vinyl is a thermoplastic product that expands and contracts as the temperature in your home fluctuates. Without a 5 to 10mm gap around the perimeter, the floor has nowhere to go when it warms up, which leads to unsightly buckling or peaking in the centre of the room. This gap is a non-negotiable industry standard that ensures your floor remains flat and stable throughout every season.
Is LVT flooring suitable for bathrooms and kitchens?
LVT is an ideal choice for high-moisture areas like bathrooms and kitchens because it is 100% waterproof. Unlike laminate or real wood, the vinyl planks won’t swell or warp if they get wet. When choosing lvt flooring for diy in these rooms, ensure you seal the expansion gaps around the edges with a high-quality, colour-matched silicone. This prevents water from seeping underneath the tiles and damaging your subfloor over time.
How do I cut LVT without a specialised cutter?
You don’t need a specialised guillotine to get a clean edge on your planks. A heavy-duty utility knife and a steel T-square are the most effective tools for the job. Use the score and snap method: firmly draw the blade across the wear layer twice, then apply pressure to snap the plank along the line. For intricate shapes around pipes, a fresh supply of concave blades will offer much better control.
What happens if I don’t acclimatise my LVT planks?
Skipping the 48-hour acclimatisation period is the primary cause of post-installation gapping. If you install cold planks in a warm room, they’ll expand rapidly, putting immense pressure on the joints and potentially causing the floor to lift. Conversely, planks that contract after installation will leave wide, ugly gaps between the tiles. Stacking the boxes flat in the installation room allows the material to reach a stable equilibrium with your home’s climate.
Can I use LVT with underfloor heating systems?
Most modern LVT products are perfectly compatible with underfloor heating, provided the system is embedded in the screed. You must ensure the surface temperature of the floor doesn’t exceed 27°C, as excessive heat can soften the vinyl and weaken the adhesive or click joints. It’s also vital to turn the heating off 48 hours before installation and wait another 48 hours before gradually increasing the temperature again to avoid thermal shock.