
DIY can still cost less if you already have the right tools and can fit the floor accurately. The real difference is what the extra fitting cost covers, and how much time and risk you’re prepared to take on.
It’s easy to see why fitting a floor yourself feels economical: you avoid labour costs and can work around your own schedule. But measurements, subfloor preparation, cuts and finishing details all affect the result. Mistakes can mean extra materials or rework.
This guide explains what professional fitting typically covers, when DIY can make sense, and why LVT and click-lock laminate may be more manageable for a confident DIYer. It also shows you how to compare the full costs, including tools, materials, time and the demands of your room, before choosing an approach.
Key Takeaways
- Compare professional quotes with the full DIY bill, including tools, materials, possible rework and the value of your time.
- Understand which preparation and finishing tasks professional fitting can cover, from checking the subfloor to precise cuts.
- Use room shape, floor condition and fitting complexity to judge when hiring a fitter is the more practical choice.
- See why LVT and click-lock laminate may suit confident DIYers, and why a flat, dry subfloor matters to the result.
Fitting Wood Flooring DIY or Hiring A Fitter?
DIY flooring costs include the floor covering, underlay, adhesives, trims, tools and your time.
Engineered wood and carpet fitting costs depend on the material and room. Quotes can also vary with local labour costs, travel and the work involved.
Professional Quotes and Tool Costs
A professional quote sets out the fitting cost for your project. DIY means pricing each tool you need to buy or hire. If you already own suitable tools, your upfront spend may be lower, but your time is still part of the real cost.
Professional Quotes and DIY Costs
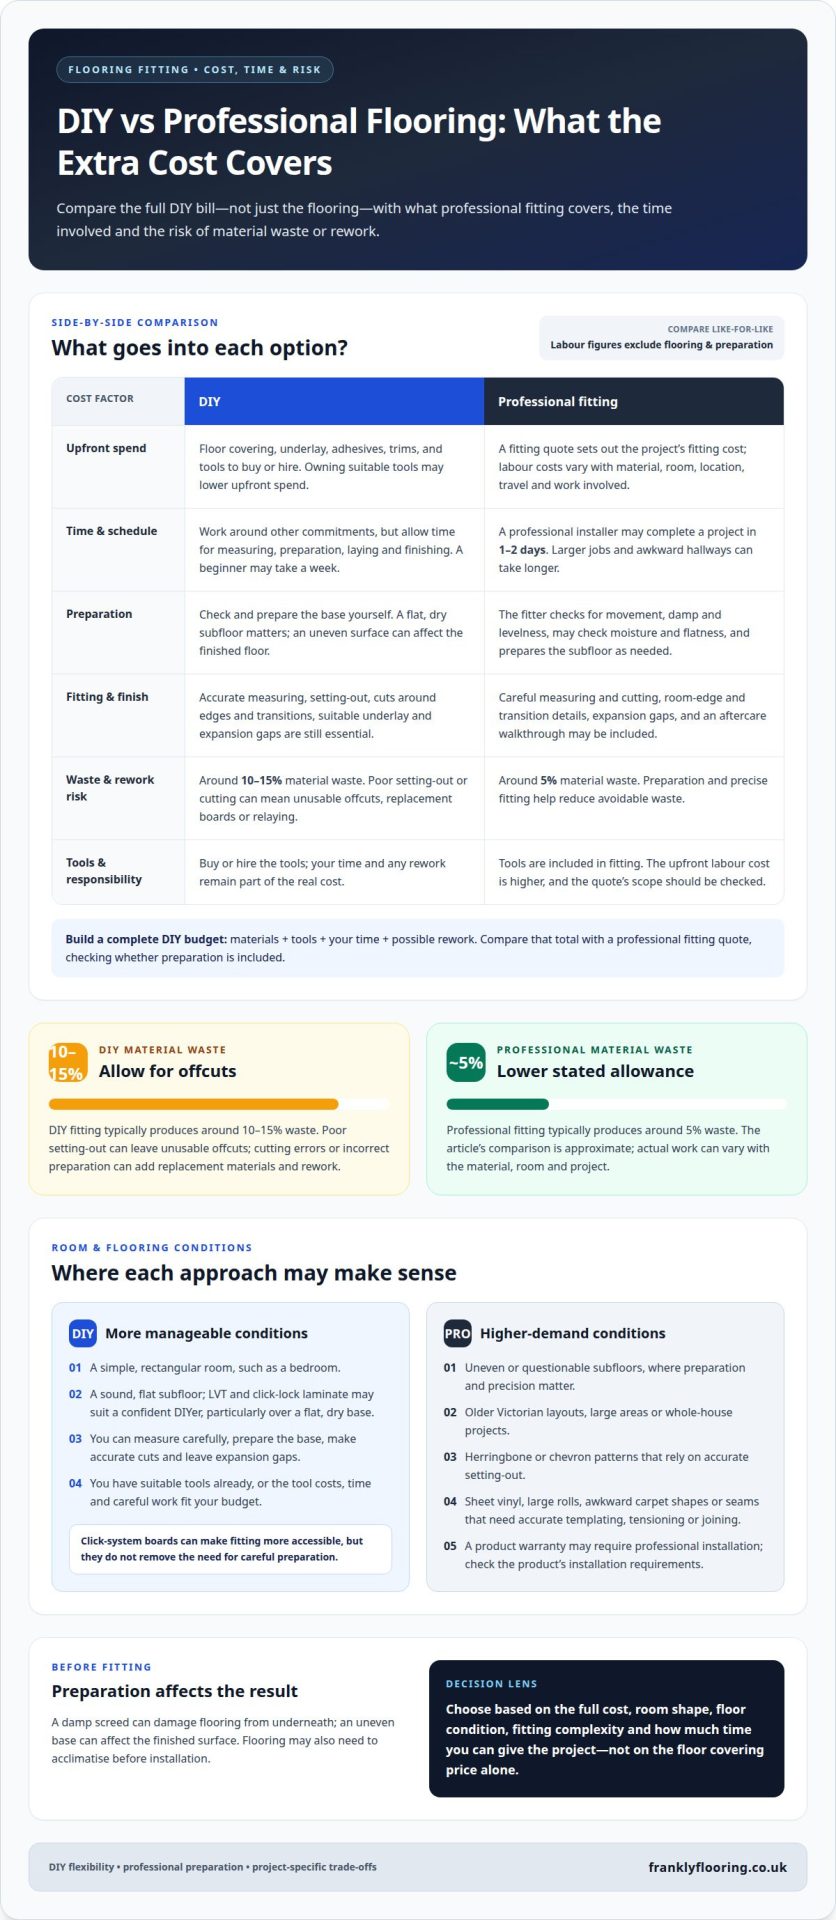
To compare professional fitting vs DIY flooring costs, build a complete DIY budget rather than pricing the floor covering alone. List materials, tools and the time needed for measuring, preparation, laying and finishing. DIY lets you work around other commitments, but may stretch the project out. A fitter costs more upfront and covers the labour involved in completing the installation.
Fitting Errors and Material Waste
Allow for waste as well as the measured floor area: DIY fitting typically produces around 10-15% material waste, compared with around 5% for professional fitting. Poor setting-out can leave unusable offcuts; a cutting error may mean replacing boards or relaying a section. Incorrect preparation can also create subfloor problems, adding work and materials to the original DIY budget.
Fitting Costs Across Flooring Types and Regions
These figures help compare labour costs, but exclude the flooring and preparation. Engineered wood and carpet fitting needs vary with the material and room. Quotes can also differ with local labour costs, travel and project complexity.
| Option | Tools | Time and risk |
|---|---|---|
| DIY | Buy or hire | Your time; rework risk |
| Professional | Included in fitting | Higher upfront labour cost |
Choose DIY if the tool costs, time and careful work suit your budget, then compare your total with a professional fitting quote.
What Does Professional Installation Include?
Professional installation involves more than laying boards. It starts with checking the subfloor for movement, damp and levelness, so any preparation needs are identified before fitting. This assessment helps determine whether the base is suitable for the chosen flooring.
A fitter may check moisture and flatness, then prepare the subfloor as needed. A damp screed can damage flooring from underneath, while an uneven base can affect the finished surface. The material may also need to acclimatise before installation, followed by careful measuring and cutting around room edges and transitions.
Finishing matters too. Precise cuts help flooring meet doorways and edges neatly, while expansion gaps allow it to move as intended. A final aftercare walkthrough can explain how to look after the finished floor. These steps involve more than simply placing laminate or another material in a room.
DIY floating-floor installation may suit a simple, rectangular bedroom with a sound, flat subfloor and no underfloor heating. You’ll still need to measure carefully, prepare the base, choose suitable underlay and leave expansion gaps. Room transitions and doorways also need accurate cuts, even in a straightforward space.
A cheaper DIY approach can become expensive if an uneven surface shows through, boards lift or a poor cut leaves a visible gap. Fixing an error may mean removing and relaying part of the floor or replacing damaged pieces. With a complex layout or questionable subfloor, preparation and precision matter more than the apparent simplicity of a floating system.
Choosing laminate flooring is a materials decision; fitting is separate work. If you’re weighing up the right product for a potential DIY project, you can browse laminate flooring options and consider the room’s shape and floor condition alongside the finish you want.
When to hire a professional fitter
Professional fitting is worth considering when the room, flooring or installation method leaves little room for error. Uneven subfloors, older Victorian layouts, large areas and whole-house projects can make DIY more demanding. A fitter can assess the conditions and plan for the room’s shape, rather than treating every space as a simple rectangle.
Patterned floors need particular care. Herringbone and chevron designs rely on accurate setting out; if the pattern drifts, it cannot be corrected once the adhesive has grabbed. Sheet vinyl also comes in large rolls, so measuring and templating must be precise. An early mistake can affect the finish across a much wider area.
Carpet fitting calls for different skills: fitters need to tension the carpet, use gripper rods and make accurate seams where joins are needed. A confident DIYer might manage a straightforward room, but awkward shapes or joins increase the demands. Errors can be visible across the room and costly to fix.
Manufacturer warranty terms matter too. Professional installation may be required to keep a flooring warranty valid, but the conditions depend on the product. Read the installation requirements before deciding whether to fit the floor yourself.
Time can also influence the decision. A professional installer may complete a project in 1-2 days, while a beginner DIY installer may take a week. A larger job can take longer if it has several rooms or awkward hallways. That difference matters if living around an unfinished floor would disrupt your household.
Ask what a fitting arrangement covers, including preparation and any guarantee against installation issues. A guarantee’s value depends on its stated scope and conditions. Choose professional fitting for complex patterns, uneven floors or large projects; a simple room and manageable flooring can suit capable DIY work.
Fitting LVT and click-lock laminate
LVT and click-lock laminate can be DIY-friendly, particularly over a flat, dry subfloor. Click-system boards can make installation more accessible, though careful preparation is still important. But easy assembly doesn’t remove the need for careful preparation: an uneven base can cause dips to show through LVT and affect the finished surface.
Start by checking the subfloor for levelness, movement and moisture. Follow the flooring manufacturer’s fitting instructions for preparation, underlay and installation. Measure the room, plan the board direction, and identify doorways or transitions before cutting. These steps help avoid awkward narrow strips and poorly aligned edges that can spoil the finish.
Moisture deserves attention in UK homes. Damp winters, condensation and seasonal temperature shifts can affect moisture levels beneath a floor. A damp screed can damage flooring from underneath if moisture isn’t tested. If the base feels uneven or shows signs of damp, address the underlying issue before laying boards or LVT. For projects exposed to high moisture or wet-area build-ups, professional waterproofing products from Pro Supply Center can help protect the subfloor from costly water damage.
Underfloor heating adds another consideration. The wrong adhesive or underlay for the floor build-up can cause problems, particularly over heating. Check the product’s fitting guidance for the correct materials and method. A straightforward rectangular room with a flat, dry base is more manageable for DIY than a space with heating, awkward edges or an uneven subfloor.
Professional fitting costs more than doing the work yourself, but preparation and precision matter as much as click-lock assembly. A fitter assesses the base and handles detailed cuts, transitions and installation planning. For confident DIYers, a simple room and suitable subfloor make laminate a practical project; LVT needs extra care if the base isn’t level.
Compare finishes and formats before choosing your flooring: browse laminate flooring options for your room and fitting plans.
Frankly Flooring: LVT
Frankly Flooring offers LVT for readers comparing DIY fitting with professional installation. If you’re planning to fit the floor yourself, use the guidance above to assess your room, subfloor and confidence with accurate measuring and cutting before choosing a material.
LVT may suit a straightforward DIY project when the base is flat and dry. An uneven subfloor can cause dips to show through, so include preparation in your decision. For a complex room or a floor that needs careful preparation, consider whether DIY fitting is practical alongside your material choice. Frankly Flooring also offers wood, carpet and furniture to consider for other rooms or furnishing needs.
For a closer look at LVT, visit Frankly Flooring online.
Make the Next Flooring Decision with Confidence
Your next step is to match the fitting approach to the room, your available time and the finish you want. Before committing, write down your priorities: keeping the project manageable, avoiding time away from work, or getting help with difficult details. This will make the choice clearer than comparing labour costs alone.
The cost of professional fitting versus DIY flooring is only part of the decision. The floor itself sets a room’s look and feel, so choose a material that suits how you use the space. Frankly Flooring offers LVT, wood and carpet to consider as you plan. Compare the options with your room and fitting plans rather than rushing into a decision based only on the installation method.
For a straightforward next step, contact Frankly Flooring for flooring advice. With a clear view of your priorities and the room ahead, you can move forward with confidence.
Frequently Asked Questions
What is DIY Flooring Installation?
DIY flooring installation means measuring, preparing and fitting the floor yourself rather than paying a fitter for labour. You choose and buy the materials, then handle tasks such as setting out the first row, cutting around obstacles and finishing room edges. For example, click-lock laminate boards need accurate planning and suitable preparation, even though they assemble together.
What Does DIY Actually Involve?
DIY involves more than laying the visible flooring. First, measure the room and plan the layout, including doorways and transitions. Then prepare the subfloor and gather suitable underlay, trims, adhesives or tools for the chosen material. During fitting, make accurate cuts and follow the product’s instructions. Finish the edges and check that the floor sits properly, without loose boards or visible gaps.
What is the average UK cost per square metre for professional flooring installation?
These are fitting costs, not the price of the flooring itself. Carpet and engineered wood fitting costs depend on the material and requirements, so compare like-for-like quotes using the same area and preparation assumptions.
How much does flooring installation cost for a typical UK room?
Calculate a room’s fitting cost by multiplying its floor area in square metres by the applicable fitting rate. The total also depends on the flooring type and any preparation needed before installation. A room with a straightforward layout and suitable subfloor requires different work from one with awkward corners, thresholds or a base needing correction. Area alone doesn’t determine the final cost.
Which flooring types are easiest and cheapest to install yourself?
Click-lock laminate and LVT are among the more DIY-friendly options, particularly in a simple room with a flat, dry subfloor. Click-system flooring assembles without specialist tools, which can reduce the equipment needed. But not every project is straightforward: accurate cuts and room transitions still take care. The lowest total depends on the tools you already own, extra materials and whether mistakes require replacement flooring.
What preparation and subfloor work can increase professional flooring fitting costs?
Subfloor work can add labour if the fitter finds movement, damp or unevenness that needs attention before laying begins. For example, a damp screed may need moisture testing, while an uneven base may need preparation to provide a suitable surface. Room transitions and detailed cuts also add work. The fitting quote depends on the condition of the base and the preparation required for the chosen floor.