
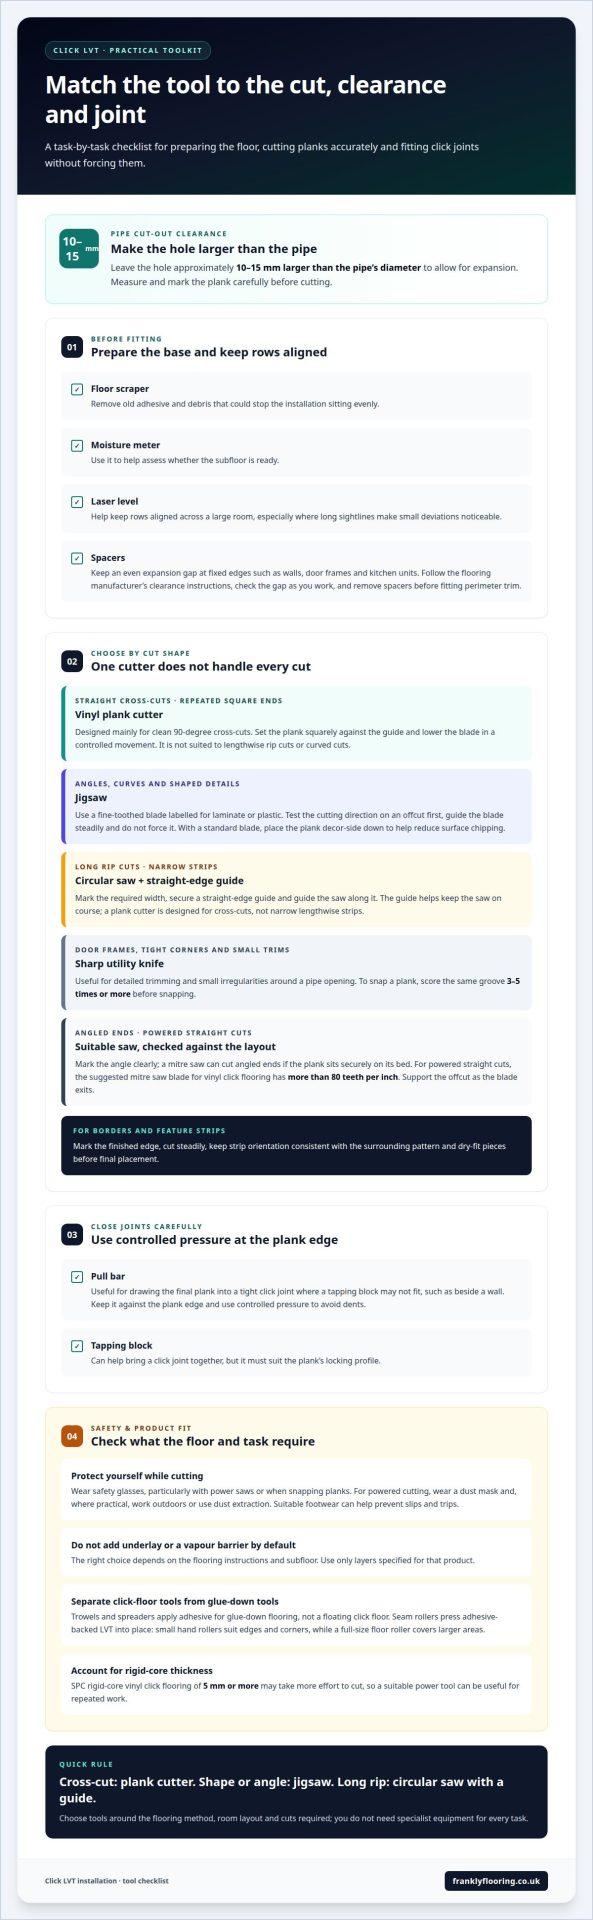
A neat click-LVT fit depends on the right tools for the cut, the clearance and the joint. The essential tools for laying click LVT include a sharp utility knife, a jigsaw for shaped cuts, spacers to preserve expansion gaps, and a pull bar to close joints. Around a pipe, leave a hole approximately 10-15 mm larger than its diameter.
It’s easy to focus on cutting planks and overlook the tools that keep rows aligned and edges tidy. This guide covers tools for pipes and tight corners, straight and diagonal cuts, and broader installation tasks. You’ll see when a hand tool is enough and when a powered cutter can make repeated or demanding cuts easier. The aim is a practical toolkit, not a pile of specialist equipment you may never use.
Key Takeaways
- Choose a cutting method to suit the shape and material: a plank cutter handles straight cross-cuts, while a jigsaw can manage angled and curved cuts.
- Use spacers to keep clearance consistent, and take care not to force planks tightly against fixed edges.
- A pull bar can help close click joints neatly; use it with controlled pressure to protect plank edges.
- Prepare the subfloor and keep alignment tools close at hand so small corrections are easier as you work across the room.
1. Cutting around pipes and maintaining expansion gaps
For a pipe cut-out, mark the plank’s position carefully, then measure the pipe diameter. Make the hole approximately 10-15 mm larger than the pipe to leave room for expansion. A jigsaw can cut the opening, while a sharp utility knife helps trim small irregularities around the edge.
Choose the blade to suit the cut and the flooring. For a jigsaw, use a fine-toothed blade labelled for laminate or plastic, and test the cutting direction on an offcut first. A utility knife suits detailed trimming at door frames and tight corners; score the same groove 3-5 times or more before snapping. For powered straight cuts, a mitre saw blade with more than 80 teeth per inch is suggested for vinyl click flooring.
There isn’t one underlay or vapour barrier that suits every click LVT floor. The right choice depends on the flooring instructions and subfloor. Use only layers specified for that product, rather than adding a generic underlay or barrier.
Wear safety glasses when cutting, particularly with power saws or when snapping planks. For powered cutting, wear a dust mask and, where practical, work outdoors or use dust extraction. UK Government guidance also identifies suitable footwear as a way to help prevent slips and trips.
For accurate LVT borders and designs, mark the finished edge on the plank and cut steadily along the line. Feature strips need clean, controlled cuts to sit neatly beside the main flooring. A trimming knife can score thin vinyl strips; use a jigsaw for shaped details, testing the cut direction on an offcut first. Keep each strip’s orientation consistent with the surrounding pattern, and dry-fit pieces before final placement. These checks help prevent ragged edges and misplaced design lines.
2. LVT cutters for straight and diagonal cuts
A vinyl plank cutter is designed mainly for clean 90-degree cross-cuts across planks. It can make repeated end cuts more quickly than marking and trimming each plank by hand. Set the plank squarely against the cutter’s guide, then lower the blade in a controlled movement. This tool isn’t suited to rip cuts along a plank’s length or curved cuts around obstacles. For those shapes, choose a saw or knife that allows more control.
For a diagonal cut, mark the angle clearly across the plank and use a jigsaw or suitable saw. A mitre saw can also cut angled ends if the plank fits securely on its bed. Check the marked line against the room layout before cutting, especially for a border or doorway. Support the offcut so it doesn’t break away unevenly as the blade exits.
A jigsaw handles angled lines and shaped cuts that a fixed vinyl cutter can’t manage. With a standard jigsaw blade, place the plank decor-side down to help reduce surface chipping. Use a fine-toothed blade intended for laminate or plastic, and test the cut direction on a spare offcut. Guide the blade steadily rather than forcing it through the flooring; too much pressure can pull the cut away from its marked line.
Long rip cuts need a different setup from cross-cuts. Mark the required width along the plank, secure a straight-edge guide, then guide a circular saw along it. The guide helps keep the saw on course along a long line. A vinyl plank cutter won’t replace this method because its cutting bed is designed for cross-cuts, not narrow strips.
Match the cutter to the job: use a vinyl plank cutter for repeated square ends, and a jigsaw or guided saw for angles and lengthwise cuts. For luxury vinyl with a visible surface pattern, inspect each cut edge and dry-fit the piece before joining it to the next plank.
3. Core flooring installation tools
Good preparation starts with the subfloor. A floor scraper removes old adhesive and debris that could prevent an even installation. A moisture meter can help assess whether the floor is ready. For click LVT, use a laser level to keep rows aligned across a large room, particularly where long sightlines make small deviations easy to spot.
A pull bar helps draw the final plank into a tight click joint where a tapping block may not fit, such as beside a wall. Apply controlled pressure and keep the bar against the plank edge to avoid dents. It can, for example, help close the last joint in a row without striking the visible surface directly.
Not every tool suits every LVT installation. Trowels and spreaders apply adhesive evenly, so they’re for glue-down flooring rather than a floating click floor. Seam rollers also help press adhesive-backed LVT into place: small hand rollers suit edges and corners, while a full-size floor roller covers larger areas.
How much do essential click LVT installation tools cost in the UK? There’s no single total: your spend depends on which tools you need, what basic equipment you already own, and whether the job calls for powered cutting tools. A scraper, pull bar and laser level handle different tasks, so plan purchases around the flooring method and room layout.
Floor thickness can affect the cutting setup. Vinyl click flooring with an SPC rigid core of 5 mm or more may take more effort to cut, making a suitable power tool useful for repeated work. A straight edge guide can help control a circular saw during long rip cuts, while a laser level keeps the first row aligned. Match each tool to the task: subfloor preparation, row alignment, joint closure or adhesive application.
4. Do you need spacers and tapping blocks for click LVT installation?
Yes, spacers help keep the expansion gap consistent around a click LVT floor. Place them between the flooring and fixed edges, such as walls, door frames and kitchen units. Without a consistent gap, rows can shift during fitting or sit too close to an edge. Follow the flooring manufacturer’s instructions for the required clearance.
Position spacers as you start each row, then check they remain upright as the planks lock together. At a doorway, place one near each side of the opening to help maintain an even edge. Keep checking the gap as you progress, especially where a wall changes direction. Remove the spacers when fitting is complete, before covering the perimeter with trim.
A tapping block can help bring a click joint together, but it must suit the plank’s locking profile. Position it against the edge specified in the flooring instructions, then tap gently with a rubber mallet. The block spreads the force across the edge instead of concentrating it at one point. Avoid striking the exposed locking lip directly.
Use the block only when a joint needs a light adjustment. If a plank resists, stop and inspect the groove for debris or misalignment instead of hitting harder. Even a small piece of grit can prevent the profile from seating correctly. Separate the planks if needed, clear the joint, and reconnect them using the specified fitting method.
A tapping block is most useful along open rows, where there’s room to position it squarely. Near a wall or radiator pipe, a pull bar can reach a joint where a block cannot fit. Whichever tool you use, check that the plank surface remains undamaged and the joint closes evenly before moving on.
For a suitable floor to work with, explore click LVT flooring options and choose a style for your room.
Frankly Flooring
Frankly Flooring is a useful next step when you’re planning a flooring project and want to consider the room as a whole. The tools in this guide depend on the click LVT, its fitting method and the cuts your layout requires. Once those details are clear, you can focus on flooring that suits the space and how it’s used.
For adjoining rooms or a wider refresh, Frankly Flooring also offers carpet and furniture, alongside other flooring options. Considering these choices together can help you plan a consistent finish across connected areas, without treating every room as if it needs the same surface.
If you’d like to discuss your flooring needs, contact Frankly Flooring.
Plan the next step with confidence
A flooring project is easier to plan when you consider the product, room layout and fitting approach together. The essential tools for laying click LVT depend on the floor you choose and the details of your space, so settle those decisions before assembling equipment or starting cuts.
Frankly Flooring offers LVT, wood and carpet, giving you options for different rooms and surfaces. If you’re planning a wider update, consider how the flooring in adjoining spaces will work together, rather than treating each choice in isolation.
You can take the next step by discussing your flooring requirements and the options that suit your plans. Contact Frankly Flooring for advice, and move ahead with a clearer idea of what your project needs.
Frequently Asked Questions
What tools are needed to install click LVT flooring?
The essential tools for laying click LVT include a tape measure, pencil, straight edge, suitable cutting tool, spacers and a pull bar. Add a moisture meter to assess subfloor readiness, plus a scraper if old adhesive or debris needs removing. The right kit depends on the room shape and plank construction. For example, several doorways call for careful measuring and trimming.
What cutting tools work best for click LVT planks?
The essential tools for laying click LVT depend on the cut: a plank cutter suits repeated square ends, while a jigsaw handles angled or shaped lines. A circular saw with a straight-edge guide helps with long rip cuts. For a small adjustment to a thin plank, a sharp trimming knife may be easier to control. Test the blade on an offcut first.
What tools are needed to prepare a subfloor for click LVT?
Use a floor scraper to remove loose material and a moisture meter to assess the subfloor before fitting. A straight edge can help identify uneven areas that may need attention, while a suitable vacuum clears dust after scraping. For example, old adhesive ridges can affect how a floor sits, so prepare a clean, even surface before laying planks.
How do you measure and plan a click LVT layout?
Measure the room’s length and width, then sketch its shape, including alcoves, doorways and fixed obstacles. Mark the direction of the first row and plan where end joints will fall, so narrow offcuts don’t dominate visible edges. Dry-lay a few planks to assess the starting position. Recheck dimensions at doorways, where adjoining rooms can affect the finished floor line.
Can click LVT be cut with a utility knife or does it need a saw?
A utility knife can cut some click LVT by scoring a straight line and snapping the plank, but thicker or rigid-core boards may take more effort. A saw is useful for shaped cuts, long rip cuts and flooring that resists hand scoring. Test the method on an offcut first. The plank’s core, thickness and cut shape determine the right tool.
What UK subfloor flatness and moisture requirements apply to click LVT?
Follow the flooring manufacturer’s fitting instructions for acceptable subfloor conditions, including flatness and moisture limits. Requirements vary by product and subfloor type, so don’t apply one tolerance to every installation. A moisture meter helps assess readiness, while a straight edge can reveal dips or raised areas. Address surface problems before laying planks to reduce movement or visible irregularities.