
Professional carpet tile installation isn’t about the glue; it’s about the grid. Most people assume the hardest part is the physical sticking, but the real challenge lies in the planning. To be frank, it’s completely normal to feel a bit of anxiety before learning how to install carpet tiles, especially when you’re worried about wasting money on poorly cut materials or choosing the wrong adhesive. You want a finish that doesn’t shift or gap, and that starts with proper preparation rather than just rushing to finish the job.
We’re here to show you exactly how to master this project using the same no-nonsense methods the experts use. Our goal is to help you achieve a perfectly aligned, durable floor on a DIY budget, giving you the confidence to handle every tool with precision. This guide breaks down the entire process into manageable steps, covering everything from subfloor requirements to the final perimeter cuts. We’ll strip away the industry jargon and focus on the practical techniques that ensure your floor looks professional and stays put for years. By the end, you’ll have a clear roadmap and the pride of a job well done.
Key Takeaways
- Learn why most flooring failures happen before the first tile is laid and how to master the non-negotiable Clean, Dry, Level rule for your subfloor.
- Discover exactly how to install carpet tiles using the professional grid method to prevent awkward gaps and ensure a perfectly centered finish.
- Identify the essential tools you need for a professional result, including why a heavy-duty metal straight edge is your most important investment.
- Master the overlap technique for precise cutting around corners and doorways to achieve a seamless, wall-to-wall fit on a DIY budget.
- Find out how to keep your floor looking pristine for years, including the simple process for replacing individual tiles if they become damaged.
Preparation: The Frank Truth About Subfloors
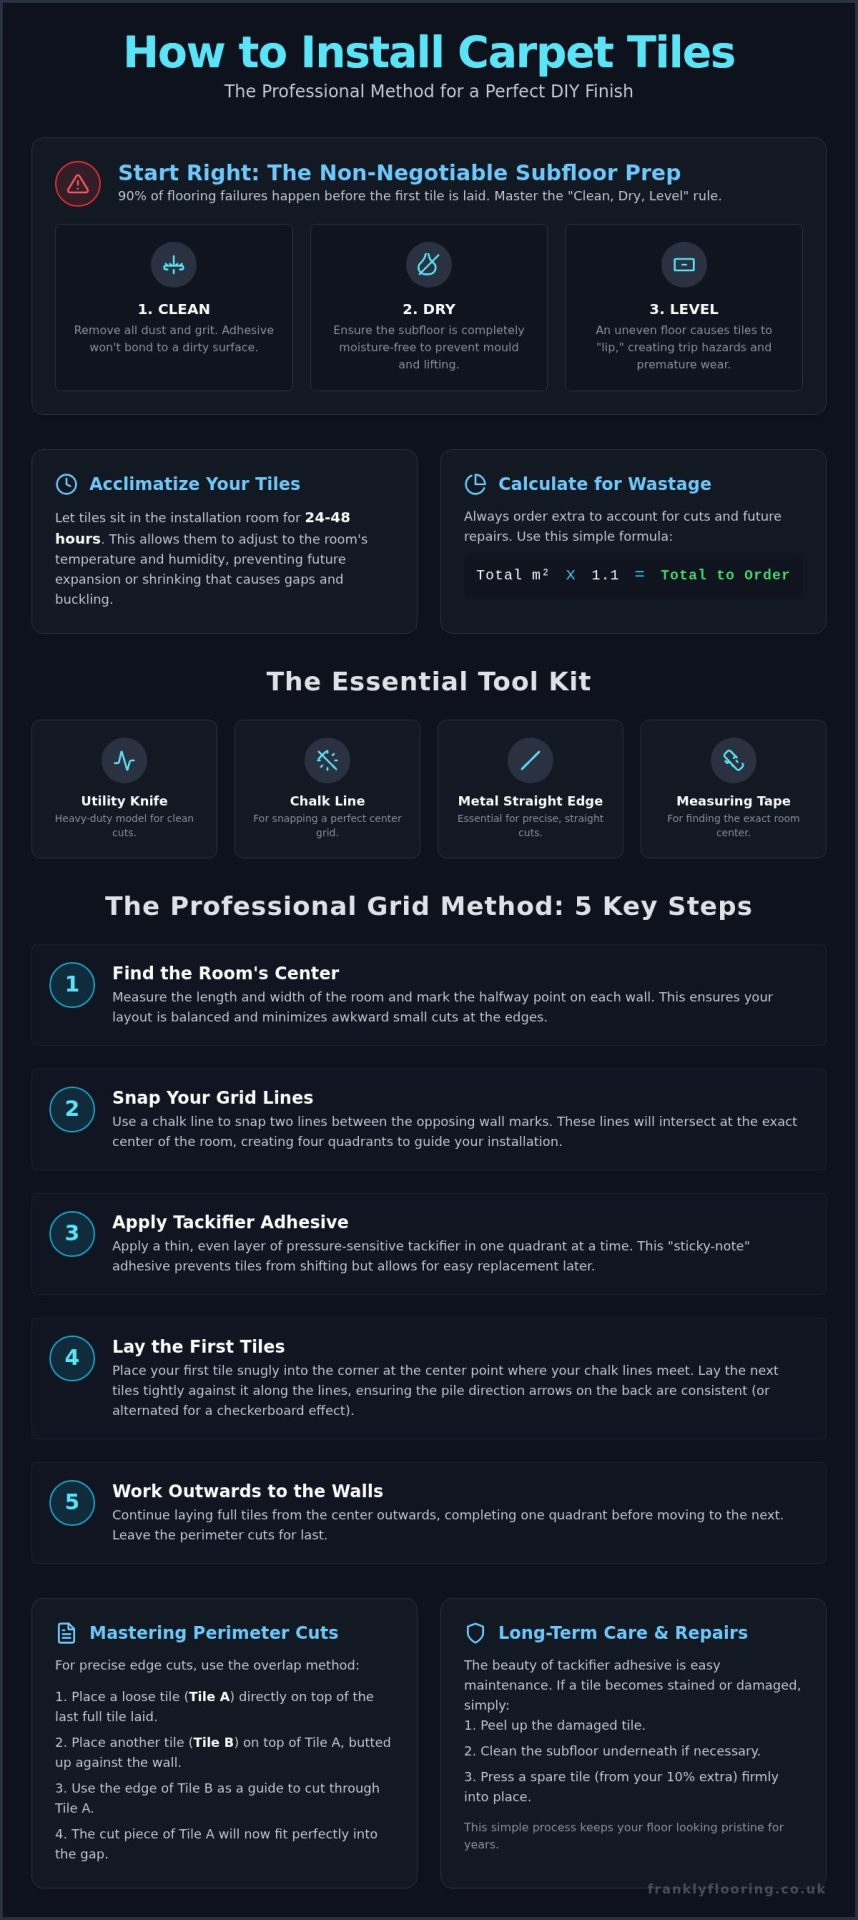
Ninety percent of flooring failures happen before you even open a box of tiles. It’s a harsh reality, but if the foundation is wrong, the finish will be too. When learning how to install carpet tiles, the prep work is where you win or lose. Most DIYers rush this stage, but we insist on the “Clean, Dry, Level” rule. It’s a non-negotiable starting point for any successful project. If there’s dust or grit, your tackifier adhesive won’t bond. If the floor is damp, you’ll eventually deal with mould or lifting tiles. If it’s uneven, those tiles will “lip,” creating tiny edges that catch your feet and wear down prematurely.
Give your tiles at least 24 to 48 hours to live in the room before you start fitting. They need time to adjust to the specific temperature and humidity of the space. It might seem like an annoying delay, but skipping this step often leads to tiles expanding or shrinking after they’re stuck down. This results in buckling or unsightly gaps that ruin the professional look you’re aiming for. While you wait, double-check your quantities. Calculating your 10% “wastage” buffer correctly is simple math that saves a lot of stress. Take your total square footage and multiply it by 1.1; this extra stock covers the inevitable off-cuts at the room’s edges and provides a few spare tiles for future repairs.
Dealing with Different Subfloor Types
Concrete floors are common but tricky. You must check for dampness and use a primer if the surface is particularly dusty or porous. If you’re working with floorboards, don’t try to lay tiles directly over the gaps. You’ll almost certainly need to over-board the area with 6mm plywood (SP101 flooring grade) to create a solid, flat base. When you’re figuring out how to install carpet tiles on different flooring types and installation requirements, remember that existing carpets must always be ripped up. You can’t achieve a stable finish on a soft, moving surface. However, some hard surfaces like vinyl or LVT can stay if they are perfectly level and securely bonded.
Measuring Up and Ordering
The “Frank” way to measure a room involves breaking the floor plan down into simple rectangles. Measure the maximum length and width of each section, multiply them, and sum the totals to find your total area. When ordering, pay close attention to batch numbers. This ensures colour consistency across your entire floor, as different dye lots can have subtle variations that become obvious once laid. If you’re still deciding on the best material for your room, take a look at our advice on Choosing the right carpet to find the best match for your lifestyle and budget.
The Essential Tool Kit: What You Actually Need
You don’t need a van full of specialized equipment to achieve a professional finish. Most of the tools required for learning how to install carpet tiles are likely already sitting in your shed or local hardware shop. The most critical item is a heavy-duty utility knife. Don’t settle for a flimsy craft blade; you need something with a comfortable grip that allows you to apply steady pressure. A dull edge won’t just make the job harder; it will fray the pile and lead to messy, visible seams that ruin the overall look.
Precision is the difference between a DIY project and a professional-grade floor. To get the best results, we recommend gathering these essentials before you begin:
- Heavy-duty metal straight edge: Plastic rulers will nick and warp under a blade, but a solid metal edge provides the stability needed for long, straight perimeter cuts.
- Chalk line: This is the simplest way to strike a perfect crosshair across your room for the initial grid.
- Spare blades: Plan to use a fresh edge for every 5 to 10 cuts to keep the backing from tearing.
- Measuring tape: Essential for finding the exact centre of your space.
While we focus on DIY simplicity, keeping an eye on official installation standards helps you understand the geometry behind a stable floor. These professional benchmarks ensure your tiles stay aligned and perform as expected over the long term.
Choosing the Right Adhesive
The professional’s secret for domestic projects is pressure-sensitive tackifier. Unlike permanent glue, tackifier creates a “sticky-note” effect. It holds the tile firmly in place to prevent lateral movement but allows you to peel an individual tile up later if it gets stained or worn. For very small rooms or temporary setups, heavy-duty double-sided carpet tile tape is a viable alternative. We strongly advise against using permanent adhesives or “contact cement” for home installs. These products make future replacements a nightmare and can permanently damage your subfloor. You can find all these reliable flooring accessories and adhesives in our online shop to save you a separate trip.
Safety and Precision Tools
Don’t underestimate the physical toll of being on your floor for several hours. Professional-grade knee pads are a small investment that your future self will certainly thank you for. Precision also depends on the state of your equipment. Finally, consider how your new floor meets other rooms. Using a carpet gripper in specific transition areas or doorways provides a secure edge where the tiles meet traditional broadloom or hard floors. This simple addition prevents tripping hazards and keeps the perimeter looking sharp and secure.
Step-by-Step: The Professional Grid Method
Many guides suggest starting in a corner, but that’s a mistake in most UK homes where walls are rarely perfectly square. If you start at one wall, you’ll likely end up with tiny, awkward slivers of tile at the opposite side. The professional approach to how to install carpet tiles always begins in the centre. By establishing a central crosshair, you ensure that any cuts needed at the perimeter are balanced and substantial. This method provides a symmetrical finish and hides the architectural quirks of older properties.
Once you’ve found your centre, strike your chalk lines to create a perfect crosshair. Before reaching for the adhesive, perform a “Dry Lay” test. Place a row of tiles from the centre point to the walls in both directions. If you find that the gap at the edge is less than half a tile wide, shift your entire centre line by half a tile’s width. This simple adjustment ensures your border tiles are large enough to stay securely in place and look intentional rather than accidental.
When you’re happy with the layout, it’s time for the tackifier. Apply it evenly across your first quadrant and wait. This is the most important rule: wait for the adhesive to turn from a milky white to completely clear. If you lay tiles while the glue is still wet, you’re essentially creating a permanent bond, which defeats the purpose of using tiles. Once it’s clear and tacky to the touch, you’re ready to start laying.
Finding the Perfect Centre Point
Measure the length and width of the room at their widest points. Mark the midpoint of each wall and snap a chalk line between them. Where they intersect is your starting point. Always check that your border tiles will be at least 15cm to 20cm wide. If the math doesn’t work out, nudge the starting point slightly. This preparation ensures you won’t be struggling with 2cm strips of carpet that refuse to stick or look right at the skirting boards.
Laying the Pyramid Pattern
Start at the intersection and build outwards using a “step” or pyramid formation. This technique prevents cumulative errors; if one tile is slightly off, you catch it immediately rather than five rows later. Look at the arrows on the back of each tile. For a “monolithic” look, point them all the same way. For a “quarter-turn” effect, rotate every second tile by 90 degrees. Press the edges together firmly but don’t force them. You want tight joins that look like a single piece of carpet without “peaking” at the seams. This is the frank secret to how to install carpet tiles with a finish that rivals a professional contractor’s work.
Cutting and Fitting: Managing Corners and Doorways
The main grid is the easy part. The perimeter is where the real craftsmanship shows. When you’re learning how to install carpet tiles, the edges are where most people lose their nerve. To get a clean edge, always cut from the back of the tile. Cutting through the pile from the front often results in a ragged, messy finish. By scoring the heavy bitumen or PVC backing first, you can snap the tile cleanly, leaving the carpet fibres intact and professional-looking. It’s a simple change in approach that makes a world of difference to the final result.
The Master Overlap Cut
We’ll let you in on the industry’s best-kept secret for perfect wall-to-wall fitting: the overlap technique. First, take the tile you want to cut and place it exactly on top of the last full tile you laid in the row. Then, take a third “template” tile and butt it firmly against the wall, letting it overlap the tile you’re about to cut. Mark a line on the middle tile where the template edge sits. When you cut along this line, the resulting piece will fit the gap between your last full tile and the wall perfectly. It’s a foolproof way to manage wonky UK walls without ever touching a tape measure.
Fitting Around Obstacles
Door architraves and radiator pipes require a bit more patience. Don’t guess these cuts; use a piece of card or paper to create a template of the shape first. Transfer this to the back of your tile, remembering to flip the orientation so your cut matches the front once the tile is turned over. For pipes, make a single “relief cut” from the edge of the tile to the centre of the pipe hole. This allows the tile to wrap around the obstacle seamlessly. Since perimeter tiles handle more foot traffic near doorways, secure them with a little extra tackifier to prevent any shifting over time. Mastering these tricky spots is a vital part of knowing how to install carpet tiles like a pro.
Transitions are the final piece of the puzzle. Where your new tiles meet another room, use high-quality door bars to create a safe, attractive bridge. This is especially important when moving between different floor heights or materials. If you’re ready to get started, you can browse our full range of carpet tiles and fitting accessories to ensure you have everything delivered to your door in one go.
Finishing Touches and Long-Term Care
The hard work is done, but the final five percent is what separates a DIY attempt from a professional-looking installation. Once you’ve finished learning how to install carpet tiles and the last perimeter piece is in place, your first task is a deep vacuum. Cutting tiles creates a surprising amount of loose fibre and bitumen dust. A thorough pass with the vacuum cleaner settles the pile and removes the debris that could otherwise migrate into the joins and prevent them from knitting together properly.
This is also the time for a final inspection. Walk the floor and look for “grinning” joins; this is where the pile has been trapped between tiles, making the seam visible. It’s a simple fix. Take a stiff brush or even just your thumb and run it along the seam to release the fibres. This allows the pile to knit together, making the individual tiles disappear into a seamless floor. To keep the floor looking even over the long term, try rotating tiles from heavy-traffic areas like doorways to quieter corners every year. This simple habit balances out the wear and tear across the entire room.
The real beauty of this flooring system is its modular nature. If a single tile suffers a spill that won’t budge or an accidental burn, you don’t have to live with the damage. Simply lift the affected tile, peel it away from the tackifier, and drop in a spare from your wastage buffer. It’s the most practical reason to master how to install carpet tiles yourself.
Cleaning and Maintenance
Your vacuum settings should match your tile type. For loop pile tiles, use the suction-only setting to prevent the beater bar from fuzzing the loops. For cut pile, a beater bar is actually helpful for agitating dirt out of the deeper fibres. If you deal with a spill, remember the golden rule: blot, don’t rub. Rubbing spreads the liquid and can damage the carpet’s texture permanently. For an annual refresh, consider a dry extraction cleaning system rather than a wet steam cleaner. Excessive water can sometimes affect the bitumen backing or the tackifier bond if the floor doesn’t dry quickly enough.
Why Quality Tiles Make the Difference
Success isn’t just about the fitting; it’s about the material. A higher pile weight typically indicates a denser, more durable product that can withstand years of foot traffic without flattening. While bitumen backing is the industry standard for stability and preventing the tiles from curling, felt-backed options can provide a softer feel underfoot and better sound dampening. To ensure your project stands the test of time, explore our range of durable carpet tiles to find the right balance of style and longevity for your home.
Step Into Your New Professional Floor
Mastering the grid and respecting the “Clean, Dry, Level” rule are the two biggest secrets to a floor that lasts. By now, you should feel confident in your ability to handle the subfloor prep, strike your chalk lines, and execute the perfect overlap cut for those tricky perimeters. Learning how to install carpet tiles is a practical skill that saves money without sacrificing the high-end finish your home deserves. It’s about precision over speed, and the results of a patient DIY project speak for themselves.
At Frankly Flooring, we bring 20+ years of flooring expertise to every product we sell. As a family-run business, we value integrity and want to ensure you have the right tools for a stress-free experience. We offer free UK-wide delivery on qualifying orders, making it easier than ever to get professional-grade materials at a DIY price point. When you’re ready to start your transformation, Shop our range of high-quality carpet tiles and accessories to get everything you need in one place. You’ve got the knowledge; now it’s time to build a floor you can be proud of.
Frequently Asked Questions
Do I need underlay for carpet tiles?
To be frank, you don’t need a separate underlay. Most quality carpet tiles are manufactured with a built-in, heavy-duty bitumen or PVC backing that provides all the stability and acoustic insulation required. Adding a soft underlay underneath would actually compromise the floor, making the tiles unstable and causing the edges to “lip” or buckle over time. Keeping the tiles directly on a solid subfloor ensures they stay flat and secure.
Can I lay carpet tiles over existing carpet?
You absolutely cannot lay carpet tiles over existing carpet. Old carpet is far too soft and creates a moving foundation that will cause your new tiles to shift, gap, and eventually fail. To learn how to install carpet tiles properly, you must remove all old floorcoverings and return to a solid subfloor. This provides the firm, level base needed for the tackifier to bond and the tiles to sit perfectly flush.
How do I know which way to lay the tiles?
Look at the back of your tiles for a printed arrow. These arrows indicate the direction of the pile. For a uniform, monolithic look, point every arrow in the same direction across the entire room. If you prefer a checkerboard effect, use the quarter-turn method by rotating every second tile 90 degrees. This choice significantly changes how light reflects off the floor and defines the final aesthetic of your space.
What is the best adhesive for carpet tiles on concrete?
A pressure-sensitive tackifier is the professional’s choice for concrete subfloors. It provides a sticky surface that prevents tiles from sliding horizontally but allows you to lift individual tiles for replacement. If the concrete is particularly porous or dusty, we recommend applying a primer first. This ensures the tackifier sits on the surface rather than soaking in, creating a reliable bond that keeps your floor stable for years to come.
Can I install carpet tiles in a bathroom or kitchen?
We don’t recommend installing carpet tiles in bathrooms or kitchens. These areas are prone to heavy spills and high humidity, which can damage the bitumen backing and cause the tackifier to fail. While carpet tiles are incredibly durable in offices or bedrooms, they aren’t waterproof. For wet rooms, we suggest looking at LVT or vinyl options, as these materials are specifically designed to handle moisture without the risk of mould.
How many carpet tiles do I need for a 4×4 metre room?
A 4×4 metre room covers 16 square metres. Since standard tiles are 50x50cm, you’ll need 4 tiles per square metre, totalling 64 tiles. However, you must include a 10% wastage buffer for cuts and perimeter fitting. For this specific room size, we recommend ordering 71 tiles. This ensures you have enough for the master overlap cuts and a few spares left over for any future repairs or accidental stains.
What happens if I cut a tile too short?
If you cut a tile too short, simply set it aside and start fresh. This is why a 10% wastage buffer is essential when learning how to install carpet tiles. Don’t be tempted to “patch” a short cut with a tiny strip of carpet; these small pieces rarely stay in place and look messy. You can often save the miscut tile for a smaller gap in a corner or cupboard later in the project.
How long does the adhesive take to dry before I can walk on it?
Tackifier adhesive generally takes between 20 and 40 minutes to turn from milky white to clear, which is when it’s ready for tiles. Once you’ve laid the tiles, you can walk on the floor immediately. However, we recommend waiting at least 24 hours before moving heavy furniture back into the room. This allows the adhesive to fully settle and ensures that no tiles shift under the weight of heavy wardrobes or desks.