Most people think the quality of a new lawn depends entirely on the turf itself, but the truth is that your garden’s success is buried three inches underground. If you’re worried about your DIY project ending up as a lumpy, puddle-filled mess, you’re not alone. It’s easy to feel overwhelmed by conflicting advice regarding aggregates and drainage layers. We believe in total candor when it comes to home improvement, which is why we’ve created this guide to show you the honest, professional method for how to lay artificial grass on soil so it stays flat and functional for years.
While the global artificial grass market is projected to reach $4.83 billion in 2026, the best results still come down to old-fashioned elbow grease and non-negotiable ground preparation. We promise to cut through the jargon and give you a clear understanding of the physical work involved. You’ll learn exactly how to excavate, grade, and compact your sub-base to achieve a professional-looking finish without the professional price tag. This guide walks you through the entire project lifecycle, from the first assessment to the final brush, ensuring your transition to a mud-free lawn is as smooth as the surface itself.
Key Takeaways
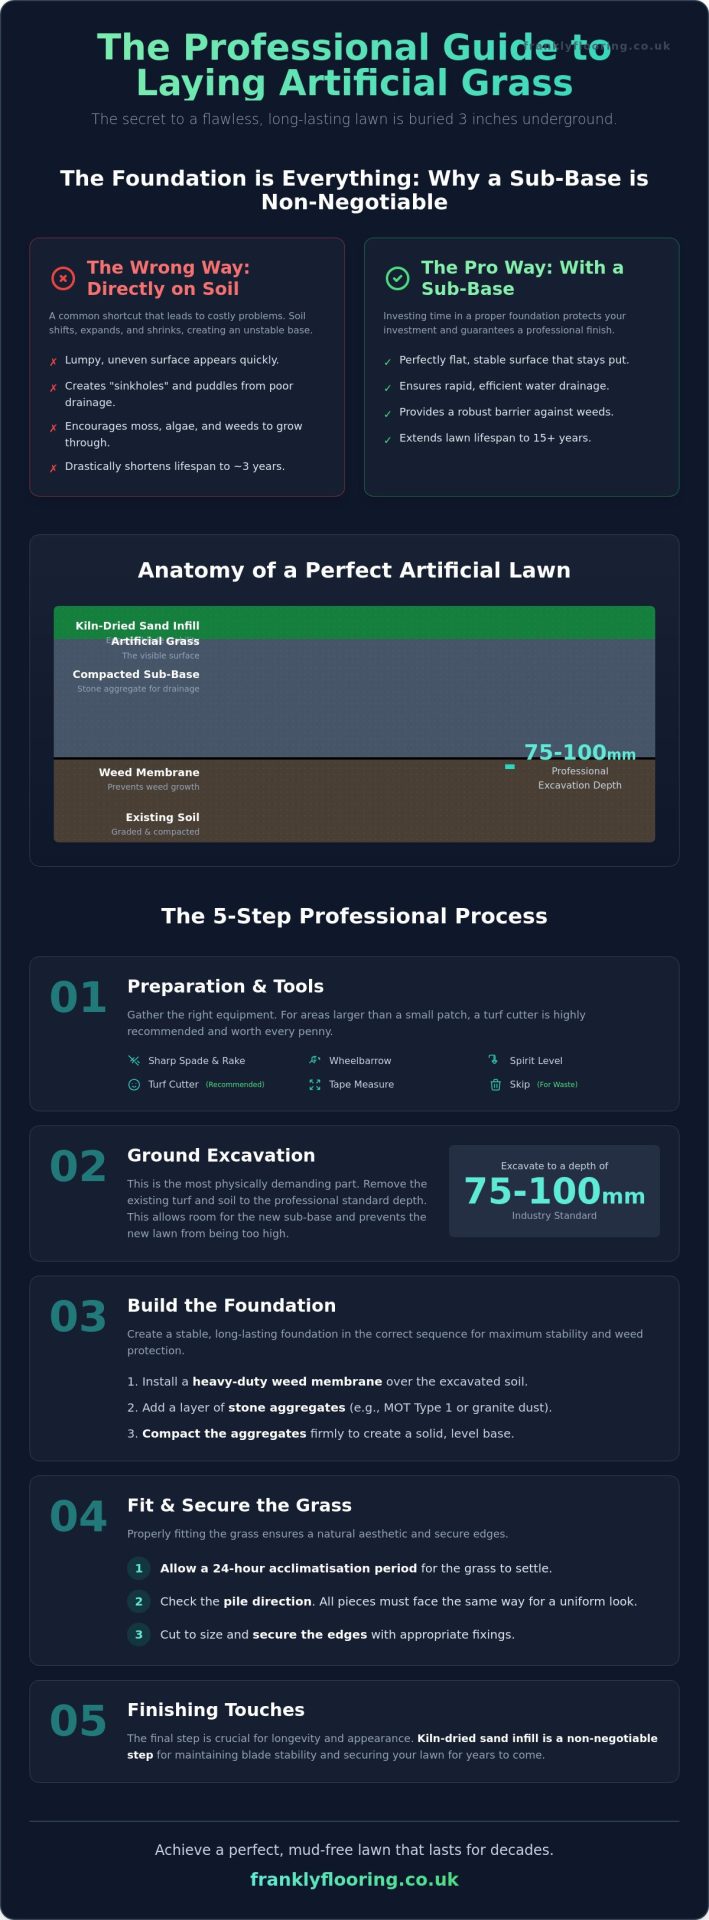
- Understand why laying turf directly onto bare dirt leads to drainage failures and how a proper sub-base prevents future sinkholes.
- Master the precise excavation process for how to lay artificial grass on soil, including why a 75mm to 100mm depth is the professional standard.
- Learn the correct sequence for installing heavy-duty weed membranes and stone aggregates to create a stable, long-lasting foundation.
- Discover the importance of the 24-hour acclimatisation period and how pile direction dictates the natural aesthetic of your finished garden.
- Identify why kiln-dried sand infill is a non-negotiable step for maintaining blade stability and securing your lawn for years to come.
The Frank Truth: Can You Lay Artificial Grass Directly on Soil?
If you’re looking for a quick shortcut, you might be tempted to roll your new lawn straight onto the dirt. Let’s be perfectly clear: you shouldn’t lay artificial grass directly onto bare soil. It’s a mistake that many homeowners make in an attempt to save a weekend of hard work, but it almost always ends in a costly redo. Soil is a dynamic, shifting substance. It expands when wet, shrinks when dry, and moves under the weight of foot traffic. When you’re researching how to lay artificial grass on soil, the most important lesson is that the soil itself is your enemy, not your foundation.
Looking back at the history of artificial turf, the product has evolved from basic plastic mats into sophisticated multi-layered systems. Modern grass is designed to be permeable and durable, but it relies on the ground beneath it to stay that way. In the UK, our weather plays a significant role in this process. A single heavy downpour can turn a bare-soil installation into a lumpy mud-pit as the water trapped under the backing has nowhere to go. This leads to “sinkholes” where the ground has washed away or compacted unevenly, leaving your lawn looking neglected and messy.
Here is the frank truth: skipping the sub-base saves you a few hours of digging today, but it will likely cost you thousands in replacement materials and professional remediation later. We’ve seen far too many people try to cut corners, only to find their low-maintenance garden has become a drainage nightmare within six months. To do this properly, you need to think of your lawn like a house; the bit you see is only as good as the foundation you can’t see.
What Happens to Grass Without a Sub-Base?
Without a proper sub-base, your garden will quickly lose its appeal. As the soil naturally settles and compacts over time, you’ll notice dips and ridges appearing across the surface. This isn’t just an aesthetic issue. These low spots collect water, creating perfect conditions for moss and algae to thrive on the pile. Even worse, while high-quality backing is tough, it isn’t a substitute for a weed barrier. Without a foundation and membrane, aggressive weeds can eventually find their way through the drainage holes, ruining the look and structural integrity of the grass.
The Benefits of a Proper Foundation
Investing the time in a solid base ensures a perfectly flat, professional-looking finish that stays that way for decades. A compacted stone foundation acts as a stable anchor point for your fixings, meaning your edges won’t lift or curl over time. It also facilitates rapid drainage, keeping your lawn dry and usable even after a typical British storm. Ultimately, understanding how to lay artificial grass on soil correctly protects your investment. It’s the difference between a lawn that lasts three years and one that stays pristine for fifteen.
Preparation: Tools and Ground Excavation
Preparation is the most physically demanding part of learning how to lay artificial grass on soil. It’s the stage where most DIY projects either succeed or fail based on the effort put into the ground. To get started, you’ll need a specific kit of tools to ensure the job is done right:
- A sharp spade and a heavy-duty rake
- A turf cutter (highly recommended for larger areas)
- A sturdy wheelbarrow for moving tonnes of soil
- A spirit level and a tape measure
For anything larger than a small patch, we strongly recommend hiring a turf cutter. It’s the difference between a clean, uniform dig and a back-breaking struggle with a spade. While you can find various methods online, such as Bob Vila’s step-by-step guide, the fundamentals of ground clearance remain consistent: you must remove the old to make room for the new.
The industry standard for excavation is between 75mm and 100mm. This depth is the secret to how to lay artificial grass on soil that doesn’t subside or become uneven over time. It allows enough room for your sub-base and the turf itself without creating a trip hazard. If you’re digging out a standard 40-square-metre lawn, you’re looking at several tonnes of waste. This is where a skip becomes your best friend. Trying to bag up that much soil is a recipe for exhaustion. Protecting your existing features is just as vital as the dig. Cover your patios and paths with plastic sheeting or plywood. Soil has a habit of staining stone, and a little foresight saves hours of scrubbing later.
Removing the Existing Turf
A turf cutter is worth every penny of its hire fee. It slices through the grass at a consistent depth, making it easy to roll up and move. If you use a spade, you’ll likely end up with an uneven base that requires more aggregate to level out. Don’t just skim the surface. Perennial weeds and grass roots can be resilient. Removing the top 100mm of soil usually takes care of most root systems, but keep an eye out for deep-rooted invaders like dandelions. You can compost old turf if you have the space, but for most residential projects, a skip is the only practical way to dispose of it responsibly.
Creating a Solid Perimeter
Think of your edging as the frame for a picture. It keeps the sub-base aggregates contained and provides a solid point to secure the grass. Whether you choose treated timber, brick, or composite strips, the goal is the same. Set the top of the edging roughly 10mm to 20mm below the surrounding path level. This ensures the grass sits flush once it’s installed. It prevents the base material from washing away during heavy rain. Before you start digging, ensure you have your artificial grass on-site so you can measure your edging heights accurately against the specific pile depth of your product.
Building the Foundation: Sub-Base and Weed Protection
Once you’ve cleared the site, the real technical work begins. Creating a foundation is the most critical stage in how to lay artificial grass on soil because it dictates how your lawn will look in five years, not just five days. The first step is to roll out a heavy-duty weed membrane across the excavated area. This isn’t just about stopping dandelions; it prevents the sub-base aggregates from mixing with the soil below, which maintains the structural integrity of your lawn. Overlap the edges of the membrane by at least 100mm to ensure no gaps are left for opportunistic growth.
Next comes the primary sub-base. You should fill the majority of your excavation with MOT Type 1 or a similar crushed stone. This layer provides the load-bearing strength needed to prevent the “sinkholes” we discussed earlier. After spreading the stone, you must use a vibrating plate, often called a wacker plate, to compact it. Don’t attempt to do this by hand or with a garden roller; the pressure from a mechanical plate is necessary to remove air pockets. We recommend compacting in “lifts” of 50mm at a time to ensure the base is solid from top to bottom.
The final step in the foundation process is the “screed” layer. This is a thinner, finer layer of aggregate that allows you to create a perfectly smooth surface. While some people use sharp sand, we prefer a grittier material that offers better stability. Once this layer is spread and levelled, give it one final pass with the wacker plate. The result should be a surface so firm that you can walk on it without leaving footprints.
Choosing the Right Aggregates
In the UK, MOT Type 1 is essential because it’s designed to withstand our damp climate and varying temperatures. For the levelling layer, we strongly advise using Grano dust (6mm to dust) rather than standard sharp sand. Grano dust binds together more effectively, creating a surface that feels like concrete but drains like a sieve. Whatever you do, avoid building sand. It’s too soft, retains far too much moisture, and will shift underfoot, leading to an uneven, “squishy” finish that ruins the professional look you’re aiming for.
Solving Drainage Issues in Clay Soil
If your garden is prone to puddling, you likely have heavy clay soil. You can test this by digging a small hole and filling it with water; if it takes more than an hour to drain, your soil needs help. In these cases, we suggest increasing your excavation depth to 125mm or 150mm to allow for a thicker layer of MOT Type 1. To ensure water moves away from your home and doesn’t sit beneath the turf, you should aim for a “fall” or gradient of 1 in 100 toward a suitable drainage point or flower bed.
Fitting and Securing Your Artificial Grass
Once your foundation is solid and screeded, you’ve reached the most rewarding stage of the project. Roll out your turf and step back. It’s tempting to start pinning it down immediately, but you must let the grass acclimatise for at least 24 hours. This allows the backing to relax and any creases from the roll to disappear. Skipping this wait is a common mistake when learning how to lay artificial grass on soil; if you secure it while it’s still tight, it will likely ripple as it warms up in the sun.
Pay close attention to the pile direction. This is an essential part of how to lay artificial grass on soil that looks professional. Artificial grass has a natural ‘lean’. For the best look, ensure the pile is leaning towards the main viewing point, which is usually your house or patio. This makes the colour look deeper and more natural. Once you’re happy with the position, trim the edges using a sharp utility knife. Always cut from the back of the turf, slicing between the stitch lines to avoid damaging the fibres on the top.
How to Achieve Invisible Joins
If your garden is wider than four metres, you’ll likely need a join. This is where many DIY jobs fall short. To make a seam disappear, you must align the pile direction of both pieces perfectly. Trim about three ‘stitches’ off the edge of each roll to ensure you’re joining two clean, flat sections. Use specialist joining tape and a weather-resistant adhesive. Apply the glue in a zigzag pattern on the tape, then slowly fold the grass edges together. The secret trick is ‘ruffling’ the fibres with your fingers along the seam to blend them together before the glue sets.
Cutting Around Obstacles
Handling curves and trees requires patience. Use the ‘relief cut’ method: make small vertical slices in the backing at the point where the grass meets the curve. This allows the material to sit flat against the edge without bunching up. While carpet grippers are the standard for indoor projects, the same ‘measure twice, cut once’ rule is vital here. If you cut too much, there’s no going back. Secure the perimeter every 150mm using galvanised pins or a bead of specialist adhesive along your timber or brick edging.
Ready to transform your garden? You can view our range of high-quality artificial grass to find the perfect pile height for your space.
Finishing Touches and Long-Term Maintenance
The final stage of how to lay artificial grass on soil is often the most overlooked, yet it’s what separates a professional installation from a floppy, temporary mat. Once your grass is pinned and the edges are secure, you must apply kiln-dried sand. This isn’t just a suggestion; it’s a structural requirement. We’ll be direct: a lawn without sand isn’t a finished lawn. Without this infill, your grass lacks the ballast needed to stay in place, and the fibres will eventually flatten under the weight of foot traffic.
Spread the sand evenly across the surface using a drop spreader or by hand, then use a stiff broom to brush vigorously against the pile. This action pushes the sand down to the base of the fibres. It creates a weighted layer that prevents the grass from “creeping” or rippling when the UK sun occasionally warms the backing. It’s the final piece of the puzzle in how to lay artificial grass on soil that looks as good in three years as it does on the day you finish the dig.
Brushing also acts as the final “grooming” for your garden. By working the broom against the grain, you’ll see the pile lift and transform from a flat roll into a lush, realistic lawn. This process takes some physical effort, but the result is a surface that feels firm and stable underfoot, much like a well-maintained natural turf without the mud.
Why Infill Matters
Kiln-dried sand does more than just add weight. It acts as a protective barrier for the backing, shielding it from UV damage that can cause the material to become brittle over time. By sitting at the base of the blades, the sand also forces the fibres to stand upright, giving you that lush, freshly mown aesthetic. If you skip this, your lawn will likely look tired and matted within a single season. The sand also helps with drainage by keeping the drainage holes open and preventing the backing from sealing against the sub-base.
Annual Maintenance Checklist
While your new lawn is low-maintenance, it isn’t “no-maintenance.” Organic debris like leaves and twigs must be removed regularly. If left to rot, they create a layer of compost that allows weeds to take root in the pile itself. We recommend a quick sweep once a month to keep the surface clear.
- Check the perimeter every spring for any lifting edges and re-secure with pins if necessary.
- Plan to top up your sand infill every 12 to 18 months to maintain stability and pile height.
- For pet owners, rinse the area frequently with water and a mild, pet-safe detergent to prevent odours from lingering in the drainage layer.
Ready to Start?
Now that you understand the full project lifecycle, you can confidently choose the right materials for your home. Check out our full range of artificial grass options to find a style that fits your garden’s character. Need tools? See our guide to essential flooring accessories to ensure you have everything needed for a stress-free installation from start to finish.
Ready to Build Your Perfect Lawn?
Transforming a muddy patch into a pristine, green space is entirely achievable when you follow the right steps. We’ve shown you that the secret to how to lay artificial grass on soil isn’t in the turf itself, but in the invisible foundation of MOT Type 1 and Grano dust. By taking the time to excavate properly and allowing your grass to acclimatise, you’re investing in a garden that will remain flat and functional for years to come. Don’t forget that the kiln-dried sand infill is the final, non-negotiable step for a stable finish.
As a family-run business with over 20 years of flooring expertise, we pride ourselves on providing the same transparent, no-nonsense advice we’d give our own neighbours. You don’t need to be a professional to get professional results; you just need the right materials and a commitment to not cutting corners. We make the process even simpler by offering national UK delivery on all our products and accessories.
Browse our range of high-quality Artificial Grass and get it delivered nationwide. Your mud-free garden is just a few steps away. Grab your spade and get started today.
Frequently Asked Questions
Can I lay artificial grass on top of my existing real grass?
No, you should never lay artificial turf directly over living grass. The existing lawn will die and rot beneath the new surface, leading to a foul smell and a lumpy, unstable finish as the organic matter decomposes. You must excavate the area to a depth of at least 75mm to create space for a proper stone sub-base that ensures drainage and stability.
How long does it take for artificial grass to settle on soil?
You should let the grass roll out and “breathe” for 24 hours before you start cutting or pinning it. This acclimatisation period allows the backing to relax and any shipping creases to disappear. Once the installation is finished and the sand infill is applied, the lawn is ready for foot traffic and furniture immediately.
Does artificial grass get too hot in the summer?
Synthetic fibres do absorb more heat than natural grass and can feel warm to the touch during a heatwave. It doesn’t become dangerously hot, but it can be uncomfortable for bare feet on the hottest days. You can quickly bring the temperature down with a light spray from a garden hose, which cools the fibres and the sand infill instantly.
Is artificial grass on soil safe for dogs and other pets?
It is perfectly safe for pets as long as you follow the professional method for how to lay artificial grass on soil with a permeable sub-base. Using MOT Type 1 and Grano dust ensures that liquids drain away quickly into the earth. This prevents puddles and odours from building up, provided you rinse the area regularly with water and a mild, pet-safe cleaner.
How do I stop weeds from growing through my fake grass?
The best defence is a heavy-duty weed membrane installed at the base of your excavation. This stops weeds from pushing up through the soil and into the turf backing. You should also keep the surface clear of leaves and organic debris. If seeds land on top of the pile and germinate, they are easy to pull out because they can’t establish deep roots.
Do I need a special type of sand for the infill?
Yes, you must use kiln-dried sand for the final stage of the installation. Regular building sand or sharp sand is too abrasive and contains moisture that makes it clump together. Kiln-dried sand is fine and completely dry, which allows it to fall deep between the blades to weight the lawn down and keep the fibres standing upright for years.
Can I install artificial grass on a sloped garden?
You can install artificial turf on a slope, and it’s often a practical solution for steep banks that are difficult to mow. The key is ensuring the timber or brick edging is securely anchored to prevent the sub-base from shifting. You may also need to use more galvanised pins along the top of the slope to ensure the backing doesn’t pull or sag over time.
How many years will an artificial lawn last if installed correctly?
A well-installed lawn typically lasts between 12 and 15 years depending on the amount of foot traffic it receives. The longevity of your garden depends entirely on how to lay artificial grass on soil with a solid, compacted foundation. If you invest the time in the ground preparation and maintain the sand infill, your lawn will remain flat and realistic for over a decade.