
What if that “24dB reduction” printed on your underlay packaging doesn’t actually mean your home will be 24dB quieter? It’s a common trap in the UK market, where confusing technical jargon like Delta Lw often hides the reality of how a product performs in a real room. Most homeowners we speak to are simply tired of hearing heavy footsteps from the kids upstairs or worrying about noisy neighbours. You want a solution that works, but the fear of buying a soundproof flooring underlay that’s too thick for your new LVT or fails to meet strict Part E Building Regulations is very real.
We believe in giving you the straight facts without the high-pressure sales tactics. This guide cuts through the noise to show you exactly how to choose the right underlay for your specific floor type and environment. We’ll explain the 2026 standards for impact sound, why compressive strength is vital for your floor joints, and how to ensure your home finally gets the peace it deserves. By the end, you’ll have the confidence to select a high-performance material that fits your budget and your building’s requirements perfectly.
Key Takeaways
- Distinguish between impact and airborne noise to ensure you’re buying a material that actually solves your specific sound problem.
- Learn how to select a soundproof flooring underlay with the correct density to prevent damaging the delicate click-lock joints of LVT and laminate.
- Decipher confusing dB ratings and “Delta Lw” figures to avoid overpaying for performance that doesn’t work in real-world UK home environments.
- Identify the essential subfloor preparation steps and perimeter sealing techniques required to meet UK Building Regulations Part E for flats.
What Is Soundproof Flooring Underlay and Do You Really Need It?
Think of soundproof flooring underlay as a high-performance shock absorber for your home. While a standard thermal underlay focuses on keeping your toes warm, an acoustic version is engineered specifically to absorb kinetic energy. These materials rely on the foundational principles of soundproofing, such as damping and decoupling, to stop vibrations from turning into noise. By placing a dense barrier between your floorboards and the subfloor, you effectively break the path that sound takes as it travels through your building’s structure.
For many UK homeowners, this isn’t just a luxury upgrade; it’s a necessity. If you live in a flat or a converted apartment, you’re likely bound by Approved Document E of the Building Regulations, which sets strict limits on impact noise. Even in a detached house, it’s often the most cost-effective way to quieten a home office or a nursery. It’s far cheaper and less disruptive to lay a high-quality acoustic mat during a floor renovation than it is to retro-fit soundproofing to the ceilings below later on.
The “Frank” Truth About Underlay Functions
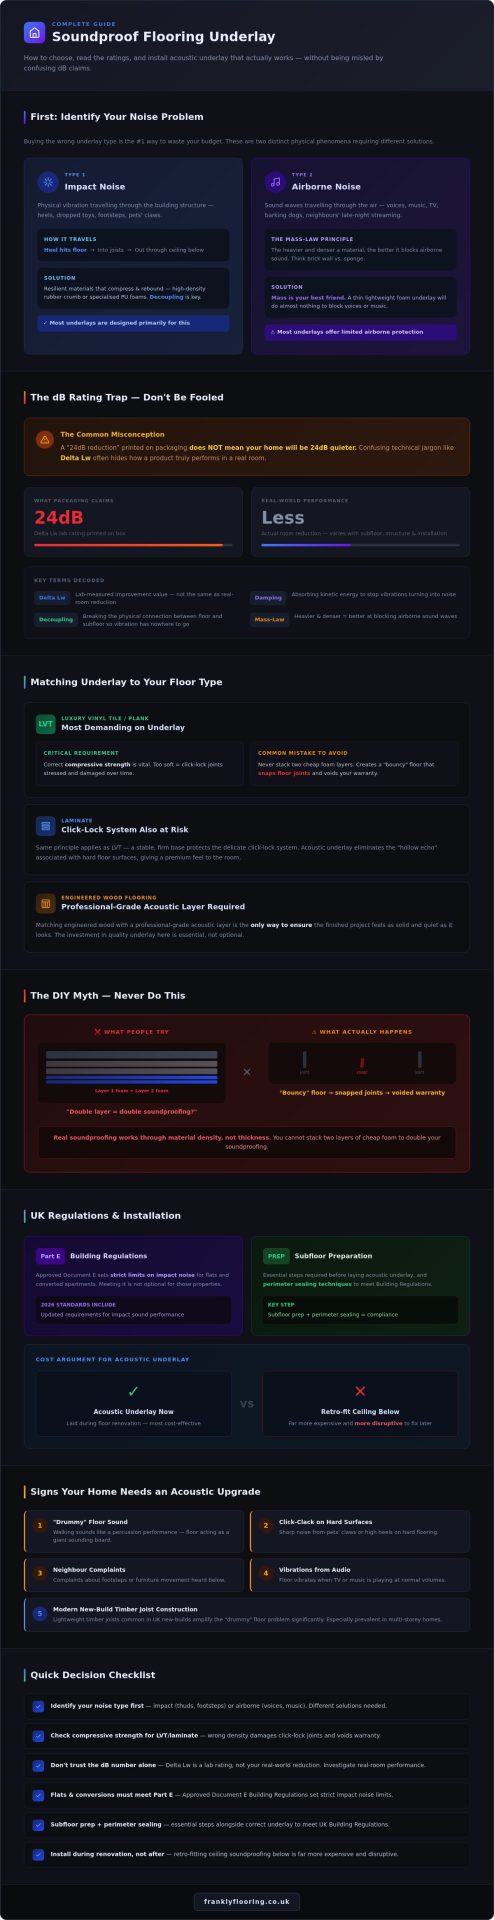
Let’s be candid about a common DIY myth: you cannot simply stack two layers of cheap foam to double your soundproofing. Doing this creates a “bouncy” floor that will eventually snap your floor joints and void your warranty. Real soundproof flooring underlay works through material density, not just thickness. It provides a stable, firm base that protects the delicate click-lock systems on your LVT or laminate. Beyond just noise reduction, it adds a premium feel to the room by eliminating that thin, “hollow” echo often associated with hard floor surfaces.
Signs Your Home Needs an Acoustic Upgrade
Is your floor “drummy”? If walking across the room sounds like a percussion performance, your floor is likely acting as a giant sounding board. This is a frequent complaint in modern UK new-builds where lightweight timber joists are common. You might also notice:
- The sharp “click-clack” of pets’ claws or high heels on hard surfaces.
- Complaints from neighbours about footsteps or furniture movement.
- Vibrations felt in the floor when the TV or music is playing.
If you’re investing in engineered wood flooring, matching it with a professional-grade acoustic layer is the only way to ensure the finished project feels as solid and quiet as it looks.
Impact vs. Airborne Noise: Which Problem Are You Solving?
Most people go shopping for a soundproof flooring underlay because they want “quiet.” But quiet is a broad term. To get the result you’re after, you first need to identify the enemy. Is it the sharp “thump-thump” of footsteps from above, or is it the muffled sound of a neighbour’s late-night Netflix binge? These are two distinct physical phenomena. They require different material properties to solve, and buying the wrong one is a quick way to waste your budget.
Impact sound is the physical vibration of the building structure. When a heel hits a laminate floor or a child drops a toy, it sends a pulse of energy through the floorboards, into the joists, and out through the ceiling below. This is where most underlays shine. By using resilient materials, you create a “spring” that absorbs that energy before it can travel. Scientific impact sound insulation testing shows that decoupling the floor from the subfloor is the most effective way to drop these decibel levels. It’s about breaking the physical connection so the vibration has nowhere to go.
Airborne noise is different. It consists of sound waves travelling through the air, like voices, music, or a television. To stop these, you need mass. Think of it like trying to stop a breeze with a sponge versus a brick wall. A thin, lightweight foam underlay will do almost nothing to block a barking dog or a loud conversation. This brings us to the “Mass-Law” principle. In acoustics, the heavier and denser a material is, the better it is at blocking airborne sound. If you’re serious about stopping voices, weight is your best friend.
Stopping the Thump: Solutions for Impact Noise
Impact noise is the number one complaint in multi-storey UK homes, especially in older conversions. Impact sound is the physical vibration of the building structure. To fix it, you need materials that can compress and rebound, such as high-density rubber crumb or specialized PU foams. These act as a buffer, ensuring that the kinetic energy of a footfall doesn’t turn into a structural vibration. If your main goal is peace from the flat above, focusing on the Delta Lw rating is your best bet. You can browse our range of underlay to find options specifically designed for high impact reduction.
Blocking the Chat: Can Underlay Help with Airborne Noise?
Here is the “Frank” truth: underlay alone is rarely a total solution for airborne noise. If you can hear your neighbour’s entire phone conversation, a standard 3mm underlay won’t make it disappear. You have to manage your expectations here. However, you can make a significant dent by choosing products that incorporate mass-loaded vinyl (MLV) or heavy mineral-loaded layers. These add the physical weight necessary to dampen sound waves. While they’re more expensive and heavier to handle, they’re the only real option if “blocking the chat” is your priority.
Matching Underlay to Your Floor Type: LVT, Wood, and Carpet
Choosing a soundproof flooring underlay is not a one-size-fits-all task. If you pick a product based solely on its decibel rating without considering your floor material, you risk more than just a noisy room; you could actually ruin your new floor. Different coverings have unique mechanical needs. A soft, thick underlay that feels great under a carpet will cause the delicate click-joints of an LVT floor to snap within weeks. Matching the material density to the floor type is the only way to ensure longevity and compliance with UK Building Regulations Approved Document E.
Acoustic Underlay for LVT and Vinyl
When you’re dealing with LVT flooring, thickness is your enemy. Most manufacturers specify a maximum underlay thickness of just 1.0mm to 1.5mm. Because LVT is thin and flexible, it requires an underlay with extreme compressive strength (CS). We recommend looking for a CS rating of at least 400 kPa. This ensures the underlay doesn’t compress under the weight of furniture, which prevents the “bouncing” effect that destroys locking systems. A high-density, low-profile acoustic underlay can still provide a respectable 17dB to 21dB impact reduction without compromising the floor’s structural integrity.
The Best Options for Wood and Laminate
Timber-based floors present a different challenge: the “drummy” echo. For engineered wood flooring, rubber crumb is often the gold standard. It’s incredibly dense, heavy, and does a fantastic job of managing the natural expansion and contraction of the wood. If you’re installing laminate flooring, a high-density foam with an integrated vapour barrier is usually the most cost-effective choice. It kills that sharp, “tinny” sound of footsteps while protecting the boards from subfloor moisture. Just remember to leave your expansion gaps clear; if the wood touches the skirting, sound vibrations will bypass the underlay entirely.
Luxury Soundproofing for Carpets
If your goal is total silence, carpet is your best ally. It’s the only material that can achieve impact reductions of 34dB to 44dB. High-density PU foam is the king here. Here’s a “Frank” tip: don’t just look at the thickness in millimetres. Check the density in kg/m³. A 10mm underlay with a high density will outperform an 11mm “budget” version every time. It acts as a secondary sound absorber, trapping noise within its cellular structure and providing a level of comfort that makes the room feel significantly more premium.
How to Read Decibel (dB) Ratings Without Being Fooled
We see it all the time: a product claiming “up to 40dB reduction” as if it’s a magic silence button. In reality, decibel ratings are one of the most misunderstood parts of buying a soundproof flooring underlay. To avoid wasting money, you need to distinguish between Delta Lw ($Delta L_w$) and Rw. Delta Lw measures the improvement in impact sound, like footsteps. Rw measures the reduction in airborne sound, such as speech. Most underlays are tested primarily for impact, and that big number on the front of the pack rarely applies to the noisy neighbour’s TV.
The biggest trap for homeowners is the logarithmic nature of sound. Unlike a ruler where 10cm is twice as long as 5cm, decibels don’t work linearly. According to the Institute of Acoustics UK, a 3dB decrease represents a 50% reduction in acoustic sound energy. However, it takes a 10dB drop for the human ear to perceive the sound as being roughly half as loud. This means a product offering a 21dB reduction is significantly better than one offering 18dB, even though the numbers look similar on paper. Decibel ratings are measured in laboratory conditions and may vary by 5-10dB in a real UK home.
Understanding Building Regulations (Part E)
If you own a flat or are converting a property, “Part E” isn’t just a recommendation; it’s a legal requirement. Under Approved Document E, purpose-built new flats must achieve a weighted standardised impact sound level ($L’_{nT,w}$) of ≤ 62dB. For conversions, the limit is ≤ 64dB. Remember, lower numbers are better here because they represent the sound left over. Always keep the technical data sheet for your underlay. If a building inspector or a disgruntled neighbour questions your flooring, that piece of paper is your only proof of compliance.
The Frank Guide to “Up To” Marketing
Manufacturers often conduct tests on massive, 150mm thick concrete slabs to get the highest possible “up to” figures. If your home has traditional timber joists, the underlay will have to work much harder to achieve the same results. You should focus on the “Improvement” rating ($Delta L_w$) rather than the total system performance. Be wary of any brand that promises total silence. Our goal is to provide frank advice so you can choose an underlay that delivers real-world results on your specific subfloor.
Installation Tips: Getting the Most from Your Soundproof Underlay
You’ve done the hard work of choosing the right soundproof flooring underlay, but the material is only half the story. In the world of acoustics, a poor installation can turn a high-spec product into an expensive mistake. The golden rule is simple: if air can get through, sound can get through. Think of your underlay as a waterproof seal; even a tiny gap allows vibrations to leak through, significantly reducing the decibel reduction you’ve paid for.
Before you start rolling out your material, your subfloor must be spotless. Any grit, old adhesive, or uneven patches will create air pockets that act as miniature echo chambers. If you’re laying over concrete, ensure it’s level to within 3mm over a 2-metre span. For timber subfloors, secure any loose boards to stop them from squeaking, as no amount of underlay can fix a noisy joist. Once the floor is prepped, you’re ready to create a truly decoupled surface.
A Step-by-Step DIY Approach
When laying your underlay, check the manufacturer’s instructions for which side faces down. Often, a foil side or a specific textured surface is designed to face the subfloor to manage moisture or grip. Unlike carpet underlay, you must never overlap the seams. Overlapping creates a ridge that will eventually snap the joints of your LVT or laminate. Instead, use “butt joints” where the edges meet precisely without crossing.
Taping these seams is non-negotiable. Use a high-quality joint tape to seal every single join, creating a continuous, airtight sound barrier. When you reach door frames or radiators, don’t just cut roughly. Take the time to trim the material so it fits snugly. Any gap larger than a few millimetres is a “sound chimney” that lets noise bypass your insulation entirely.
Common Mistakes That Ruin Soundproofing
The most frequent error we see is “flanking noise.” This happens when the flooring touches the skirting boards or walls, allowing vibrations to travel directly into the building’s structure. To prevent this, use perimeter flanking strips or turn the underlay up the wall by about 10-15mm. You can hide this behind the skirting board later. It’s a small detail that makes a massive difference in meeting Part E requirements.
Another “Frank” warning: never nail or screw through your acoustic underlay. This creates a “sound bridge,” a mechanical connection that carries vibrations straight to the subfloor, rendering the underlay useless. Similarly, avoid using standard hard-setting adhesives that can bridge the gap. Use the recommended flexible acoustic sealant around the edges to ensure your floor remains floating and isolated. This attention to detail ensures your home stays as quiet as the technical data sheet promised.
Building a Quieter Home for the Long Term
Building a quieter home shouldn’t be a technical headache. By now, you should understand that the right soundproof flooring underlay is about more than just a high decibel number on a packet. It’s about matching material density to your specific floor type to protect those delicate LVT joints and ensuring an airtight seal during installation to stop noise leaks. Whether you’re aiming for Part E compliance in a flat or simply want to stop footsteps from echoing downstairs, the material you choose is a foundational element of your home’s comfort.
At Frankly Flooring, we leverage 20 years of expertise to provide the candid, no-nonsense advice you need. We prioritize your long-term satisfaction over quick sales, ensuring you have the right accessories to match your project. You can browse our range of high-performance underlays at Frankly Flooring and take advantage of our reliable national UK delivery. Investing in a quality acoustic barrier today means enjoying a peaceful, structurally sound home for years to come. You have the facts; now it’s time to create the quiet environment you deserve.
Frequently Asked Questions
Does thicker underlay mean better soundproofing?
Thicker does not necessarily mean better. While thickness can help with comfort, soundproofing relies on density and the material’s ability to dampen vibrations. A 3mm high-density rubber underlay often outperforms a 10mm low-density foam. For LVT, using an underlay that is too thick can actually cause the joints to flex and eventually snap. You should always prioritize the decibel (dB) improvement rating over the physical thickness of the product.
Can I lay soundproof underlay over my existing flooring?
It’s best to avoid laying new underlay over existing flooring. For a soundproof flooring underlay to work effectively, it needs to sit on a flat, stable subfloor. Laying it over old carpet or uneven vinyl creates too much “bounce,” which leads to floor failure. You should always strip the room back to the concrete or floorboards. This ensures the underlay can create a proper acoustic seal without any trapped debris causing air pockets.
What is the best underlay for noisy neighbours downstairs?
If you are trying to block noise from neighbours downstairs, you need a material that prioritizes impact reduction. High-density rubber crumb or heavy PU foam underlays are the most effective options. These materials absorb the energy from your footsteps before it can vibrate through the floor structure. However, remember that underlay is primarily designed to stop your noise from reaching them. It has a much smaller effect on noise coming up from below.
Is rubber or foam underlay better for soundproofing?
Both have their place depending on your floor covering. Rubber underlay is incredibly dense and heavy, making it the superior choice for engineered wood and laminate to stop that “hollow” sound. High-density PU foam is usually better for carpets because it offers a mix of acoustic absorption and underfoot comfort. For LVT, you need a specialized, very thin high-density material that can withstand high pressure without compressing too much.
How much does soundproof flooring underlay typically cost?
The cost depends entirely on the material density and the level of sound reduction you require. Standard acoustic foams are the most affordable option for basic domestic use. High-performance rubber crumb or multi-layer composite systems sit at the premium end of the market because they contain more mass. While performance products require a higher initial investment, they often provide a more noticeable reduction in noise and better protection for your floor joints over time.
Do I need a damp proof membrane (DPM) with my acoustic underlay?
If you are installing over a concrete subfloor, a damp proof membrane is essential to protect your flooring from moisture. Many modern acoustic underlays now come with an integrated DPM and silver foil backing. This saves you the hassle of laying a separate polythene sheet. If your chosen underlay doesn’t have an integrated barrier, you must lay a dedicated DPM first to prevent damp from warping your wood or laminate boards.
Will soundproof underlay help with my loud TV or music?
A soundproof flooring underlay provides very limited help with airborne sounds like loud music or TV. These sounds consist of waves travelling through the air rather than vibrations through the floor. To block them, you need significant mass. While a heavy, mineral-loaded underlay can help slightly, you would typically need a more comprehensive soundproofing system, including acoustic mineral wool between joists or sound-rated plasterboard on the ceiling below, to solve serious airborne noise issues.
Can I use two layers of underlay for extra soundproofing?
You should never use two layers of underlay. While it might seem like a logical way to get double the soundproofing, it creates an unstable, “spongy” surface. This excess movement puts immense stress on the locking mechanisms of laminate and LVT, leading to snapped joints and gaps. If you need better performance, you should invest in a single, higher-quality acoustic mat rather than trying to stack cheaper materials together.