
What if the secret to a flawless floor isn’t a professional’s trade certificate, but a bit of candid advice and the right sequence of movements? Many homeowners feel a genuine sense of dread at the thought of learning how to fit a carpet yourself, worried they’ll trim a corner too tight or leave a room full of stubborn ripples. It’s understandable to feel protective of your investment, especially when the technical jargon around underlay and grippers starts to pile up. At Frank, we’ve always believed in being straight with you: fitting your own carpet is entirely doable if you’re willing to be precise and patient.
This guide delivers a transparent, step-by-step roadmap to achieving a wrinkle-free finish without the expense of a third-party fitter. We’ll demystify the process of using a knee kicker, clarify which underlay actually matters for your space, and ensure your transitions look sharp and professional. From the first measurement to the final trim, we’re here to guide you through a stress-free project that saves you money and treats your home with the respect it deserves. You’ll soon see that a professional finish is more about discipline than it is about magic.
Key Takeaways
- Learn the professional tool kit required for success, including why high-quality grippers are the secret to a taut, wrinkle-free finish.
- Master the step-by-step sequence of how to fit a carpet yourself, from the initial rough cut to the final stretch against the longest wall.
- Discover the “V-Cut” technique for perfect corners and why you should always trim your excess material from the back of the carpet.
- Understand the technical nuances of laying underlay and positioning grippers with a precise 10mm gap from your skirting boards.
- Get honest advice on when to DIY and when to call in help, including our firm warning about the complexities of fitting carpets on stairs.
Essential Tools and Preparation: Setting the Stage
Before you even think about unrolling your new purchase, we need to talk about the groundwork. If you want to know how to fit a carpet yourself properly, you can’t skip the boring bits. Preparation is what separates a DIY disaster from a professional-grade finish. First, let’s look at the roll itself. It needs to sit in the target room for at least 24 hours before you start work. This process, known as acclimatisation, is vital because carpets react to their environment. A cold carpet is stiff and difficult to manipulate. Letting it reach room temperature makes it more pliable, which is essential for a smooth install. This is particularly true when understanding carpet materials and how different backings expand or contract with temperature changes.
The Minimalist Tool Checklist
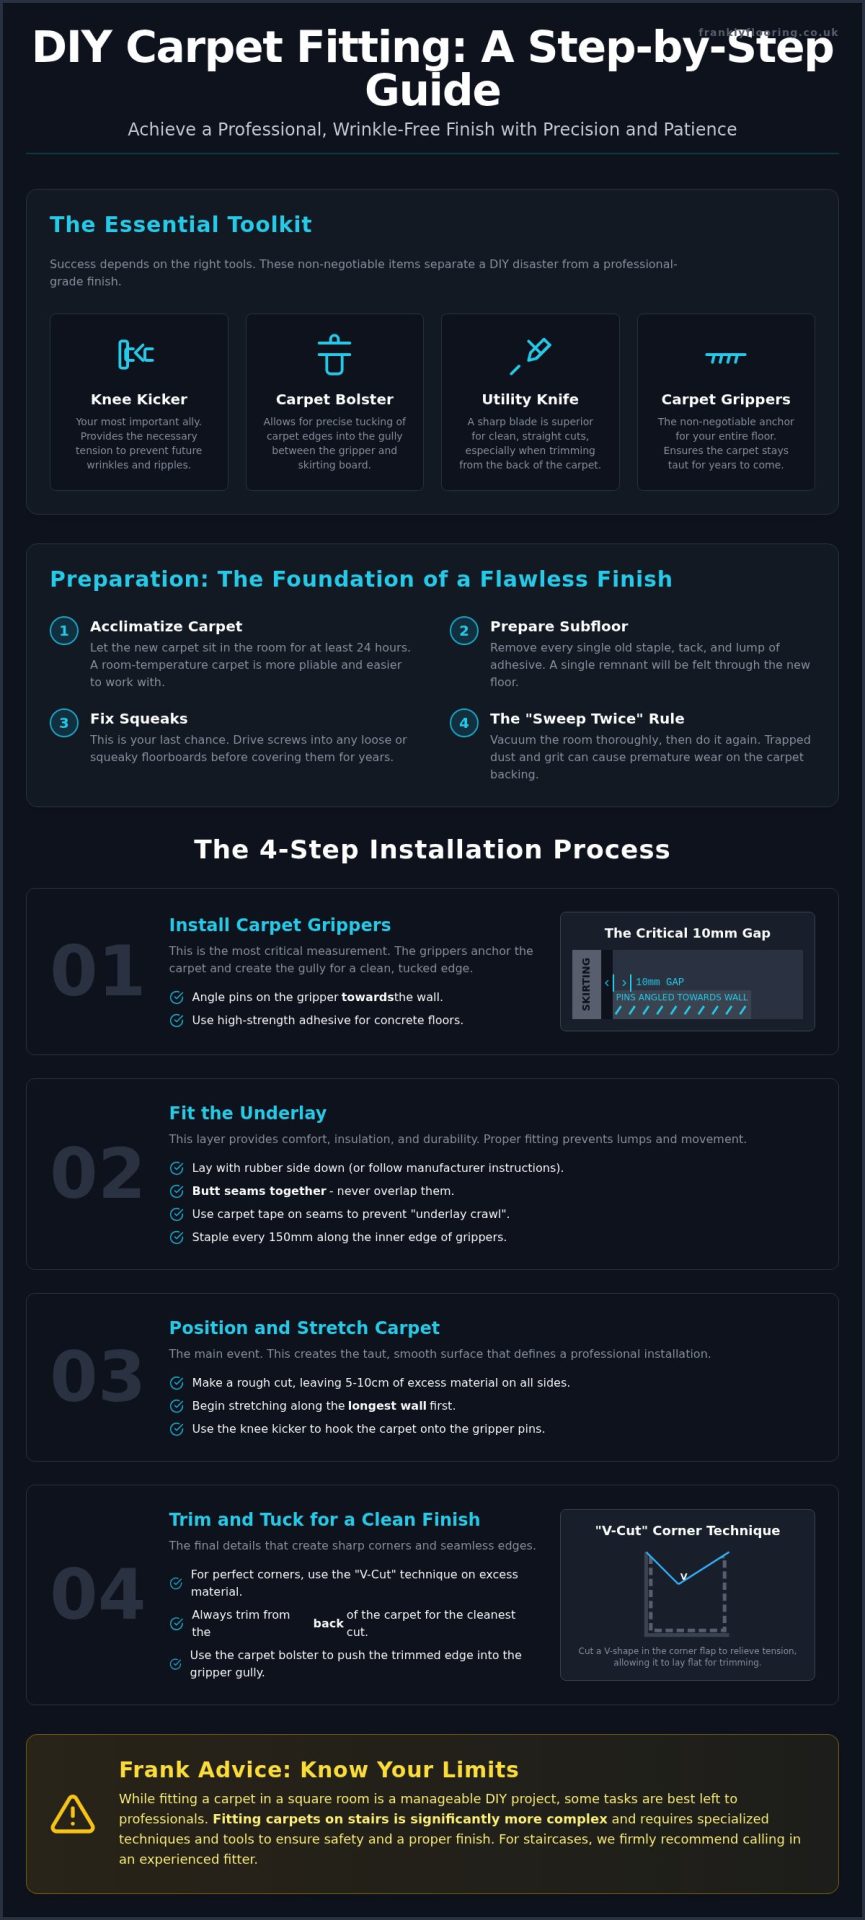
You don’t need to overspend on equipment, but three items are mandatory for a successful project. Let’s be frank: trying to stretch a carpet with your bare hands is a recipe for a bad back and a lumpy floor. A knee kicker is your most important ally; it is the only tool that provides the tension required to prevent future wrinkles. You will also need a carpet bolster, which allows you to tuck the edges into the gully between the gripper and the skirting board with precision. For cutting, a sharp utility knife is generally superior to heavy-duty shears for beginners. It allows for much cleaner lines when you are trimming from the back of the material. Finally, a professional-grade carpet gripper is non-negotiable. It acts as the anchor for your entire floor, ensuring the pile stays taut for years to come.
Subfloor Secrets: Clean, Dry, and Level
Frank advice: a clean subfloor is the difference between a floor that looks great and one that feels like a mistake. A subfloor that looks “good enough” usually isn’t. You need to remove every single old staple, tack, and lump of adhesive residue from the previous installation. If you leave a single 5mm staple head sticking up, you will feel it through the underlay every time you walk across the room. This is also your last chance to check for squeaky floorboards. It’s much easier to drive a few screws into a loose board today than it is to live with the noise for the next decade. Finally, follow the sweep twice rule. Vacuum the room thoroughly, then do it again. Dust and grit trapped under the underlay can cause premature wear on the carpet’s backing, shortening its lifespan significantly.
Laying the Foundation: Grippers and Underlay
Once your subfloor is immaculate, it’s time to build the layers that will support your new floor. Understanding how to fit a carpet yourself starts with the invisible components that provide comfort, insulation, and longevity. You’ll need to install your grippers first, followed by the underlay, and finally manage the thresholds where your new carpet meets other rooms. These steps are the structural foundation of your project; if they aren’t right, the final result will never look professional.
Gripper Installation Like a Pro
The 10mm gap between the gripper and the skirting board is the most critical measurement in the room. This space acts as a gully where the carpet edge is eventually tucked and secured. If the gap is too narrow, the carpet won’t sit flush; too wide, and it will pull away from the wall. Ensure the pins on the gripper are angled toward the wall so they “bite” the carpet backing as you apply tension later. For concrete floors, standard nails won’t work, so you’ll need to use a high-strength adhesive to secure the strips. Adhering to professional installation standards ensures these anchors don’t fail when you start stretching.
Fitting Your Underlay
Choosing the right underlay is a balance between underfoot comfort and long-term durability. It’s tempting to pick the thickest option available, but in high-traffic areas like hallways, a denser underlay is actually the smarter choice to prevent the pile from collapsing. Lay the underlay with the rubber side down, or follow the manufacturer’s specific instructions. It’s vital to butt the seams together tightly without any gaps. Never overlap the edges, as this creates permanent, visible lumps that ruin the look of your room. Using carpet tape on the seams prevents “underlay crawl” during the stretching phase.
Before the carpet roll is opened, fit your door thresholds or carpet metals. These should sit directly under the door when it’s closed to create a clean transition between rooms. Use the “Tape and Staple” method to secure the underlay perimeter, stapling every 150mm along the inner edge of the grippers on timber floors. Learning how to fit a carpet yourself requires attention to these small details that keep the foundation stable. If you’re missing any of these essentials, you can find professional-grade accessories to complete your toolkit before you move on to the main event.
The Main Event: Positioning and Stretching
Now that your grippers are set and your underlay is taped down, it’s time for the carpet itself. This is the stage where most DIY projects either succeed or fail based on patience. Start by laying your carpet out across the room, allowing it to ride up the walls on all sides. We recommend a rough cut strategy: leave exactly 10cm of excess material on every wall. This margin of error is your insurance policy. If the carpet shifts slightly while you are stretching, that extra 10cm ensures you won’t end up with a gap on the opposite side of the room. It is a simple step that saves a lot of stress.
To understand how to fit a carpet yourself like a pro, you must establish an anchor point. Secure your first corner at the longest wall by pressing the carpet onto the gripper pins with your bolster. From this fixed point, you will work in a 4-step sequence, moving across the longest wall first before tackling the width of the room. This disciplined approach ensures the pile remains straight and the tension is distributed evenly across the floor.
The Correct Way to Stretch
A knee kicker is not a tool of brute force; it is a tool of precision. Place the head of the kicker approximately 2cm away from the gripper. Use the padded end to absorb a firm strike from your knee, which pushes the carpet forward and onto the pins. You should always stretch from the centre of the wall out toward the corners. This technique avoids bunching and ensures the material is taut. You will know you have the right tension when the carpet feels firm underfoot and the ripples disappear completely. Once the carpet is hooked, use your bolster to firmly seat it into the gully.
Avoiding Common Stretching Mistakes
Bubbles in the middle of the room are the hallmark of a rushed job. They usually occur because the tension wasn’t checked from the centre outward. If you spot a bubble, don’t try to push it down. You must unhook the nearest wall and re-stretch that section. Remember that very few rooms are perfectly square. If you find the carpet isn’t aligning with your walls, use your 10cm of excess to pivot the material until it sits correctly. Always re-check the tension across the entire room before you reach for your knife. Once you’ve mastered the stretch, you’re ready for the final trim, but rushing this phase is the easiest way to ruin a good piece of carpet. Take your time, stay focused, and keep your movements consistent.
Trimming, Tucking, and Finishing
The 10cm of excess you left earlier is now your best friend. Learning how to fit a carpet yourself reaches its most critical point when you pick up the utility knife. One wrong move here can leave a visible gap that no amount of stretching can fix. Always trim the excess from the back of the carpet where possible. This prevents you from accidentally cutting the pile too short and ensures a much cleaner edge. If you must cut from the front, use the gully between the gripper and the skirting board as your guide, keeping the blade angled slightly away from the wall to avoid scuffing your paintwork.
Mastering the Corners
Internal and external corners require a specific approach called the relief cut. For an internal corner, make a diagonal V-cut into the excess material exactly where the two walls meet. This releases the tension and allows the carpet to drop neatly into the corner. For external corners, cut straight down from the top of the excess to the floor level, then fold the material around the corner. If you encounter radiator pipes, use the keyhole method. Cut a straight line from the edge of the carpet to the pipe, then cut a small circle around the base. This allows the carpet to sit flat without bunching or unsightly gaps.
The Final Tuck
Once the excess is trimmed to approximately 5mm above the floor level, use your carpet bolster to drive the backing into the gully. This creates a hidden finish where the carpet appears to grow out from under the skirting. It is a satisfying part of the process that gives the room that professional look you’re after. While you work, check for any exposed gripper pins that might have bent upward. These are a genuine hazard for bare feet and should be tapped down gently with a hammer. Safety is just as important as aesthetics.
Finish the project by installing your door bars. These should be positioned so the join is hidden directly under the door when it’s closed. If you are transitioning to a room with laminate flooring, ensure the door bar matches the height of both surfaces to prevent a trip hazard. Finally, give the room a thorough vacuum to remove loose fibres and debris. If you’ve followed these steps, your floor should be flat, taut, and ready for furniture. If you need the right tools to get this crisp finish, you can browse our professional accessory range to ensure you have everything required for the job.
Frank Advice: DIY vs. Professional Fitting
Choosing to learn how to fit a carpet yourself is an empowering decision that can save you a significant amount on labour costs. However, our commitment to transparency means we have to be straight with you about the limits of DIY. While a rectangular bedroom is a perfect starting point, other areas of the home demand a level of technical precision that takes years to master. Integrity is at the heart of what we do, and sometimes the most professional advice we can give is to tell you when a project might be better handled by a specialist.
The most important warning we can offer is regarding staircases. We rarely recommend DIY carpet installation on stairs. Each individual tread and riser requires perfect tension and secure anchoring to ensure the material doesn’t shift underfoot. A loose carpet on a staircase isn’t just an aesthetic issue; it is a genuine safety hazard. Additionally, you should consider your carpet’s warranty. Many manufacturers specify that their wear guarantees are only valid if the product is installed to professional standards. If a DIY fit is too loose and causes the carpet to “ruck” or ripple, the increased friction will wear out the fibres much faster than intended.
When to Call the Pros
There are certain scenarios where the complexity of the task outweighs the potential savings. If your room features multiple alcoves, complex bay windows, or fireplace hearths that require intricate cutting, the risk of a mistake increases. Woven carpets, such as Axminster or Wilton styles, also require specialist seaming techniques that are difficult to replicate without professional training. If you find yourself staring at a premium roll of material and feeling a sense of dread rather than excitement, that’s a clear sign to seek help. There is no shame in protecting a significant investment by bringing in a seasoned expert for the final stretch.
The DIY Victory Lap
If you have successfully navigated the stretching and trimming of a standard room, you should take a moment to appreciate the results. By learning how to fit a carpet yourself, you’ve kept hundreds of pounds in your pocket that can now be reinvested into other areas of your home. A “Frankly” good job is one where the edges are crisp, the surface is taut, and there isn’t a ripple in sight. Once the floor is settled and vacuumed, the next step is to choose quality furniture to complement your handiwork. There is a unique satisfaction in knowing that the very foundation of your room’s character was laid by your own hands.
Transforming Your Space with Confidence
Mastering the art of a professional floor finish comes down to a disciplined sequence of preparation, stretching, and precision trimming. By now, you understand that the secret lies in the details; from the 10mm gripper gap to the patient acclimatisation of your materials. Learning how to fit a carpet yourself is more than just a way to avoid labour costs. It’s a chance to take full control of your home’s character, ensuring every corner and transition meets your personal standards for quality and longevity.
At Frank, we bring over 20 years of industry expertise as a family-run UK business to help you get the job done right. We don’t just provide materials; we offer honest advice to ensure your project is a success from start to finish. With our direct-to-door national delivery, you can have everything you need for a professional result arrive right at your entrance. When you’re ready to start your next project, browse our DIY-friendly carpets and accessories to find the perfect match for your home. You’ve got the knowledge; now it’s time to pick up the tools and create something you’re proud of.
Frequently Asked Questions
Can I fit a new carpet over an old one?
No, you shouldn’t fit a new carpet over an old one. An old carpet acts as a sponge for dust and allergens, which will be trapped forever under your new floor. It also creates an unstable foundation, causing the new pile to wear unevenly and potentially slip. For a professional result when learning how to fit a carpet yourself, always strip back to the subfloor to ensure your new underlay and grippers can do their job properly.
How much extra carpet should I order for DIY fitting?
You should order at least 10% more material than your room’s net measurements. For a DIY project, we specifically recommend leaving 10cm of excess on every wall during the initial positioning. This extra margin protects you against rooms that aren’t perfectly square and gives you enough material to achieve a clean trim. It’s much better to have a small amount of waste than to find yourself 2cm short at the final corner.
Do I really need to use carpet grippers?
Yes, carpet grippers are essential for any stretch-fit installation. They provide the necessary tension to keep the carpet flat and prevent it from bunching up over time. Without grippers, the carpet will eventually develop ripples and move underfoot, which looks poor and creates a trip hazard. If you want to know how to fit a carpet yourself with a finish that lasts, professional-grade grippers are a non-negotiable part of your toolkit.
What is the best underlay for a DIY project?
The best underlay depends on the room’s usage, but PU foam is often favoured for DIY projects. It is lightweight, easy to cut, and provides excellent thermal insulation. For high-traffic areas like hallways, choose a high-density underlay that offers better recovery. Always ensure you butt the seams together rather than overlapping them. This prevents the visible ridges that can ruin the look of an otherwise perfect carpet installation.
How do I fit a carpet around a radiator pipe?
Fitting around a radiator pipe requires a precise keyhole cut. Start by folding the carpet back and making a straight cut from the edge of the material directly to the centre of the pipe. At the end of this cut, snip a small circle to accommodate the pipe’s diameter. This allows the carpet to drop neatly into place. You can then tuck the edges around the base for a clean, seamless finish that looks professional.
Can I use a normal hammer instead of a carpet bolster?
You shouldn’t use a standard hammer as a substitute for a carpet bolster. A hammer’s head is too small and concentrated, which makes it very easy to tear the carpet backing or dent your skirting boards. A bolster has a wide, blunt blade designed specifically to drive the carpet into the gully between the gripper and the wall. This tool ensures the carpet stays hooked on the pins without causing any structural damage to the pile.
How do I stop my carpet from fraying at the edges?
Preventing fraying starts with using a very sharp utility knife and cutting from the back of the carpet. This ensures you aren’t pulling at the fibres as you cut. For edges that meet other floor types, always use a proper door bar or transition strip. These accessories secure the raw edge and protect it from the constant friction of foot traffic. Proper tucking into the gully also hides the cut edge from view.
Is it possible to fit a carpet without a knee kicker?
While you can physically lay a carpet without a knee kicker, you won’t achieve a professional, wrinkle-free finish. A knee kicker is the only tool that allows you to apply the consistent tension required to hook the carpet firmly onto the gripper pins. Without this stretch, your carpet will eventually develop loose bubbles and ripples as it settles. If you’re investing in new flooring, using the correct tools is the only way to protect that investment.