Why does your floor often look duller immediately after you’ve spent an hour scrubbing it? If you’re tired of seeing a cloudy residue or stubborn scuff marks every time the sun hits the surface, you aren’t alone. Many homeowners worry that using the wrong chemical might accidentally void their warranty or strip the wear layer entirely. We understand that frustration. To be perfectly frank, the best way to clean vinyl floors isn’t about buying the most expensive industrial cleaner; it’s about using the right technique and a minimalist touch.
If you are considering a full replacement, you can learn more about Wholesale and Direct Supply of Flooring Products to see the range of high-performance solutions available from Project Floors.
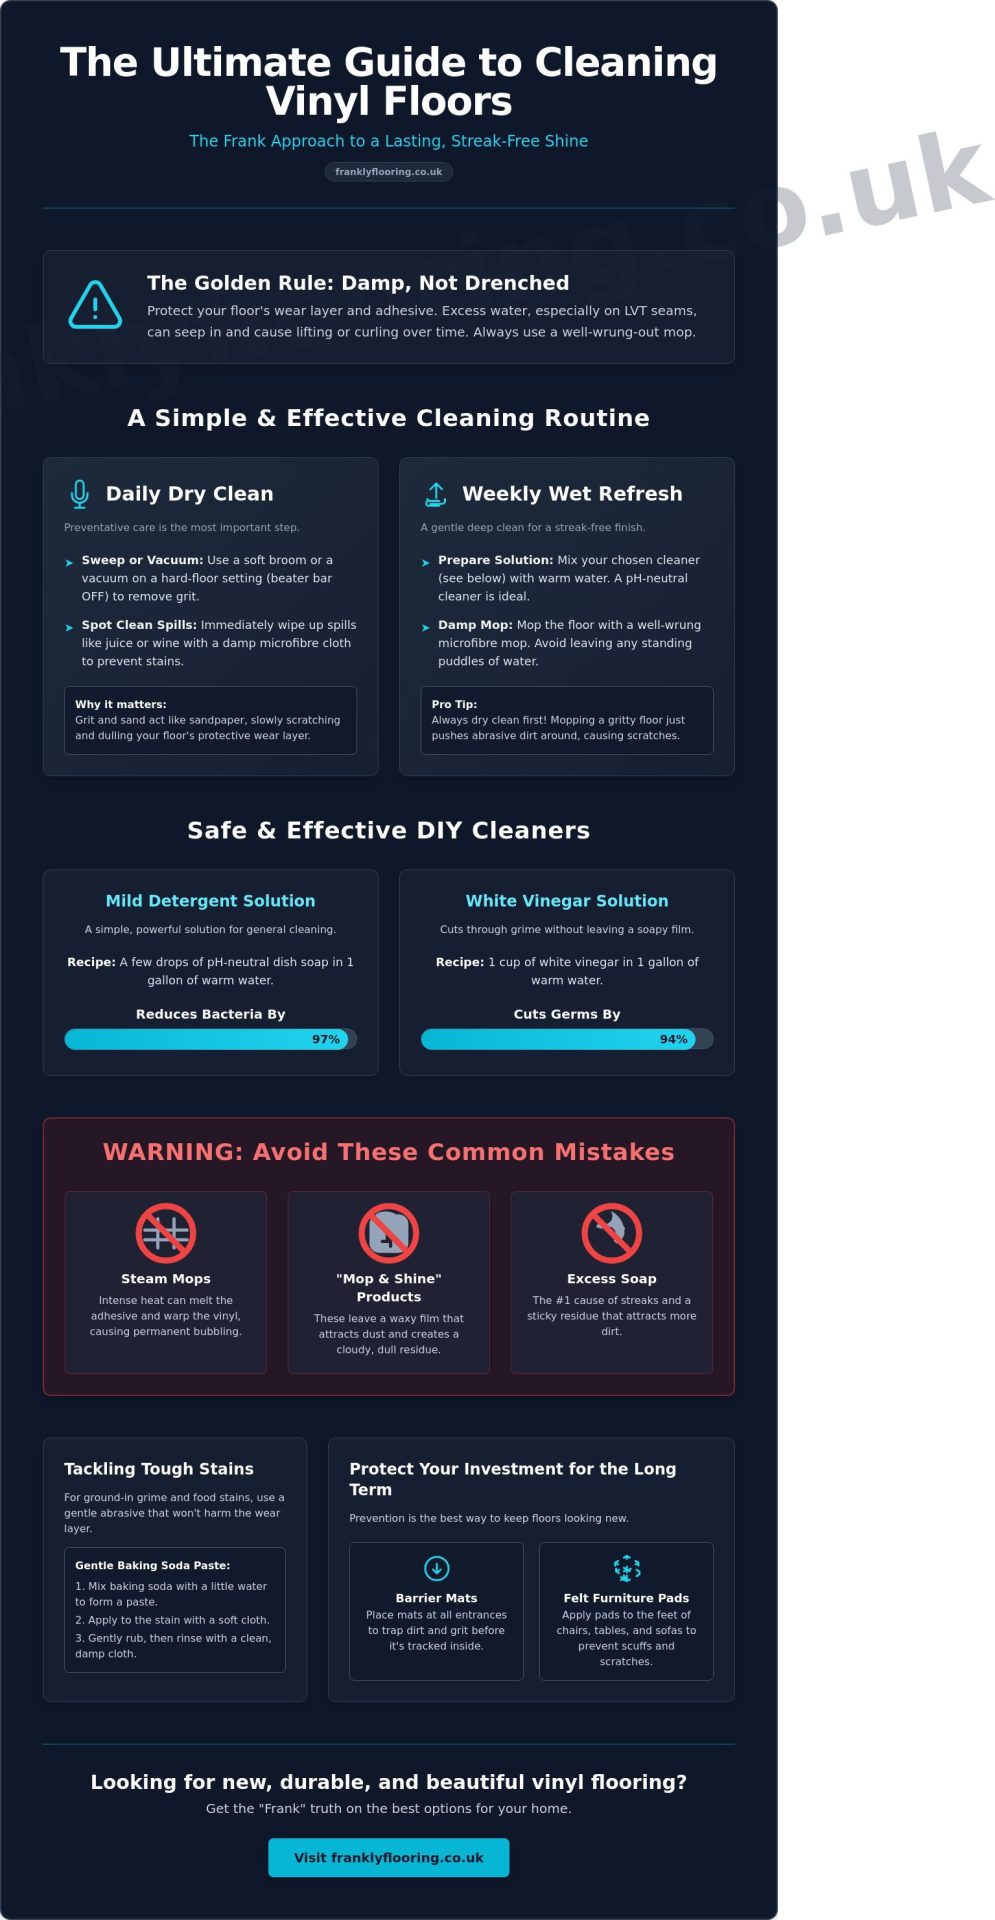
In this guide, we’ll show you how to maintain that “just installed” look for years to come. Research shows that a simple mixture of mild detergent and water can reduce bacteria by an average of 97 percent, while a vinegar solution cuts germs by 94 percent. We’ll walk you through these safe, effective methods for both standard vinyl and LVT. You’ll discover which household items provide a streak-free finish, how to handle tough stains without abrasive tools, and why avoiding steam mops is the smartest move you can make for your home’s longevity. Let’s get straight to the facts about keeping your floors beautiful.
Key Takeaways
- Learn why the best way to clean vinyl floors starts with a thorough dry phase to prevent grit from scratching the surface during mopping.
- Discover how to lift ground-in grime and food stains using a gentle baking soda paste that won’t damage your floor’s protective wear layer.
- Understand the technical importance of pH-neutral cleaners and why they are superior to standard supermarket “all-purpose” sprays for maintaining a streak-free finish.
- Identify the essential preventative measures, such as barrier matting and felt furniture pads, that act as the first line of defence against permanent scuffs.
- Get the “Frank” truth on moisture management to ensure your vinyl or LVT remains bonded and beautiful for its entire lifespan.
The Fundamentals of Vinyl Care: The Frank Approach
Vinyl has earned its spot as the UK’s go-to flooring for busy kitchens, bathrooms, and hallways. It’s affordable, looks fantastic, and stands up to the daily chaos of muddy boots and spilled coffee. However, there’s a common misconception that because it’s water-resistant, you can treat it like a swimming pool. The frank truth is that while vinyl is incredibly tough, it isn’t invincible to moisture. If water seeps into the seams or edges, it can weaken the adhesive and cause the material to curl or lift over time.
Understanding what’s under your feet helps you care for it better. Whether you have modern luxury planks or traditional Vinyl composition tile (VCT), the construction relies on a series of layers. Your primary goal is to protect the “wear layer.” This thin, transparent top coat is the only thing preventing scratches and stains from reaching the design layer. Once you scrub through that protection, the floor is essentially ruined. This is why the best way to clean vinyl floors involves a “damp, never drenched” approach. If you can see standing puddles after you’ve finished a pass with the mop, you’ve used far too much water.
Sheet Vinyl vs. LVT: Does the Method Change?
While the cleaning solutions remain similar, the physical structure of the floor dictates your level of caution. Sheet vinyl is one continuous piece, making it excellent for splash zones, but it’s vulnerable to tearing from heavy furniture or high heat. On the other hand, understanding what is lvt flooring helps you see why joints are the main focus. Because LVT consists of individual planks or tiles, every joint is a potential entry point for excess liquid. You need to be extra careful not to let water sit on these seams, as it can compromise the bond between the plank and the subfloor.
Common Vinyl Cleaning Myths Debunked
We see the same mistakes repeatedly, often fueled by “quick fix” advice found online. To keep your floors in top condition, keep these three rules in mind:
- Ditch the steam mop: The intense heat can melt the glue and warp the material, causing permanent bubbling that no amount of cleaning can fix.
- Avoid “mop and shine” products: These leave a waxy film that attracts dust and hair, eventually creating the cloudy residue that most homeowners hate.
- Less is more: Don’t assume more soap means a cleaner floor. Excess soap is the primary cause of streaks and a sticky residue that actually grabs onto new dirt as you walk.
The best way to clean vinyl floors is to keep the process simple. Using a minimalist approach ensures you aren’t fighting against your own cleaning products to achieve a clear, lasting shine.
The Best Way to Clean Vinyl Floors: A Daily & Weekly Routine
Establishing a consistent routine is the best way to clean vinyl floors without spending your entire Saturday on your hands and knees. Cleaning shouldn’t be a massive chore; it’s a series of small, strategic habits that prevent dirt from becoming a permanent part of your home’s decor. By breaking your maintenance into a simple “dry” and “wet” phase, you ensure that you’re actually removing grime rather than just pushing it into the corners.
The Daily Maintenance Habit
The most important tool in your arsenal isn’t a mop; it’s a soft-bristled broom or a vacuum. Outside grit and sand act like sandpaper on your floor’s wear layer, slowly grinding away the shine with every footstep. We recommend a quick sweep of high-traffic areas every evening to catch these abrasive particles before they do damage. If you prefer vacuuming, ensure you turn off the beater bar or use a hard-floor setting. A rotating brush designed for carpets can easily leave fine scratches on a vinyl surface, dulling the finish over time.
Spot cleaning is the second half of the daily habit. When a spill happens, don’t wait for the weekly deep clean. Wiping up acidic liquids like orange juice or wine immediately prevents the risk of permanent staining. A damp microfibre cloth is usually all you need for these quick fixes.
The Weekly Deep Refresh
Once a week, it’s time to move to the “wet” phase. This is where many homeowners go wrong by using too much water or the wrong chemical. For a natural, effective clean, a mixture of one cup of white vinegar to a gallon of warm water works wonders. The acidity of the vinegar breaks down dirt without leaving the soapy film that causes streaks. For more detailed ratios on homemade solutions, HGTV’s guide to cleaning vinyl floors offers excellent advice on mixing vinegar for various levels of grime.
Technique matters more than the tool you choose. We advocate for the “two-bucket” method: one bucket for your cleaning solution and another for clean rinse water. This prevents you from dipping a dirty mop back into your fresh solution. When mopping, follow these steps:
- Choose your mop: Use a microfibre flat mop rather than a traditional string mop. They hold less water and are better at trapping fine dust.
- Wring it out: Your mop should be damp to the touch, never dripping.
- The “Dry” Finish: This is the secret to a streak-free shine. After mopping, go back over the floor with a clean, dry microfibre cloth or a dry mop head. This picks up any remaining moisture and prevents water spots from forming as the floor air-dries.
If your current floor is starting to show its age despite your best cleaning efforts, it might be time for an upgrade. You can explore our latest vinyl and LVT collections to find a durable, modern replacement that’s even easier to maintain.
Tackling Tough Stains and Ground-in Dirt
Life happens, and even the most diligent cleaning routine can’t always prevent the occasional mishap. Whether it’s a dropped glass of red wine or the slow buildup of “grey” grime in the grain of textured planks, some marks require a more targeted approach. If your floor has lost its lustre and looks permanently dusty, you’re likely dealing with dirt trapped in the micro-textures of the wear layer. The best way to clean vinyl floors when they’ve reached this stage is to use a soft nylon brush and a pH-neutral solution to gently agitate the surface. Avoid anything metal or overly stiff, as you’ll leave permanent micro-scratches that actually trap more dirt in the future.
For organic stains like fruit juice, tomato sauce, or wine, a simple baking soda paste is your best friend. Mix two parts baking soda with one part water to create a thick consistency. Apply it to the stain and rub gently with a soft cloth until the mark lifts. Baking soda is a mild abrasive that’s effective enough to break down the stain but gentle enough to leave your floor’s finish intact. Just be sure to wipe away every trace of the paste with a damp cloth afterward, as dried baking soda leaves a stubborn white film.
Truly “unremovable” stains like ink, lipstick, or crayon usually require a solvent. Dab a small amount of rubbing alcohol onto a cotton ball and rub the area until the pigment disappears. If you’ve recently finished a DIY installation and found adhesive residue on the surface, a tiny amount of white spirit or a citrus-based adhesive remover on a cloth will do the job. Always test these stronger substances on a hidden corner or a spare offcut first to ensure they don’t discolour the wear layer.
Removing Scuff Marks Without Chemicals
Black rubber scuffs from trainers or furniture feet are a common headache, but you don’t need harsh chemicals to fix them. We recommend the “Tennis Ball” trick: cut a small “X” in a clean tennis ball, pop it onto the end of a broom handle, and rub the scuff mark. The friction of the ball lifts the rubber right off the floor without any liquid involved. For more stubborn marks, a drop of WD-40 or Jojoba oil on a soft cloth works wonders. However, you must clean the area with soapy water immediately after; any oily residue makes vinyl incredibly slippery and dangerous.
Deep Cleaning After a Renovation
Post-construction cleaning is a different beast. Plaster dust is notorious for settling into every crevice, and the best way to clean vinyl floors after a renovation is to start with a high-filtration vacuum. Do not reach for the mop until the floor is completely free of loose dust, or you’ll simply create a grey, muddy slurry. This process is very similar to maintaining laminate flooring, though vinyl is much more resilient to the repeated damp-mopping needed to lift the final construction haze. If a hazy film persists after four or five passes, the dust may have bonded with a previous cleaning product, and a professional machine scrub might be necessary to restore the original shine.
Protecting Your Vinyl Floor for the Long Term
Prevention is the secret weapon of any savvy homeowner. While we’ve already discussed the best way to clean vinyl floors once they’re dirty, keeping the grit off in the first place is a much more efficient use of your time. Think of your floor as a precision-engineered surface. You wouldn’t drive a car over gravel without expecting a few stone chips; the same logic applies to your home. By controlling what comes into contact with your floor, you can extend its lifespan by years.
The first line of defence is high-quality barrier matting at every external entrance. These mats trap up to 80 percent of the grit, sand, and moisture that would otherwise act as an abrasive on your floor’s wear layer. Inside the home, furniture is the next hurdle. Vinyl is resilient, but it isn’t immune to heavy, concentrated pressure. Use wide-load protectors or felt pads under every leg of your tables, chairs, and sofas. This is a tiny investment that prevents deep, permanent indentations. If you have pets, keep their claws trimmed regularly. While the top coat is tough, a large dog’s claws can leave fine scratches over time if they aren’t managed.
Sunlight is another factor that many people overlook. Intense UV exposure can cause the design layer of your vinyl to fade or discolour. If you have a south-facing room with large windows, use blinds or curtains during the brightest parts of the day. This simple step preserves the vibrant colour and character of your floor for much longer.
The ‘No-Go’ Zone: What to Keep Away from Vinyl
There are a few items that should never touch your vinyl floor. Rubber-backed rugs are a common mistake. The chemicals in rubber or latex can react with the vinyl’s surface, causing permanent yellow staining that no cleaning solution can lift. Always choose rugs with a natural jute or woven backing instead. Similarly, avoid harsh chemicals like bleach or ammonia. These are far too aggressive and will eventually strip the protective coating, leaving the floor dull and vulnerable. Finally, discourage the use of stiletto heels in the house. The weight of a person concentrated on such a small point can easily exceed the material’s limit, leaving permanent pockmarks.
Seasonal Maintenance Tips
Your maintenance needs will shift with the weather. In the winter, road salt and grit are your primary enemies. These are both chemically aggressive and physically abrasive, so you’ll need to increase your sweeping frequency. During humid summers, keep an eye on your floor’s edges. Extreme changes in humidity can occasionally affect the subfloor or the adhesive bond. We recommend performing a quick “Frank” floor audit once a year. Check the seams for any signs of lifting, replace worn felt pads on your furniture, and ensure your barrier mats are still doing their job effectively.
If your current floor is showing permanent signs of wear that no amount of protection can fix, you can find durable, high-quality replacements in our latest vinyl and LVT collections.
Choosing the Right Products: A Frank Guide to UK Options
Selecting the right tools for the job is just as important as the technique itself. In the UK, supermarket shelves are packed with “all-purpose” cleaners that claim to work on everything from windows to worktops. We advise caution here. Many of these sprays contain harsh chemicals that can strip the factory-applied finish from your floor. The best way to clean vinyl floors while preserving their integrity is to use a dedicated pH-neutral cleaner. These solutions are specifically balanced to lift dirt without reacting with the vinyl or LVT material, ensuring you don’t accidentally dull the surface you’re trying to shine.
For your hardware, we recommend a high-quality flat microfibre mop system over a traditional string mop. Spray mops are popular for their convenience, and they’re generally safe as long as they don’t over-saturate the floor. However, a microfibre head is the only material that effectively traps fine dust without scratching the wear layer. When it comes to floor polishes, the frank advice for 2026 is that you probably don’t need them. Most modern vinyl comes with a high-performance coating that stays shiny for years. Adding a separate polish often just creates a waxy buildup that eventually turns cloudy and requires a professional strip-and-clean to fix. If you’re looking for the right maintenance gear, you can find professional-grade vinyl flooring accessories to keep your installation in top shape.
Our Top Product Recommendations
In the UK market, brands like Bona and Dr. Schutz are the gold standard for professional vinyl care. Their systems are designed to be gentle but effective. If you prefer a DIY approach, the ratio of white vinegar to warm water mentioned earlier remains a reliable, cost-effective alternative. Regardless of the solution you choose, always finish with a dry microfibre pass. This is the only way to guarantee a streak-free finish and ensure no moisture lingers in the seams, which is especially vital for LVT compared to traditional sheet vinyl.
When It’s Time to Replace Rather Than Clean
Even the most careful maintenance can’t stop the clock forever. If you notice that your floor looks dull even after a deep clean, or if you can see the design layer through a thinning top coat, your wear layer has likely failed. At this point, no amount of scrubbing will restore the original shine. Comparing the cost of professional deep restoration against a fresh installation of modern lvt flooring often reveals that a replacement is the better long-term value. New LVT offers improved scratch resistance and more realistic textures than older products. If you’ve reached the limit of what cleaning can achieve, we can provide a frank quote for a brand-new start that fits your home’s character perfectly.
Keeping Your Vinyl Beautiful for Years
Maintaining a floor that looks as good as the day it was laid doesn’t require a cupboard full of expensive chemicals. By now, it’s clear that the best way to clean vinyl floors is through a simple, minimalist routine that prioritises dry maintenance and pH-neutral solutions. By avoiding the common pitfalls of steam mops and waxy polishes, you protect the wear layer and ensure your investment stands the test of time. It’s about working smarter, not harder, to keep that factory-fresh finish intact for the long haul.
At Frankly Flooring, we believe in providing the kind of no-nonsense, transparent advice you’d expect from a family-run business with over 20 years of experience. We don’t just sell products; we help you find the foundational elements of your home’s character. Whether you’re looking for a fresh start or the right accessories to maintain your current space, we offer nationwide UK delivery on our entire range. Browse our durable LVT and Vinyl flooring ranges at Frankly Flooring to find your perfect match. With the right care and a bit of “Frank” honesty, your floors will remain a stunning feature of your home for many years to come.
Common Questions About Vinyl Care
Can I use a steam mop on my vinyl floor?
No, you should never use a steam mop on vinyl or LVT. The intense heat and high-pressure moisture can penetrate the seams, causing the adhesive to fail and the planks to bubble or warp. Stick to a damp microfibre mop to keep your floor safe and flat.
Is it okay to use bleach on vinyl for disinfecting?
Avoid using bleach as it’s far too aggressive for the wear layer. Over time, bleach can lead to permanent discolouration and a brittle surface that cracks easily. A pH-neutral cleaner or a diluted vinegar solution is a much safer way to sanitise your home without risking the finish.
How do I get rid of the cloudy film on my vinyl floor after mopping?
Cloudy residue is usually the result of using too much soap or “mop and shine” products. To fix this, mop the area with a mixture of one cup of white vinegar to a gallon of water, then immediately dry it with a clean microfibre cloth. This is often the best way to clean vinyl floors that have lost their original clarity due to product buildup.
Can I use a vacuum with a beater bar on vinyl?
You should always turn off the beater bar or use the hard-floor setting on your vacuum. The stiff, rotating bristles are designed for carpets and can leave fine, permanent scratches on a vinyl surface. These micro-scratches eventually trap dirt and make the floor look dull over time.
Does vinegar damage vinyl floors over time?
Diluted white vinegar is perfectly safe and won’t damage your floor if used correctly. It’s a mild acid that effectively cuts through grease and grime without leaving a soapy film behind. Just ensure you aren’t using it at full strength; always mix it with warm water for a gentle clean.
How often should I deep clean my vinyl flooring?
A weekly damp mop is usually sufficient for a deep refresh, provided you’re sweeping or vacuuming daily to remove grit. High-traffic areas like kitchens might need more frequent attention. The best way to clean vinyl floors is to focus on consistent dry maintenance to prevent abrasive dirt from building up in the first place.
What is the best way to remove old wax or polish buildup?
Use a commercial vinyl floor stripper or a slightly stronger vinegar solution to break down the layers of old polish. Apply the solution, let it sit for a few minutes to soften the wax, and then gently scrub with a soft-bristled brush. Never use metal scrapers or abrasive pads that could gouge the material.
Are rubber-backed mats safe for vinyl floors?
No, rubber-backed mats are a major risk for vinyl and LVT. A chemical reaction between the rubber and the flooring can cause permanent yellowing or dark stains that are impossible to remove. We always recommend using mats with a natural jute or woven backing to protect your floor’s appearance.