
The biggest threat to your laminate floor isn’t the dirt you see. It’s the bucket of water you’re using to clean it. While modern laminate is built to be durable, it isn’t invincible. Most homeowners feel the frustration of spending an afternoon mopping only to be left with dull streaks or the nagging fear that their floorboards might start peaking. This laminate flooring cleaning guide offers a direct, no-nonsense approach to floor care that prioritizes moisture control over heavy chemicals.
We understand that you want a home that looks its best without the constant stress of maintenance. You deserve a routine that actually works. By following this guide, you’ll gain the confidence to maintain a streak-free shine and the knowledge to extend your floor’s lifespan for years. We will cover everything from the right tools for popular matte finishes to the honest truth about which retail cleaners are worth your money and which ones to leave on the shelf. It’s time to stop guessing and start protecting the character of your home.
Key Takeaways
- Understand why moisture is the primary cause of flooring failure and how to protect the fibreboard core from permanent warping or peaking.
- Use this laminate flooring cleaning guide to select the right tools, including pH-neutral cleaners and specialized vacuums that won’t scratch the surface.
- Master the 30 second rule for liquid spills to prevent moisture from seeping into seams and damaging the structural integrity of your planks.
- Learn how simple additions like felt pads and strategic doormat placement act as the cheapest insurance for your floor’s longevity.
- Discover how AC ratings and edge profiles impact your maintenance routine before you commit to your next laminate project.
The Reality of Laminate Care: Why Moisture is the Enemy
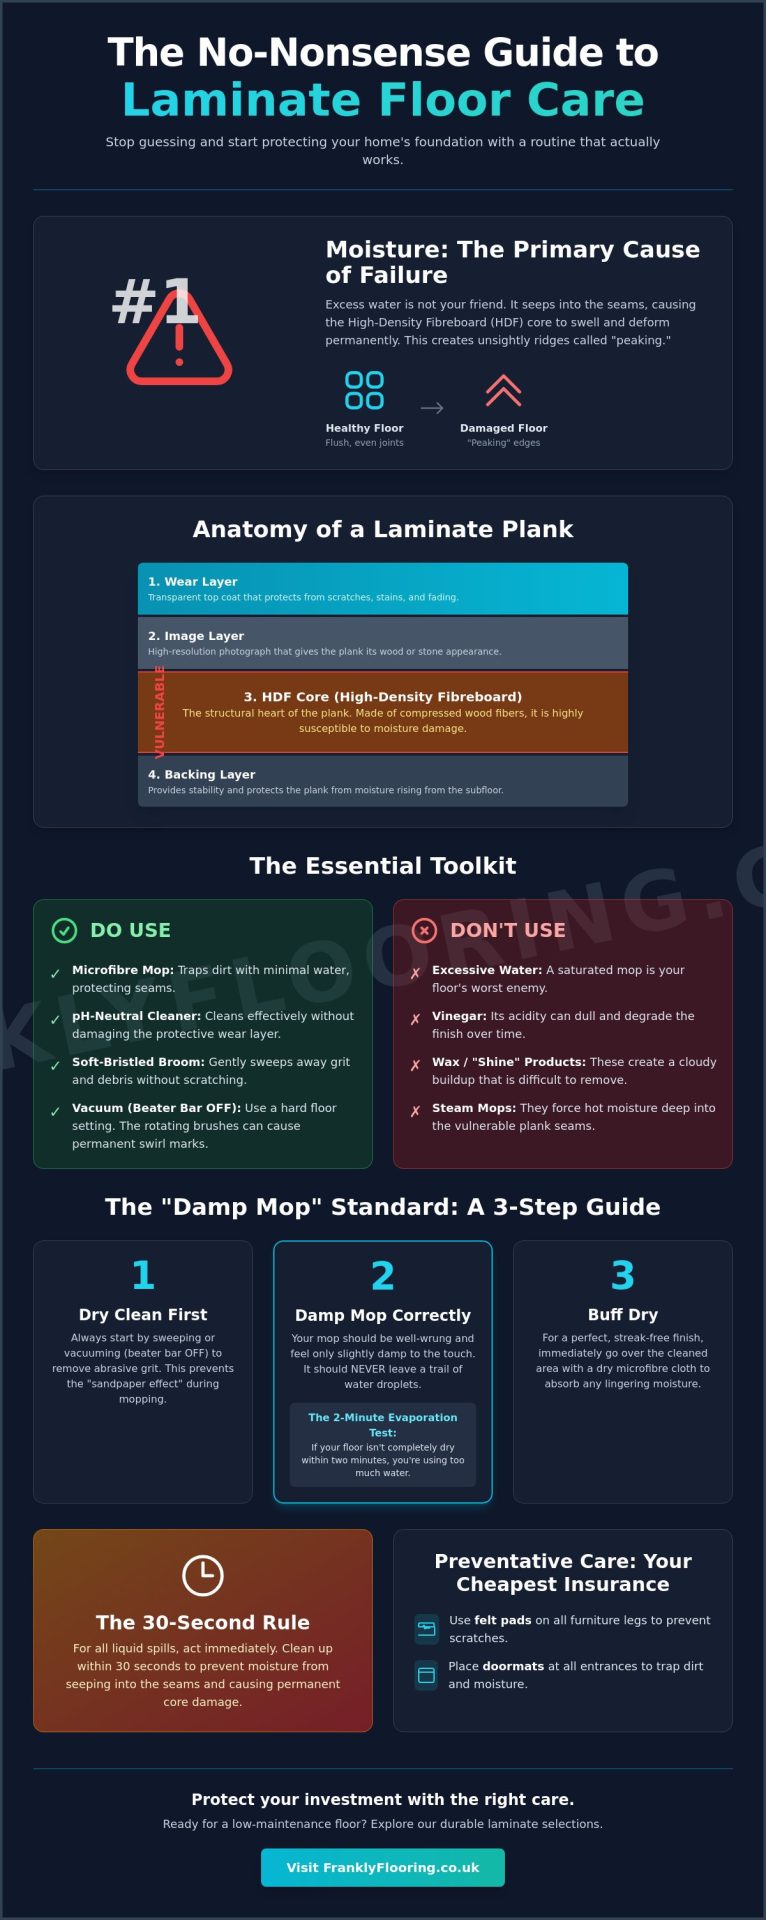
Let’s be frank about your floors. Many people treat laminate like it’s a sheet of indestructible plastic, but that is a mistake that leads to warped boards and expensive replacements. To maintain your home properly, you need to understand what laminate flooring is at a structural level. It is a multi-layer synthetic product built around a core of High-Density Fibreboard (HDF). This core is essentially highly compressed wood fibres. Just like any wood product, those fibres react to moisture by expanding. This laminate flooring cleaning guide starts with a hard truth: moisture is the primary cause of laminate failure. When water seeps into the joints, the HDF core swells, leading to “peaking” where the edges of the boards push upward and lose their flush finish.
You will see plenty of marketing in 2026 for “waterproof” laminate. While technology has improved significantly to include water-resistant top coatings and tighter click-systems, the HDF core remains vulnerable if submerged. The Frank rule is simple. If you see standing water on the surface after you’ve passed over it with a mop, you aren’t cleaning; you’re irrigating. A floor that stays wet is a floor that is dying. True maintenance is about controlled dampness, not saturation.
The Anatomy of a Laminate Plank
The top of your plank is a transparent wear layer designed to protect the photographic image beneath it from scratches and fading. It’s tough, but it isn’t a sealant for the entire board. The real vulnerability lies in the click-joint system. These seams are the only entry points for liquids to reach the HDF core. Because the core is so sensitive to humidity and direct liquid contact, even a small amount of water trapped in a seam can cause the board to puff up like a sponge. Once HDF swells and dries, it rarely returns to its original shape, leaving you with permanent ridges across your room.
The “Damp Mop” Standard Explained
To clean safely, you must master the damp mop technique. A “well-wrung” mop should feel barely cool to the touch and should not leave a visible trail of droplets behind it. We recommend using a microfibre flat mop instead of a traditional string mop. Microfibre is superior because it uses capillary action to grab dirt with minimal liquid, whereas string mops tend to dump water into the crevices of the floor. Follow the evaporation test: if your floor isn’t completely dry within two minutes of mopping, you’re using too much water. Using a dry microfibre cloth to buff the floor immediately after cleaning is a reliable way to ensure no moisture lingers in the joints.
The Essential Toolkit for Laminate Maintenance
Building a proper toolkit is the next logical step in this laminate flooring cleaning guide. You don’t need a cupboard full of expensive gadgets or industrial chemicals to keep your home looking sharp. In fact, the simpler your approach, the longer your floor will last. The goal is to remove abrasive grit and light soil without compromising the transparent wear layer that protects the design. Before you start, it’s worth checking your floor’s AC rating. An AC3 rating is standard for residential use, while an AC5 rating indicates a much tougher surface designed for commercial traffic. Higher-rated floors can handle more frequent cleaning, but the tools you use should remain gentle regardless of the durability grade.
Microfibre technology is the gold standard for this job. Unlike traditional cotton cloths that often push dirt into the seams, microfibre uses tiny loops to trap and lift particles away from the surface. This prevents the “sandpaper effect” where walking on trapped grit creates micro-scratches over time. If your current floor has already suffered from years of improper tool use, you might find it easier to browse our latest laminate selections rather than trying to buff out deep abrasions.
Vacuuming vs. Sweeping: Which is Better?
Grit is the enemy. A soft-bristled broom or a vacuum with a dedicated hard-floor setting is your first line of defense. If you use a vacuum, you must ensure the beater bar is turned off. Those rotating brushes are designed to agitate carpet fibres, but on laminate, they can leave permanent swirl marks. We recommend a simple maintenance schedule: a quick sweep or vacuum daily to remove track-in grit, followed by a damp mop once a week for deeper cleaning. This rhythm prevents dirt build-up without over-exposing the floor to moisture.
Chemical Dos and Don’ts
There is a lot of bad advice online suggesting you use vinegar or “mop and shine” products. We’ll be frank: stop doing that. Vinegar is acidic and can slowly eat away at the protective coating, leaving the floor looking dull and lifeless. Similarly, products that promise a high-gloss shine often contain waxes or oils that create a sticky film. This build-up actually attracts more dust and makes the floor harder to clean in the long run. Stick to pH-neutral cleaners specifically formulated for laminate. For a professional perspective, the World Floor Covering Association provides excellent dos and don’ts for laminate floor care that align with these expert standards. Always check your specific warranty before trying a new spray, as using unapproved chemicals can sometimes void your coverage.
Dealing with Spills, Scuffs, and Stubborn Stains
Accidents are a part of life, but they don’t have to be a permanent part of your floor. When a glass of water tips or a plate of food hits the deck, time is your most valuable resource. We follow the Golden Rule of laminate care: 30 seconds. That is the maximum window you have to clear a liquid spill before it begins to threaten the structural integrity of your planks. As we discussed in earlier sections, the seams are the gateway to the sensitive fibreboard core. If you let moisture sit, you are inviting the boards to swell. A quick response is the difference between a simple cleanup and a ruined room.
It’s also important to distinguish between a surface scuff and a deep scratch. Most dark marks left by rubber-soled shoes or dragged furniture are actually just residue sitting on top of the wear layer. These are scuffs, and they usually vanish with the light friction of a dry microfibre cloth or even a clean tennis ball. A scratch, however, is a physical gouge in the decor layer. If you discover a minor chip or a deep line, you don’t necessarily need to replace the plank. A laminate repair kit, which typically uses color-matched wax sticks, can fill the void and seal the area. This is a practical, cost-effective way to maintain the floor’s appearance without a major project. This laminate flooring cleaning guide is built on these kinds of honest, sustainable fixes.
The Blotting Technique for Liquid Spills
When a spill happens, your first instinct might be to grab a rag and start scrubbing. Stop. Rubbing a spill actually spreads the liquid and forces it deeper into the click-joint system. Instead, use the blotting technique. Place a highly absorbent paper towel or a clean microfibre cloth directly over the liquid and let it draw the moisture up. Once the bulk of the spill is gone, use the “dry-behind” method. Take a fresh, bone-dry cloth and buff the area until there isn’t a hint of dampness left in the grooves. This ensures no residue remains to cause long-term damage.
Removing Tough Marks (Ink, Wine, and Grease)
Some stains require a more targeted approach than a damp mop can provide. For ink, permanent markers, or stubborn wine spots, a small amount of isopropyl alcohol on a clean cloth is remarkably effective. It breaks down the pigment and evaporates almost instantly, which is ideal for moisture-sensitive floors. If you’re dealing with hardened wax or chewing gum, we have a Frank tip for you: use an ice cube. Hold the ice against the sticky residue until it becomes brittle, then gently pop it off with a plastic scraper. Never use a metal knife or blade. Metal will slice through your floor’s protective finish, creating a permanent problem out of a temporary mess. For grease or oil, a single drop of pH-neutral cleaner on a soft cloth will lift the residue without leaving a dulling film behind.
Preventative Care: Stopping Damage Before it Starts
Cleaning your floors is only half the battle. If you find yourself constantly scrubbing away stubborn marks, you aren’t just cleaning; you’re reacting to damage that could have been avoided. This laminate flooring cleaning guide prioritizes prevention because it is far easier to stop a scratch than it is to repair one. Most of the debris that dulls your floor’s finish comes from outside. Small pebbles and sand act like sandpaper under the weight of your footsteps, slowly grinding away the transparent wear layer. To stop this, you need a double-barrier system. Place one heavy-duty mat outside your door to catch the bulk of the mud and a second, softer mat inside to trap fine grit and moisture.
Inside the home, your furniture is the most likely culprit for deep gouges. We consider felt protector pads to be the cheapest insurance policy you can buy for your property. Every chair leg, table base, and sofa foot should have a high-quality felt pad attached. These should be checked every few months, as they can collect their own grit or wear thin over time. If you have pets, their maintenance is just as important as the floor’s. Keeping claws trimmed is a simple way to avoid the micro-scratches that eventually make a floor look cloudy. It’s about creating an environment where the floor can thrive without being under constant physical assault.
Furniture and Heavy Loads
There is one rule you must never break: never drag furniture across your laminate. Even a lightweight side table can catch a grain of sand and leave a permanent trail. When you need to move heavy appliances or large wardrobes, use gliders or lay down sheets of thin plywood to create a temporary path. You should also be wary of “point loading.” This occurs when a large amount of weight is concentrated on a tiny area, such as narrow chair legs or high heels. Over time, this pressure can cause indentations or even crack the click-joint system. Distributing weight with wider furniture feet or area rugs can protect these high-pressure zones.
Environmental Factors: Sun and Air
Your floor is a living part of your home’s ecosystem. While it’s synthetic, the fibreboard core still reacts to the air around it. Maintaining a consistent indoor environment with a humidity level between 40% and 60% is the sweet spot for stability. If the air gets too dry, the boards can shrink and create gaps; if it’s too humid, they may expand and peak. Direct sunlight is another factor often overlooked. UV rays can cause the photographic layer to fade over time, leaving “ghost” marks where furniture or rugs once sat. Using blinds during peak sun hours or occasionally rotating your floor coverings will ensure the color remains uniform across the entire room.
Choosing Low-Maintenance Laminate for Your Next Project
Selecting a new floor is about more than just picking a color you like. If you want a home that remains easy to manage, you need to consider how the technical specifications of the plank will impact your daily routine. This laminate flooring cleaning guide has focused on how to treat the floor you have, but if you’re planning a new project, you have the chance to “build in” durability from the start. Choosing a product with a high-quality wear layer and a stable core will significantly reduce the effort required to keep it looking new for the long haul.
One detail that often gets overlooked is the edge profile of the planks. Square-edged laminate provides a smooth, monolithic appearance, but it can be prone to “chipping” at the seams if the subfloor isn’t perfectly flat. Bevelled edges, or V-grooves, create a more traditional wood-plank look. While some worry that these grooves catch dirt, they actually do a better job of hiding minor gaps and protecting the joints from the friction of footsteps. When paired with a professional-grade, high-density underlay, these joints remain locked tight. This stability is vital because it prevents the boards from shifting and opening up pathways for moisture to reach the HDF core. High-quality underlay also provides a better acoustic barrier, making the floor feel more substantial underfoot.
AC Ratings: Matching the Floor to the Room
The AC (Abrasion Class) rating is your most reliable indicator of how a floor will stand up to cleaning and traffic. We recommend an AC5 rating for high-traffic areas like hallways and kitchens. These planks are designed for commercial-level use, meaning they can withstand the frequent sweeping and damp mopping required in busy zones. An AC3 rating is perfectly sufficient for a bedroom where you’re likely walking in socks or slippers. However, our frank advice is to “over-spec” where your budget allows. Choosing a higher AC rating for a residential space isn’t just about durability; it’s about peace of mind. It gives you a thicker buffer against the accidents and grit that are inevitable in a family home.
The Frank Conclusion: Quality Matters
At the end of the day, the secret to a lasting shine isn’t a miracle chemical or an expensive machine. It’s a combination of the right material selection and a consistent, moisture-controlled maintenance routine. We’ve seen budget-friendly laminate last for decades because the owners respected the “damp mop” rule and used felt pads. Conversely, the most expensive floor on the market won’t survive a year of being soaked with a string mop. View your cleaning routine as a simple act of preservation rather than a difficult chore. If you’re looking for a floor that combines modern water-resistant technology with classic style, browse our range of laminate flooring UK to find a durable foundation for your home.
Protecting Your Investment for the Long Haul
Maintaining a beautiful floor isn’t about working harder; it’s about working smarter. By following this laminate flooring cleaning guide, you’ve learned that moisture is the primary enemy and grit is a silent saboteur. Whether it’s mastering the damp mop technique or ensuring every chair leg has a felt pad, these small habits prevent the need for expensive repairs. Protecting the fibreboard core and the transparent wear layer today ensures your home stays looking sharp for decades.
At Frankly Flooring, we believe in providing the honest truth about the products we sell. As a family-run business with over 20 years of expertise, we offer direct UK-wide delivery and frank, no-nonsense advice on every product in our catalogue. If you’re ready to upgrade your space with a floor built to last, you can browse our durable, easy-to-clean laminate flooring ranges today. Your floor is the foundation of your home’s character, and with the right care, it’ll remain a source of pride for years to come.
Frequently Asked Questions
Can I use a steam mop on laminate flooring?
No, you should never use a steam mop on laminate. The high-pressure steam forces moisture deep into the click-joints and the HDF core, which leads to irreversible warping and peaking. While steam is effective for tile, it is the fastest way to ruin a laminate floor. Stick to the damp mop method we described earlier to keep your warranty intact and your boards flat.
How do I get a streak-free shine on my laminate floor?
You achieve a streak-free shine by buffing the floor with a dry microfibre cloth immediately after mopping. Most streaks are caused by cleaning solutions drying on the surface or excess water sitting too long. By removing that moisture manually before it air-dries, you prevent a dull film from forming. It only takes a few extra minutes but makes a massive difference in the final look of the room.
Is it safe to use vinegar and water to clean laminate?
We don’t recommend using vinegar and water. Vinegar is an acid that can slowly eat away at the transparent wear layer over time. This makes your floor look cloudy and removes its protective properties. This laminate flooring cleaning guide prioritizes longevity, so we always suggest using a pH-neutral cleaner specifically formulated for synthetic surfaces instead of common household hacks that can cause long-term damage.
What should I do if my laminate floor starts to bubble at the edges?
Bubbling at the edges is a sign that moisture has penetrated the core and caused the wood fibres to swell. Unfortunately, this type of damage is usually permanent. Once the HDF core expands, it won’t return to its original flat state. You should identify the source of the moisture, such as a spill or a nearby appliance leak, and replace the damaged planks to prevent the issue from spreading.
How often should I deep clean my laminate floors?
You should only deep clean with a damp mop about once a week. If the room has very low traffic, twice a month is often enough. Daily care should be limited to dry sweeping or vacuuming to remove grit. Over-cleaning with liquids increases the chance of moisture damage, so less is often more when it relates to wet maintenance routines.
Can I use a vacuum cleaner with a brush bar on laminate?
No, you should never use a vacuum with the brush bar engaged. The stiff, rotating bristles are designed to agitate carpet but will leave micro-scratches on a laminate wear layer. Always use a hard-floor setting or a soft-bristle attachment. This ensures you lift the dirt without grinding it into the finish of your planks and causing a dull appearance over time.
How do I remove deep scratches from my laminate floor?
Deep scratches that penetrate the decor layer require a laminate repair kit. These kits use color-matched wax sticks that you melt or rub into the gouge to seal it from moisture. Unlike solid timber, you cannot sand or refinish laminate. If the scratch is too large for wax to hide, the only permanent fix is to disassemble that section of the floor and replace the specific board.
Why does my laminate floor feel sticky after cleaning?
A sticky floor is typically the result of using too much cleaning solution or products containing wax and oils. These substances leave a residue that actually attracts more dust and hair. To fix this, wipe the floor with a well-wrung cloth dampened only with plain water. This helps strip the chemical build-up and restores the original, smooth feel of the surface without leaving a new film behind.