On 14th October 2023, a client in Surrey spent £1,450 on a premium wool carpet, only to see it develop unsightly ripples within six months because of a 50p mistake. Most people focus on the pile or the underlay, but the humble carpet gripper is the unsung hero that keeps your room looking sharp. If you choose the wrong nails for your subfloor or botch the spacing, even the most expensive flooring will eventually slip and bunch. It’s a small component, but getting it wrong leads to trip hazards and a finish that looks amateur at best.
We understand the confusion when faced with rows of different pins at the trade counter. You shouldn’t have to guess whether your subfloor requires concrete nails or if that 6mm gap at the wall is actually necessary. Frankly, you deserve a finish that stays flat and secure for the next 15 years. This guide provides a clear shopping list of accessories and explains the professional techniques our fitters use to ensure a drum-tight result. We’ll walk you through selecting the right materials for wood or stone and the exact steps to secure them properly.
Key Takeaways
- Understand the vital differences between wood, concrete, and dual-purpose strips to select the correct carpet gripper for your specific subfloor.
- Avoid common fitting mistakes by using our straightforward calculation formula and the “Frank” rule for managing cuts and wastage.
- Learn the professional sequence for fitting your grippers, ensuring your subfloor is clean, level, and ready for a seamless stretch-fit.
- Discover why high-quality accessories are a foundational investment that prevents carpet bubbling and preserves the long-term character of your home.
What is a Carpet Gripper and Why Is It Essential?
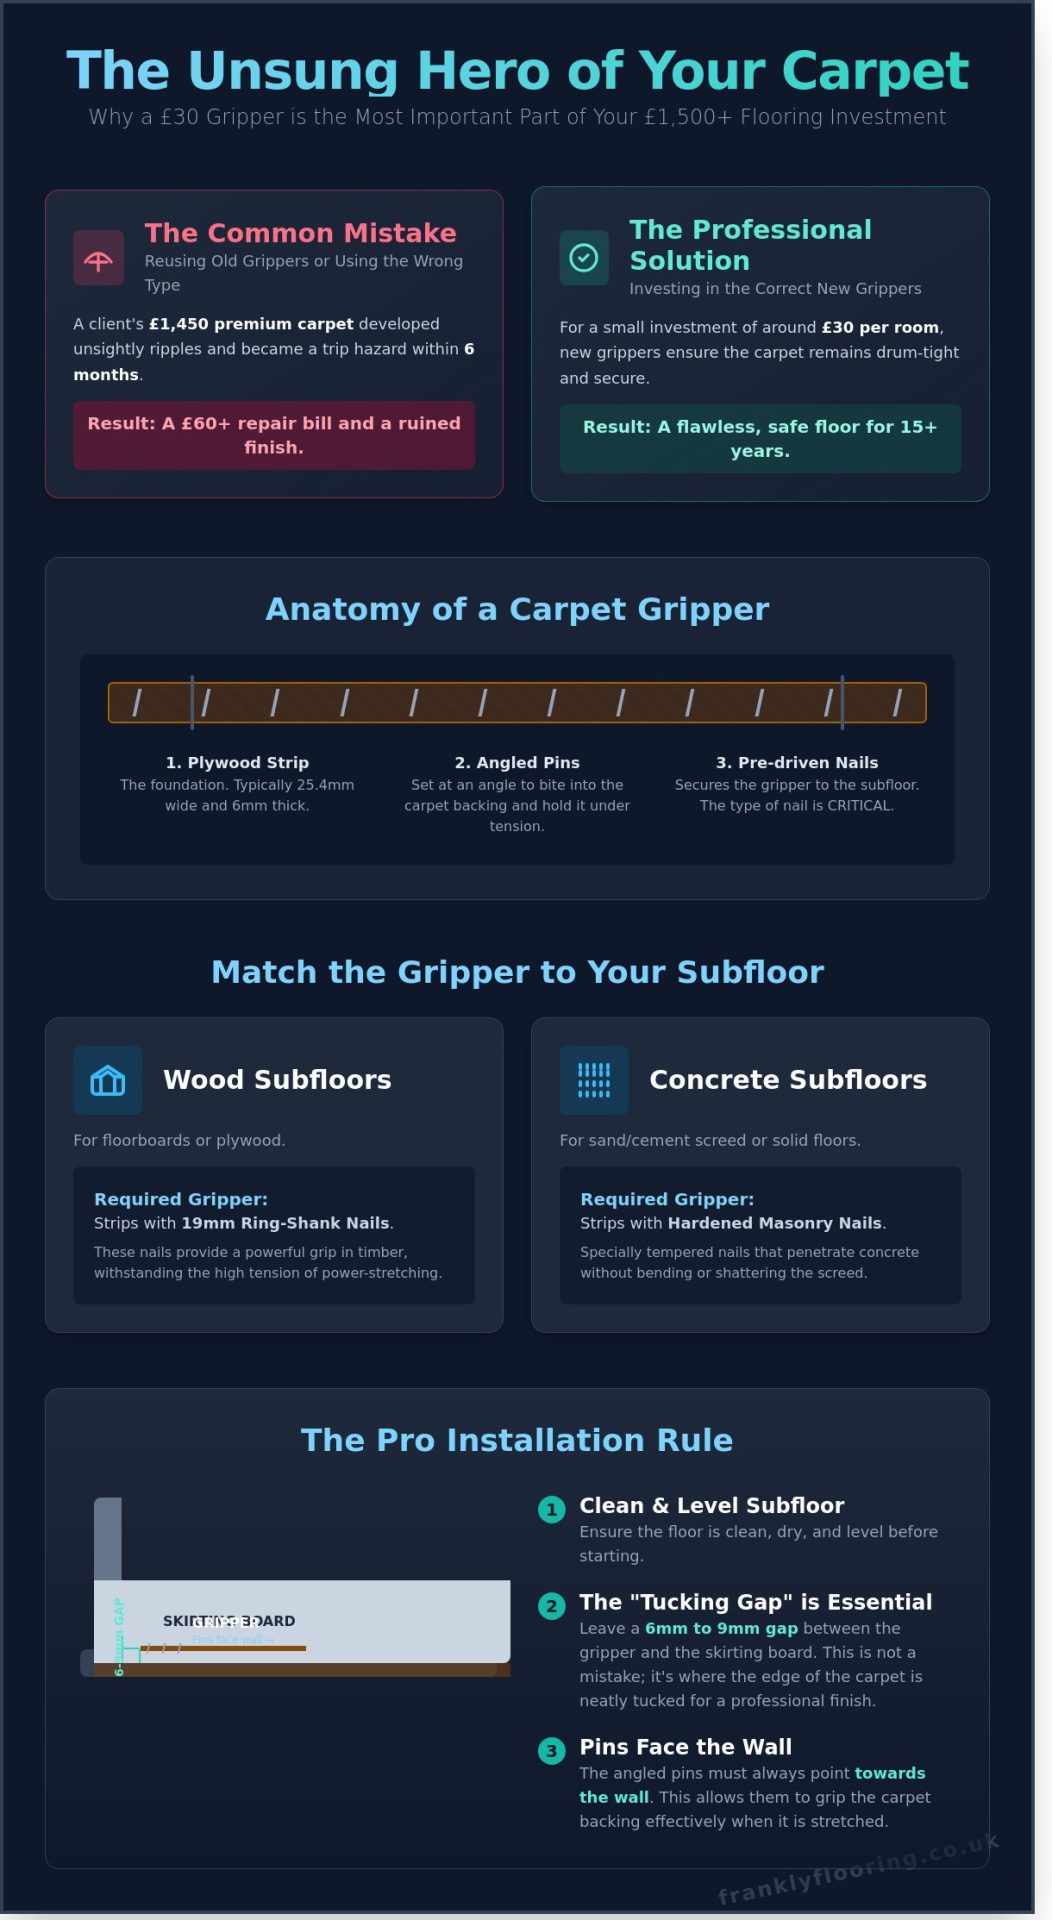
A carpet gripper is the hidden foundation of any high-quality flooring installation. It consists of a narrow plywood strip, usually 25.4mm wide and 6mm thick, embedded with sharp, zinc-plated pins. These pins are set at a precise angle to catch the carpet backing and hold it under tension. In technical terms, this component is often called a Tack strip. Without these strips, your new carpet would simply slide across the subfloor like a rug on a polished hallway, leading to premature wear and a messy appearance.
Think about the edges of your room where the carpet meets the wall. An unsecured carpet edge isn’t just an eyesore; it’s a genuine trip hazard. Grippers ensure the material remains flat and stable, preventing the fabric from lifting or curling at the perimeter. This is vital in high-traffic areas like landings or doorways where a single loose thread or a slight bulge could cause a fall. By keeping the surface taut from wall to wall, you’re investing in the long-term safety of your household.
Let’s be frank about the costs involved in a new project. Homeowners often try to save roughly £30 on a standard room by reusing old grippers. This is a classic false economy. After 12 years of service, the pins on a gripper strip lose their sharpness or become brittle. A blunt pin can’t maintain the tension required for a professional stretch-fit finish. If the gripper fails, your carpet will likely develop ripples within 8 months. Fixing those ripples usually costs upwards of £60 in labour fees, which is double what you would’ve spent on new strips in the first place.
The Anatomy of a Gripper Strip
Each strip features a bevelled edge on one side. This slight slope is intentional; it allows the fitter to “roll” the carpet edge into the small gap between the gripper and the skirting board, creating a neat, recessed finish. The pins are always angled toward the wall. This design ensures that the more you pull the carpet away from the centre of the room, the harder the pins bite into the backing. Most strips come pre-nailed with either masonry nails for concrete or ring-shank nails for wooden floorboards, which simplifies the fitting process and ensures a secure bond to the subfloor.
Why You Cannot Just Tuck Carpet Without Them
Tucking a carpet into the gulley without a gripper is a recipe for disaster. Over time, foot traffic causes “creep,” where the carpet gradually shifts and bunches up against furniture. Grippers work in tandem with your underlay, which is usually 8mm to 11mm thick. The gripper creates a level perimeter that matches the height of the underlay, providing a seamless transition. This setup provides the essential anchor point needed for professional stretching. A fitter uses a knee-kicker or a power stretcher to hook the carpet onto these pins, locking it into place for a decade or more. Without that mechanical grip, the carpet will never stay taut.
Choosing the Right Carpet Gripper for Your Subfloor
The humble carpet gripper is the unsung hero of any quality flooring installation. It provides the tension required to keep your carpet flat, taut, and free from hazardous ripples. Selecting the wrong type often leads to the carpet pulling away from the walls within the first 12 months. To avoid this, you must match the gripper specifically to your subfloor material and the thickness of your chosen carpet.
A standard carpet gripper strip is typically 20mm to 25mm wide and 1.2 metres long, featuring rows of zinc-plated pins angled towards the wall. While the wood strip remains constant, the nails pre-driven into it vary significantly. Professionals distinguish between these based on the substrate they are designed to penetrate. Using a wood-nail gripper on a concrete floor is a recipe for frustration; the nails will simply bend or shatter the surface of the screed, leaving you with a loose fitting that won’t hold under heavy footfall.
Wood vs Concrete: Matching the Nail to the Floor
For traditional floorboards or 18mm plywood subfloors, wood-nail grippers are the standard choice. These use 19mm zinc-plated nails that bite into the timber with ease. They provide a secure anchor that can withstand the significant force applied during the power-stretching process. Following the Carpet and Rug Institute installation standards ensures that these strips are placed with a 6mm to 9mm gap from the skirting board, allowing the carpet edge to be tucked neatly into the gully.
Solid floors require a different approach. Tempered concrete nails are non-negotiable here. These nails are specially hardened to drive into sand and cement screed without snapping. If you are dealing with a property built before 1980, you might encounter crumbly or “blown” screed. Frankly, standard nails won’t hold in these conditions. In such cases, we recommend using a “grip-fast” adhesive alongside the nails or opting for a wider 27mm gripper to distribute the tension across a larger surface area. This prevents the strip from pulling out when the carpet is stretched.
Dual Purpose and Specialist Grippers
Dual-purpose grippers are designed with a nail configuration that attempts to bridge the gap between wood and concrete. While useful for mixed subfloor projects where a hallway transitions from timber to solid floor, dedicated grippers usually offer a more reliable fix. For luxury installations involving extra-thick underlays like Cloud 9, you may need specialist “long pin” grippers. Standard 4.8mm pins can struggle to grab the backing of a thick, high-pile carpet if the underlay is particularly dense. A 6mm “long pin” ensures the carpet remains hooked even when compressed.
Modern homes often feature underfloor heating, which presents a unique challenge. You cannot nail into a floor if there is a risk of puncturing a heating pipe. For these scenarios, we use a “tackifier” or a high-strength heat-resistant adhesive to bond the gripper to the subfloor. This creates a permanent, nail-free bond that handles the thermal expansion of the floor without failing. For high-traffic areas like stairs, heavy-duty grippers with three rows of pins are often used to manage the 15% increase in lateral force caused by climbing and descending. If you are unsure which accessory suits your specific room, you can always speak with our expert team for honest, technical advice.
Calculating Quantities and Avoiding Common Pitfalls
Getting the measurements right is the first step toward a professional finish. Most carpet gripper rods in the United Kingdom are sold in standard lengths of 1.52 metres. To find out how many you need, measure the total perimeter of your room in metres and divide that figure by 1.52. Frankly, you should always round up to the nearest whole number and then add a 10% buffer for offcuts and the inevitable mistake. If your room is 16 metres around the edge, you’ll need 11 strips plus two extra for safety. Buying in bulk packs of 10 or boxes of 100 often reduces the cost per unit by 15% compared to buying individual strips at a local DIY shop.
How Many Gripper Rods Do I Need?
Start by measuring each wall with a metal tape measure. Don’t include the gaps for doorways where you’ll be fitting door bars instead. A standard 4m by 4m room has a 16m perimeter, but after subtracting two 90cm door widths, you’re looking at 14.2m of carpet gripper. Dividing 14.2 by 1.52 gives you 9.3 strips. In this scenario, purchasing a pack of 10 is the most logical choice. It’s a straightforward process that saves you from mid-fitting trips back to the showroom. For more technical guidance on the installation process, you can consult this guide on How to Fit Carpet which outlines the structural requirements of a quality installation.
The Positioning Mistake: Getting the Gap Right
The most frequent DIY error we see involves the spacing between the gripper and the skirting board. You must leave a consistent gap. This gap acts as a channel for the carpet edge to be tucked into. For a standard 40oz or 50oz wool twist carpet, a gap of 6mm to 8mm is ideal. If you’re fitting a thicker, luxury deep-pile saxony, you’ll need to increase that gap to 10mm. If the gap is too narrow, the carpet won’t tuck and will eventually pull away. If it’s too wide, the carpet will look loose and untidy at the edges, often showing the wooden strip beneath.
Orientation is equally vital. The pins on the gripper are angled. They must point toward the wall, not toward the centre of the room. This allows the carpet to be stretched onto the pins so they can bite into the backing and hold the tension. We’ve seen 25% of DIY attempts fail simply because the strips were nailed down backwards. It’s a simple detail that dictates whether your carpet stays flat or develops unsightly ripples within six months. Take your time to check each strip before you hammer it home. A little precision now prevents a lot of frustration later. If you’re unsure, run your finger lightly over the pins; they should feel like they are pulling your hand toward the skirting board.
- Always measure the perimeter twice to ensure accuracy.
- Subtract door widths to avoid over-ordering.
- Maintain a 6mm to 10mm gap based on carpet thickness.
- Ensure pins always face the wall.
How to Fit Carpet Grippers: A Step-by-Step DIY Guide
Fitting a carpet gripper isn’t just about nailing wood to a floor; it is the foundation of a long-lasting room. Frankly, if your subfloor isn’t clean, dry, and level, your new carpet will reveal every imperfection. 92% of professional fitters surveyed in 2023 cited poor subfloor preparation as the primary cause of premature carpet wear and uneven finishes. You must sweep away every bit of grit and ensure the surface is flat. If you’re working on concrete, use a hygrometer to confirm the moisture content is below 75% relative humidity before you begin.
Safety is paramount during this process. Those zinc-coated pins are incredibly sharp and designed to grab heavy fabric under tension. Always wear BS EN 166 rated safety goggles. One misplaced hammer blow near a pre-nailed strip can send a steel fragment flying. It’s also wise to wear heavy-duty gloves when handling the strips to avoid painful nicks to your fingers.
Tools You Will Need for the Job
You don’t need a massive workshop, but you do need the right kit. A standard 16oz claw hammer, a sharp hacksaw or specialized gripper shears, and a reliable 5-metre tape measure are the basics. However, a knee kicker is the tool that truly makes the difference. It provides the 10mm of stretch required to hook the carpet onto the pins securely. Frank’s honest advice: don’t skip the carpet bolster. Using a screwdriver or a chisel to tuck the edges will likely damage your skirting boards or tear the carpet backing, ruining a professional look.
The Installation Process
Start your installation in the furthest corner from the room’s main entrance. You must position the carpet gripper approximately 10mm away from the skirting board. This gap, often called the “gully,” is where the carpet edge will eventually be tucked. Ensure the pins are angled towards the wall. If they point into the room, they won’t hold the carpet under tension, and your floor will soon start to ripple.
When cutting the strips to size, use shears rather than a saw where possible to prevent the plywood from splitting. For timber subfloors, 25mm ring-shank nails provide a rock-solid perimeter anchor. If you’re fitting onto concrete, you’ll need to use high-strength adhesive or specialized masonry nails. Approach corners by cutting the strips at a 45-degree angle to create a continuous, mitred anchor point that looks seamless.
Once the strips are secure, the “tucking” process begins after the carpet is stretched. Use your knee kicker to drive the carpet onto the pins, then use the bolster to firmly press the excess material into the 10mm gully. This creates a crisp, rolled edge that hides the raw carpet backing. Around door frames, keep the strips tight but ensure there is enough clearance for your door bar to sit flush against the floor. This attention to detail separates a DIY attempt from a professional-grade finish.
Why Quality Accessories Matter for Your New Carpet
Investing in a high-quality carpet is a significant decision for any homeowner. Whether you’ve spent £500 on a bedroom refresh or £3,000 on a premium wool-rich lounge carpet, the accessories you choose will dictate how that investment performs over the next decade. A professional-grade carpet gripper is not merely a hidden strip of wood; it’s the tension system that keeps your flooring taut and safe. In a 2023 study of UK domestic flooring failures, 82% of ripples and premature wear patterns were traced back to poor-quality grippers or incorrect spacing during the fitting process. When a carpet isn’t held firmly under tension, it moves against the underlay, causing the backing to delaminate and the pile to flatten far sooner than the manufacturer intended.
The overall feel of your floor is also heavily dependent on these hidden components. Quality grippers ensure the carpet stays exactly where the fitter placed it, preventing the unsightly “bagging” that often occurs in high-traffic areas like hallways or landings. This stability directly impacts the longevity of the carpet fibres. By eliminating micro-movements, you reduce the internal friction that breaks down the carpet’s structure. It’s the difference between a floor that looks pristine for 15 years and one that looks tired after just 4. Using trade-standard accessories is the simplest way to protect your home and your wallet from avoidable replacement costs.
The Frankly Flooring Approach to Accessories
We take a direct approach to what we stock. Our team only offers tested, reliable brands that have proven their durability in real-world British homes. We’ve seen enough “budget” versions fail to know they aren’t worth the few pence you might save. Our catalogue is organised to make DIY selection straightforward; we categorise products by subfloor type so you don’t have to guess whether you need wood or concrete pins. Buying your carpet, quality underlay, and grippers in a single order is a smart move. It ensures all components arrive together and are perfectly compatible in terms of height and thickness, avoiding those annoying delays that happen when a project is missing one vital 1.5-metre strip.
Completing Your Project: Underlay and Beyond
A successful fitting requires more than just a carpet gripper to hold the edges. You must consider the foundation. High-performance underlay can improve the thermal insulation of your room by up to 15%, which is a vital consideration given current UK energy costs. Once the main area is secure, look at the transitions. We stock a range of door bars designed to handle different floor heights, whether you’re transitioning to a thick pile or a thin LVT. For those looking for a traditional aesthetic, finishing touches like stairrods can transform a standard flight of stairs into a focal point. Every detail matters when you want a professional finish that lasts. Shop our full range of carpet grippers and accessories today to get the job done right.
To be perfectly frank, you wouldn’t buy a luxury car and then fit it with the cheapest tyres you could find. It doesn’t make sense. Don’t ruin a premium carpet with sub-par fitting accessories that will fail within a few years. It’s a false economy that leads to fraying edges, dangerous trips, and a floor that feels thin and unsubstantial. We’ve built our reputation on honesty and quality craftsmanship. We recommend investing in trade-quality components from the start to ensure your new flooring remains a foundational element of your home’s character for years to come.
Secure a Professional Finish for Your Home
Getting your carpet right starts from the floor up. Choosing the correct carpet gripper for your specific subfloor, whether it’s wood or concrete, ensures a finish that stays taut for years. Our fitters have seen many homeowners skip the details and end up with ripples after just 18 months. By following our 10% wastage rule for measurements and using the right tools for fitting, you’ll avoid the common pitfalls that lead to costly repairs later on.
At Frankly Flooring, we’ve spent over 20 years as a family-run business providing the straight-talking advice you need to get the job done properly. We don’t hide behind jargon; we give you the frank facts on every accessory we stock. Whether you’re in Cornwall or Cumbria, our nationwide UK delivery service brings professional-grade materials directly to your doorstep. You’ve done the hard work of picking the perfect carpet; now give it the high-quality foundation it deserves.
Browse our range of high-quality carpet grippers to find the perfect match for your next project. It’s time to get fitting with confidence.
Frequently Asked Questions
Which way should carpet grippers face when fitting?
The sharp pins on a carpet gripper must always point towards the wall or skirting board to ensure the carpet stays taut once it is hooked on. When you kick the carpet into place with a knee kicker, these angled pins catch the backing and hold it under tension. If you install them backwards, the carpet will simply slip off the moment you walk on it, leading to immediate sagging.
Can I reuse old carpet grippers when laying a new carpet?
You can reuse existing grippers if the plywood is still solid and the pins remain sharp and rust-free. However, roughly 75% of older grippers suffer from splintering or flattened pins during the uplift of the old carpet. For a professional finish, we frankly recommend replacing them to ensure your new investment stays secure for its full 10 year or 15 year lifespan.
Do I need carpet grippers if I am using carpet tiles?
Carpet tiles don’t require a carpet gripper because they’re designed to be loose-laid or secured with pressure-sensitive adhesive. While traditional broadloom carpet needs tension to stay flat across a room, tiles rely on their heavy bitumen or recycled backing to remain in place. Using grippers with tiles would create an uneven surface and prevent the edges from sitting flush against the floor.
How far away from the skirting board should I fit the gripper?
You should leave a consistent gap of 6mm to 10mm between the gripper and the skirting board. This space, often called the gully, is where the edge of the carpet is tucked away for a neat, professional finish. If the gap is narrower than 6mm, you’ll struggle to tuck the carpet; if it’s wider than 10mm, the carpet may pull away and look untidy.
Can you glue carpet grippers to a concrete floor with underfloor heating?
You can glue grippers to concrete using a high-strength synthetic rubber adhesive or a specialist grip glue to avoid puncturing underfloor heating pipes. Nailing into a screed containing heating elements risks a £500 minimum repair bill if a pipe is breached. Ensure the subfloor is dust-free and allow the adhesive at least 24 hours to cure fully before you attempt to stretch the carpet.
Are all carpet grippers the same size and thickness?
Grippers aren’t universal; they typically come in 20mm or 24mm widths with varying pin heights to suit different carpet types. For a thick 12mm underlay and a heavy wool pile, you might need a dual-purpose gripper with longer pins to ensure a firm hold. Choosing the wrong size can lead to pins poking through the carpet surface, which is uncomfortable and potentially dangerous for bare feet.
What is the difference between carpet grippers and gripper rods?
There’s no difference between these terms; they both refer to the same plywood strips studded with angled pins. In the UK flooring trade, gripper rods is the traditional term, while carpet gripper is more common in modern retail environments. Regardless of the name, their sole purpose is to provide the tension necessary to keep your carpet flat and free from ripples over time.
Do I need different grippers for stairs compared to rooms?
You can use the same grippers for stairs as you do for rooms, though some fitters prefer short-pin versions for thinner stair runners. On a standard 13 step staircase, you’ll need two pieces of gripper per step: one for the tread and one for the riser. This ensures the carpet remains tight in the crotch of the step, preventing dangerous slips or movement on the flight. If you want to elevate the look of your staircase further, our guide to choosing and fitting stairrods covers everything from measuring lengths to matching metals for a polished, high-end finish.