
Your brand new wood or LVT flooring is only as good as the surface beneath it. Most people spend weeks picking the perfect shade of oak but only minutes thinking about the concrete or timber hiding under their feet. It’s a gamble that rarely pays off. If you’re searching for the best flooring for uneven subfloor uk, you’ve likely already spotted a few dips or bumps that make you nervous. We’re here to tell you that a flawless finish isn’t about hiding those flaws; it’s about fixing them before the first plank is ever laid.
We understand the anxiety of watching a significant investment literally crack under pressure because of a rushed prep job. You want a floor that stays quiet, flat, and durable for decades, not just until the end of the month. This guide provides a frank look at the essential steps of subfloor preparation. We’ll walk you through moisture testing, the realities of self-levelling compounds, and how to handle different materials so you can achieve professional results without the professional price tag.
Key Takeaways
- Understand that subfloor preparation is 90% of the work, ensuring your wood or LVT flooring looks professional and survives for decades.
- Discover how to identify the best flooring for uneven subfloor uk by stripping back to the bare surface and addressing structural dips before laying a single plank.
- Learn the specific differences between preparing suspended timber and solid concrete, focusing on stability for wood and moisture control for LVT.
- Master the precision phase of moisture testing with a hygrometer to protect your investment from the silent damage caused by hidden dampness.
- Select the correct underlay and accessories to provide a vital moisture barrier and sound dampening for a quiet, durable finish.
What is a Subfloor and Why Does Preparation Matter?
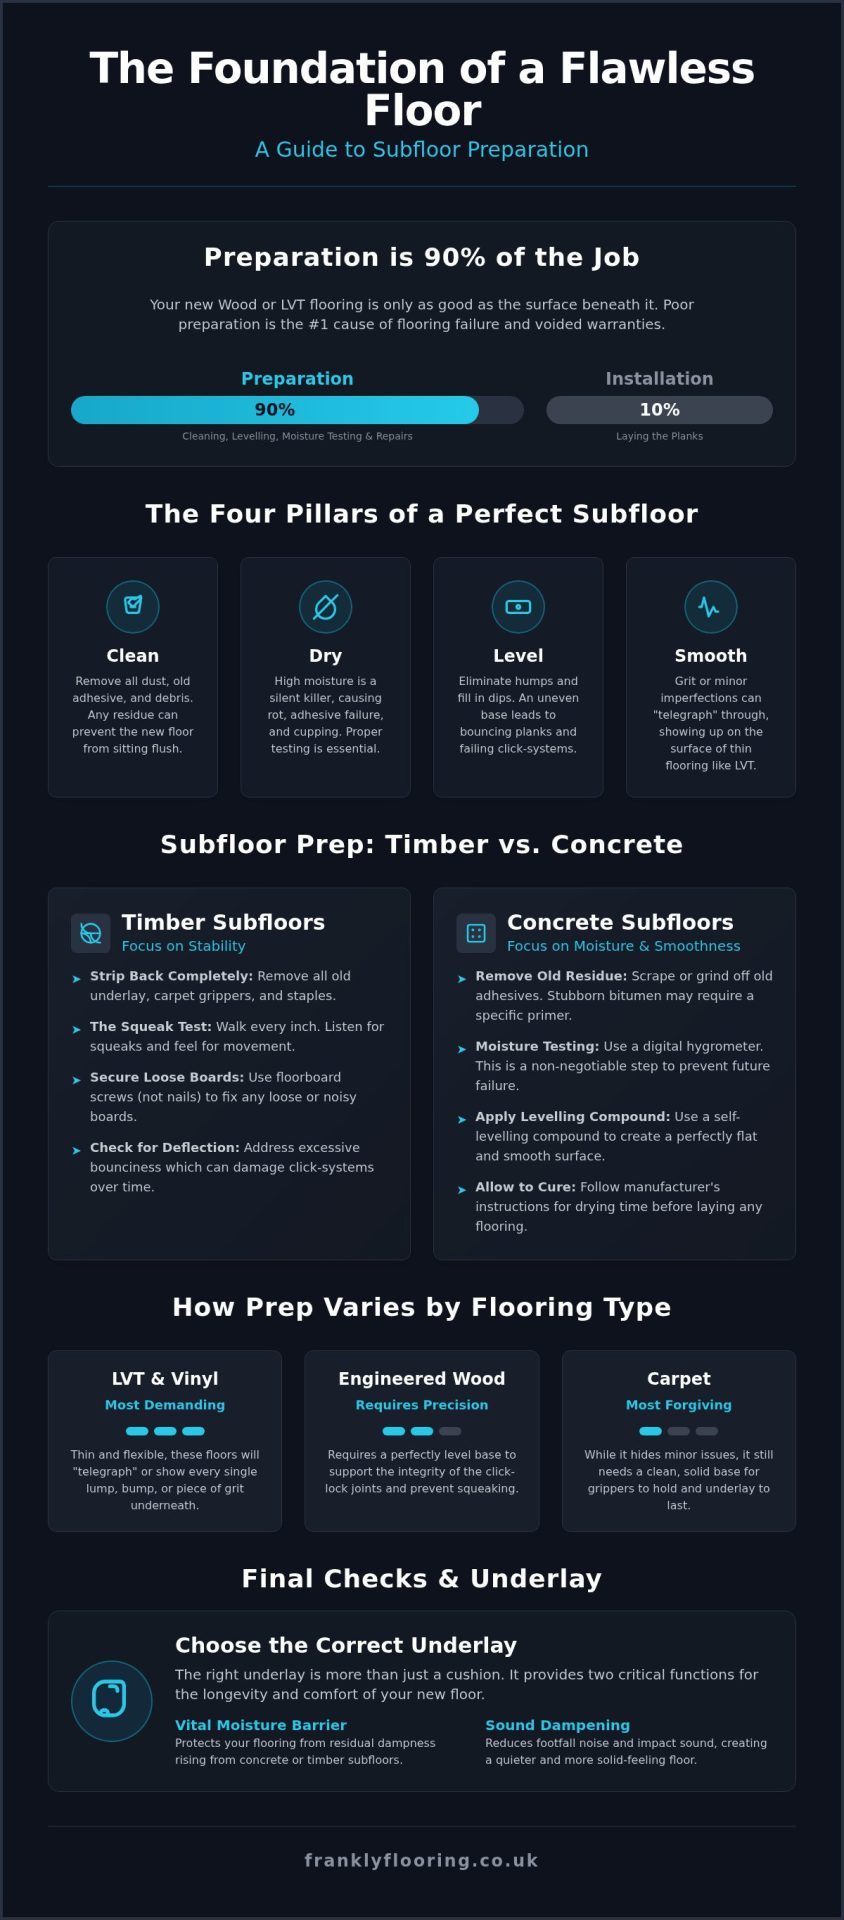
To understand why your new floor might fail, you first need to identify What is a Subfloor. It is the structural foundation of your room, typically consisting of concrete or timber joists and floorboards. While most homeowners spend weeks debating over the perfect shade of oak, they often spend only minutes considering the surface beneath it. This is a mistake. We believe that preparation is 90% of the job; the actual laying of the planks is simply the finishing touch that gets all the credit.
Here is the Frank truth: poor subfloor preparation is the primary cause of flooring failure and voided warranties in the UK. When you are searching for the best flooring for uneven subfloor uk, you aren’t just looking for a product that can hide bumps. You are looking for a system that works with a stable base. If your subfloor isn’t right, even the most expensive LVT or wood will eventually click, creak, or cup. Manufacturers are incredibly strict about this. If you haven’t followed their preparation guidelines to the letter, your warranty is effectively worthless the moment the first plank goes down.
The Four Pillars of a Perfect Subfloor
Achieving a flawless finish requires a disciplined approach to the surface. First, it must be clean. This means removing every speck of dust, old adhesive, and debris that could prevent your new flooring from sitting flush. Second, it must be dry. High moisture levels are a silent killer, leading to rot in timber or adhesive failure on concrete. Third, the surface must be level. We aren’t just talking about a slight slope; we mean removing humps and filling dips to prevent bouncing planks. Finally, the subfloor must be smooth. Any grit or minor imperfection can eventually show through thinner materials.
How Prep Varies by Flooring Type
The amount of work required depends heavily on what you’ve bought. LVT and vinyl are the most demanding because they are thin and flexible. Any imperfection in the subfloor will “telegraph” through to the surface, showing every lump and bump. Engineered wood flooring is slightly more robust but requires a perfectly level base to support the integrity of the click-lock system. Carpet is the most forgiving of the group, but it still requires a clean, solid base to ensure the grippers hold firm and the underlay doesn’t wear prematurely. Choosing the best flooring for uneven subfloor uk starts with knowing how much preparation you’re willing to do.
Step 1: Clearing the Deck and Assessing Damage
Before you can even think about aesthetics, you’ve got to get down to the bones of the room. This means stripping back every layer until you reach the bare structural surface. Whether it’s old carpet, dated vinyl, or worn-out laminate, it all has to go. Don’t be tempted to leave old underlay behind; it’s often compressed, brittle, and harbouring decades of dust. When searching for the best flooring for uneven subfloor uk, many people forget that the “uneven” part needs to be addressed at the source before the new product even arrives.
Pulling up carpet grippers and staples is a tedious but vital task. If you’re installing LVT, even a single staple left flush with the floor will eventually cause a bump that ruins the finish. While you’re at it, consider removing your skirting boards. It’s more work, but it allows the new flooring to sit neatly underneath the skirting, avoiding the need for scotia beads or trim. Once the room is clear, vacuum thoroughly. You’ll need to do this again later, but starting with a clean slate is the only way to spot Common subfloor problems like cracks, damp patches, or rot.
Removing Old Adhesives and Residue
Good enough isn’t good enough when it comes to old glue. If you’re laying LVT, any leftover adhesive residue will prevent the new planks from bonding or sitting flat. Bitumen, that black tar-like substance found in many older UK homes, is particularly stubborn. Unless you’re prepared to grind it off, you’ll likely need a specific primer to seal it so it doesn’t react with new levelling compounds. Use chemical adhesive removers sparingly because they can soak into the subfloor and interfere with the bond of your new flooring. For the right tools to tackle these tasks, check out our range of flooring accessories.
The Squeak Test for Timber Floors
If you have a timber subfloor, walk every single inch of the room. Listen for squeaks and feel for movement. Loose boards or noisy joists won’t fix themselves once the new floor is down. Use floorboard screws rather than nails to secure anything that moves; nails eventually work themselves loose again. If the floor feels like a trampoline when you jump on it, you’re dealing with deflection. This bounce is a major hurdle when looking for the best flooring for uneven subfloor uk, as excessive movement will snap the click-joints of laminate or engineered wood. Identifying these issues now saves you from a costly failure later.
Timber vs. Concrete: Tailoring Your Prep
In the UK, your subfloor is almost certainly going to be either suspended timber or solid concrete. Each requires a distinct strategy to ensure your new floor doesn’t fail. When you’re searching for the best flooring for uneven subfloor uk, you have to remember that timber prep is primarily about achieving stability and flatness, whereas concrete prep focuses on managing moisture and creating a perfectly smooth surface. They aren’t interchangeable, and treating them as such is a shortcut to a noisy, unstable floor.
It’s a common mistake to assume that a new-build concrete floor is ready for planks immediately. In reality, these are rarely perfectly level and often contain significant residual moisture that can take months to escape. Following professional subfloor preparation procedures is non-negotiable if you want your warranty to remain intact. These same rigorous prep rules apply whether you are installing luxury vinyl tiles or looking for laminate flooring UK wide.
Prepping a Timber Subfloor
If you have floorboards, you’ll likely need a plywood overlay to create a suitable base for LVT or thin laminates. We recommend using 6mm SP101 grade plywood, which is specifically designed for the flooring industry. Don’t just lay the sheets side-by-side; you must stagger the joints. This prevents structural lines from appearing in your finished floor over time. Additionally, check that your air bricks are clear. Adequate ventilation beneath the floorboards is essential to prevent the build-up of condensation and eventual rot, which can destroy both the subfloor and your new covering.
Prepping a Concrete or Screed Subfloor
Concrete floors often look flat to the naked eye, but a long spirit level or straight edge will usually tell a different story. You’ll need to grind down any high spots and use a high-quality self-levelling compound to fill the dips. This is a critical step when identifying the best flooring for uneven subfloor uk, as it provides the mirror-smooth finish LVT requires. Before you pour any compound or apply adhesive, you must prime the concrete. Priming is a step many DIYers skip, but it’s essential. It stops the porous subfloor from sucking the moisture out of your levelling compound too quickly, which would cause it to crack and fail. Finally, look out for laitance. This is a weak, dusty layer that forms on the top of new screed as it dries. If you don’t sand this off, your adhesive will simply peel away from the floor, taking the top layer of screed with it.
Moisture Testing and Levelling: The Precision Phase
Moisture is the silent killer of engineered wood flooring. A concrete slab might look bone dry on the surface, but it can still hold enough residual water to cause warping, cupping, or adhesive failure within weeks of installation. You cannot rely on a visual check or the “touch test.” Instead, use a digital hygrometer to get an accurate reading of the Relative Humidity (RH) within the slab. The Frank threshold is strict: concrete should always be below 75% RH before you even think about laying your final floor. If your readings are higher, you’ll need to apply a Liquid Damp Proof Membrane (DPM) to create a permanent barrier against rising damp.
Achieving a professional finish when searching for the best flooring for uneven subfloor uk requires more than just a good eye. It requires precision tools and patience. If you skip the moisture check or ignore the levelling phase, you’re essentially gambling with your budget. To ensure your subfloor is ready for the next stage, you can shop our range of moisture-resistant accessories and compounds to get the job done right the first time.
How to Use a Self-Levelling Compound
Mixing levelling compound is a science, not a suggestion. You must follow the manufacturer’s water-to-powder ratio exactly; frankly, guessing the consistency leads to a weak, brittle surface that will eventually crack under the weight of your furniture. Once poured, use a spike roller to move the compound into the corners and remove trapped air bubbles. This ensures the glass-smooth finish that thin LVT requires. Most importantly, respect the drying times. While some products claim to be “walk-on” in hours, you should generally wait a full 24-48 hour window before installing your flooring to ensure all residual moisture has escaped.
The Straight-Edge Test
Before you declare the job finished, perform the straight-edge test. Take a 2-metre metal straight edge and slide it across the room to identify any “daylight” gaps where the floor dips away. The industry standard is clear: there should be no more than a 3mm deviation over a 2-metre span. In a flooring context, flatness refers to the surface being a perfectly smooth plane without bumps or dips, whereas levelness refers to the floor being perfectly horizontal. While your floor doesn’t always need to be perfectly level, especially in older UK homes, it must be perfectly flat to prevent the best flooring for uneven subfloor uk from clicking or failing at the joints.
Final Checks and Choosing Your Underlay
Before you open a single pack of planks, you must perform one final, obsessive vacuum of the entire room. Even a tiny pebble or a stray piece of grit will feel like a mountain under LVT once it’s walked upon. This is the moment where many DIY projects stumble. If you’ve spent days searching for the best flooring for uneven subfloor uk, don’t ruin the result by leaving debris trapped beneath the surface. A clean subfloor is a silent subfloor.
Underlay is often treated as an afterthought, but it’s actually a vital component of your subfloor preparation. It serves as a moisture barrier, a sound dampener, and a thermal insulator. You must match your underlay to your specific subfloor type. For concrete, a built-in vapour barrier is essential to stop moisture from rising. For timber, you need something breathable to prevent rot. Using the wrong underlay isn’t just a technical error; it can officially void your manufacturer warranty, leaving you with no recourse if the floor fails.
The Role of Underlay in Subfloor Prep
While we’ve stressed the importance of a level floor, a high-quality underlay can help compensate for minor imperfections under 2mm. It won’t fix a massive dip, but it will smooth out the micro-roughness of a screed. Beyond structural support, consider your environment. If you’re on a ground-floor concrete slab, thermal insulation is key to keeping your home warm. Conversely, if you live in a flat or apartment, you’ll need an underlay with a high acoustic decibel rating to satisfy building regulations and keep the neighbours happy. This careful selection is part of finding the best flooring for uneven subfloor uk for your specific property.
Ready to Lay: The Last Walk-Through
Your no-nonsense checklist before starting is simple: Clean, Dry, Level, and Sound. If you can’t tick all four boxes, you aren’t ready to lay. Acclimatisation is your final hurdle. Your new flooring needs to sit in the room for at least 48 hours to adjust to the local temperature and humidity. This prevents the boards from expanding or contracting too much after they’ve been fitted. If your project involves soft coverings rather than hard planks, make sure you’ve consulted our carpet gripper guide to ensure your edges are as professional as your subfloor. Once these steps are complete, you can finally enjoy the flawless finish you’ve worked so hard to prepare.
Achieve a Professional Finish from the Ground Up
Mastering subfloor preparation is the only way to ensure your new investment stands the test of time. It’s about moving beyond aesthetics and focusing on the structural foundation. You now know that 90% of a successful installation happens before the first plank is laid, specifically through rigorous moisture testing and achieving a perfectly flat surface. Whether you’re dealing with timber or concrete, following these steps ensures that even the best flooring for uneven subfloor uk performs exactly as the manufacturer intended.
At Frankly Flooring, we bring over 20 years of technical expertise to your project. As a family-run UK business, we pride ourselves on providing the straight-talking advice you need to avoid costly failures. We offer direct-to-consumer prices on premium brands, ensuring you get professional-grade materials without the middleman markup. We value integrity and long-term satisfaction, which is why we advocate for doing the job right the first time.
Browse our range of high-quality underlays and accessories to finish your prep right. With the right preparation and quality materials, you can create a quiet, durable, and beautiful floor that truly defines your home’s character.
Frequently Asked Questions
Can I lay new flooring over old flooring?
You should always strip back to the bare subfloor for the best results. Laying new planks over old carpet or vinyl creates an unstable base that can cause click-joints to snap or moisture to become trapped. While some people attempt it to save time, it often voids your warranty. Removing the old layer allows you to properly assess the surface and find the best flooring for uneven subfloor uk by fixing issues at the source.
How do I know if my concrete subfloor is dry enough?
You must use a digital hygrometer to get an accurate Relative Humidity (RH) reading. A visual check is never sufficient because moisture can be trapped deep within the slab. For a safe installation, the concrete should read below 75% RH. If your subfloor exceeds this level, you’ll need to apply a liquid damp proof membrane to prevent moisture from damaging your new wood or LVT flooring over time. It’s a vital step for long-term durability.
Do I really need to use plywood over my floorboards?
If you are installing LVT or thin laminate, a plywood overlay is essential. Standard floorboards often have slight ridges or gaps that will show through your finished floor. Using a 6mm SP101 grade plywood creates a perfectly flat, stable surface. It prevents the new flooring from dipping into gaps and ensures the joints remain secure. For thicker engineered wood, you might skip this if the boards are exceptionally flat and sound, but it’s rarely a risk worth taking.
What happens if my subfloor is not level?
An unlevel subfloor leads to structural failure and annoying noise. When planks bridge a dip, they flex every time you walk on them, which eventually snaps the delicate click-lock joints. This “bounce” also creates creaking sounds and can cause furniture to wobble. Over time, the constant movement will cause the floor to separate, leaving visible gaps and potentially ruining your investment before its time. Preparation is the only way to prevent these expensive structural issues.
How much does it cost to prepare a subfloor?
The cost of subfloor preparation varies based on the level of damage and the materials required. In the UK, typical costs for repairs or levelling range between £5 and £30 per square metre. If you need a professional screed, you might pay around £33 per square metre for labour and materials. DIYers can save on labour by purchasing a 25kg bag of self-levelling compound for approximately £12.00, while 20kg bags from various retailers range between £18 and £29.
Can I use underlay to fix an uneven floor?
Underlay is designed to cushion your floor and dampen sound, not to bridge significant dips or humps. While a high-quality underlay can mask micro-imperfections under 2mm, it cannot fix a subfloor that is structurally unlevel. Attempting to use extra layers of underlay to fill holes creates a spongy surface that will cause your floor’s joints to fail. Always level the subfloor properly before choosing the best flooring for uneven subfloor uk for your specific room.
How long does self-levelling compound take to dry?
Most self-levelling compounds are walk-on within 2 to 4 hours, but they aren’t ready for flooring that quickly. You should generally wait 24 to 48 hours for the moisture to fully escape before laying your final floor. Rushing this window can trap moisture beneath your new planks, leading to adhesive failure or warping. Always check the specific manufacturer’s instructions, as drying times can vary based on the depth of the pour and the room’s ventilation.
What is the best way to remove old floor adhesive?
Mechanical removal is the most reliable method. Use a heavy-duty floor scraper or a diamond grinder to strip back old glue until the subfloor is clean and porous. While chemical removers are available, they can soak into the subfloor and interfere with the bond of your new adhesive or levelling compound. If you’re dealing with old bitumen, it’s often safer to prime it with a specific bitumen-compatible primer rather than trying to scrape every speck away from the concrete.