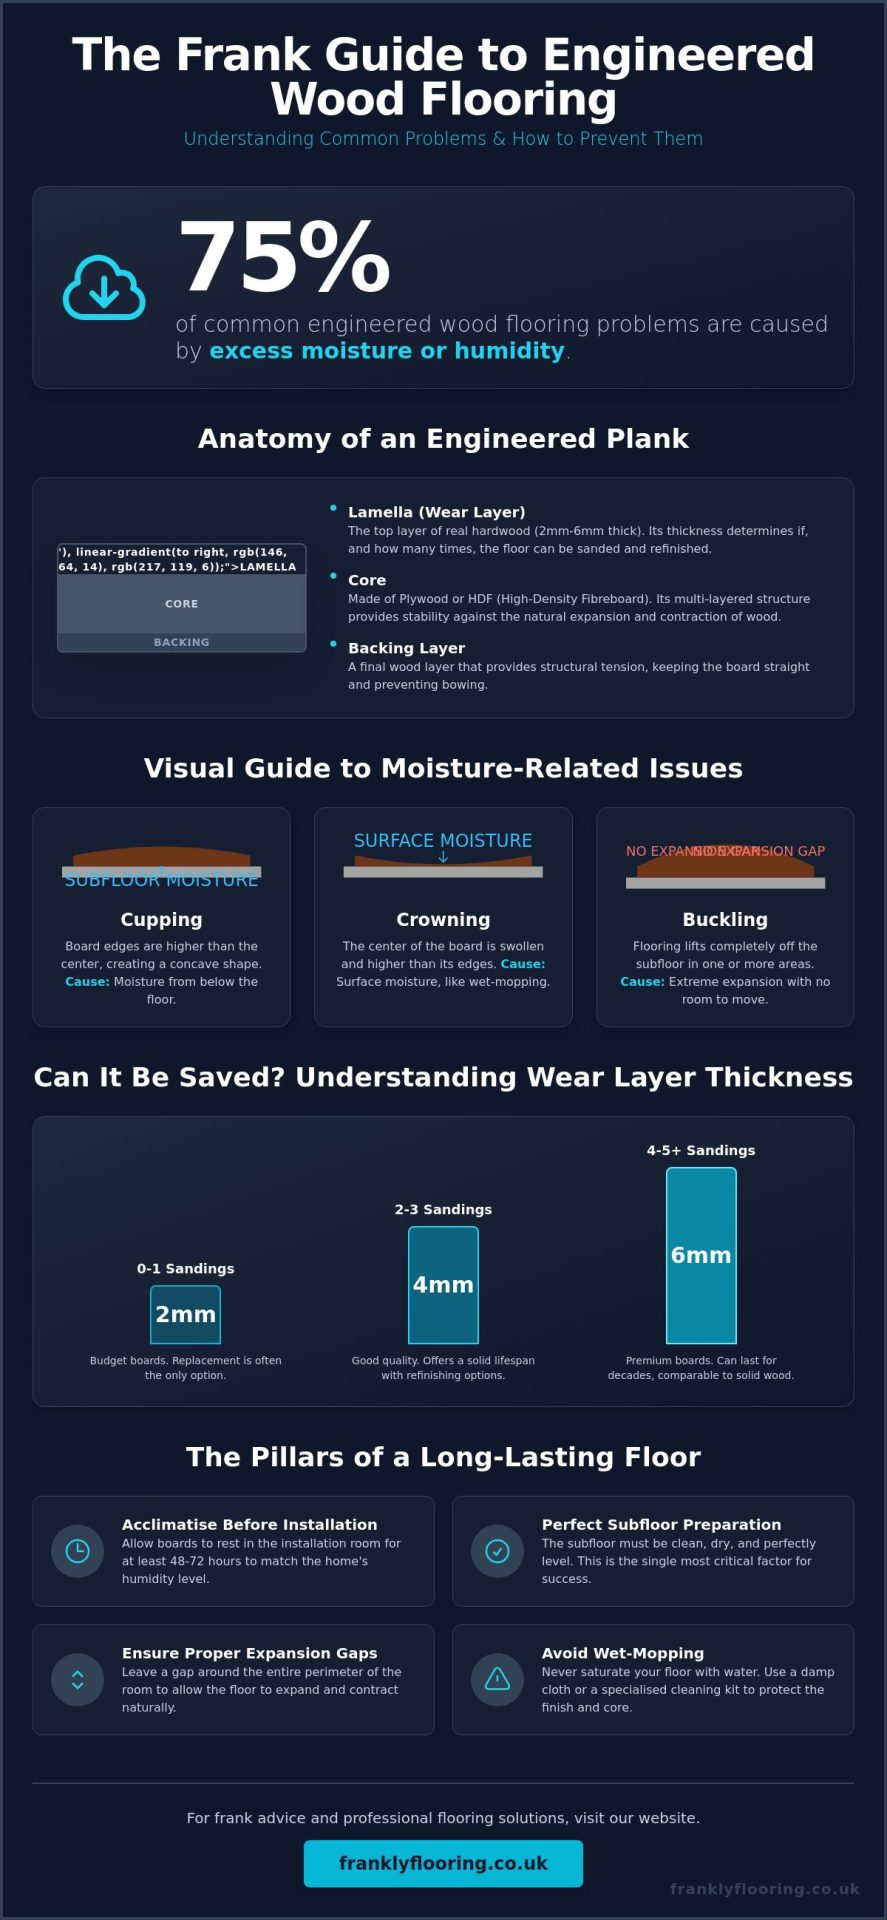
Did you know that approximately 75% of common engineered wood flooring problems are actually caused by moisture? It’s a startling figure, but for many British homeowners, it’s a reality that manifests as unsightly cupping, crowning, or buckling. We understand the frustration of watching a premium investment lose its lustre. You’ve chosen a beautiful material for your home, and seeing gaps appear or hearing a persistent squeak with every step makes it easy to worry that the floor is beyond saving.
We believe in being frank about why floors fail. It’s often difficult to tell if you’re dealing with a simple environmental shift or a fundamental installation error, which is why we’ve put together this troubleshooting guide. We’ll show you exactly how to identify the root cause of your floor’s issues and explain whether a repair is viable or if a replacement is the only reliable path forward.
From the technical requirements of BS 8201:2011 to the impact of underfloor heating, we’ll cover the essential factors that keep your boards stable. You’ll learn how to spot subfloor failures, understand wear layer limitations, and discover the maintenance habits that prevent these headaches from returning.
Key Takeaways
- Learn to identify common engineered wood flooring problems like cupping and crowning by understanding how moisture levels in the UK climate affect real wood veneers.
- Discover why subfloor preparation is the single most important factor in preventing squeaks, creaks, and structural failure in your home.
- Get the Frank truth about wear layer thickness so you can determine if your floor is thick enough to be sanded or if it’s time for a replacement.
- Master a simple, effective maintenance routine that eliminates the risks of wet-mopping and keeps your floor’s finish looking pristine for years.
- Understand the critical role of expansion gaps and why leaving room for movement is the best way to prevent buckling and board displacement.
Why Engineered Wood Flooring Faces Challenges: The Frank Reality
Let’s be frank from the start. Many homeowners choose engineered wood because they’ve been told it’s a “miracle” product that won’t warp or move like solid oak. While it is technically more stable, believing it’s indestructible is exactly what leads to many common engineered wood flooring problems. To troubleshoot a floor that’s failing, you first have to understand the specific way these planks are built and why that construction isn’t a total shield against the elements.
Engineered wood is a composite product designed to balance the aesthetic of natural timber with the structural integrity of modern manufacturing. By bonding a real wood veneer to a multi-layered core, manufacturers create a plank that resists the natural urge of wood to expand and contract. However, this bonding process creates internal tension. If the environment in your home shifts too drastically, those layers can begin to fight one another, leading to structural failures that a solid piece of wood might have handled differently.
The Anatomy of an Engineered Plank
Understanding what’s under your feet helps you spot why things go wrong. An engineered plank is typically made of three distinct parts:
- The Lamella: This is the top layer of real hardwood that you see and walk on. Its thickness, or “wear layer,” usually ranges from 2mm to 6mm. This layer determines how many times the floor can be sanded and refinished.
- The Core: Usually made of plywood or high-density fibreboard (HDF). Plywood cores use layers of wood glued at 90-degree angles to counteract movement. HDF is a denser, compressed material often found in budget-friendly options.
- The Backing: A final layer of wood that provides the necessary structural tension to keep the board flat and prevent it from bowing.
Stability vs. Invincibility
The “Frank” truth about the stability myth is that engineered wood still reacts to moisture and temperature. It moves less than solid wood, but it doesn’t move zero. In a typical British home, the humidity levels can swing significantly between a damp autumn and a winter where the central heating is blasting. When we talk about common engineered wood flooring problems, we’re usually talking about what happens when these environmental changes exceed the plank’s ability to cope.
A plank can realistically expand by several millimetres across a room. If you don’t leave enough space for this movement, or if the core material is of poor quality, the internal layers can delaminate or the boards can buckle. Setting realistic expectations is key. You’re buying a natural product that lives and breathes with your home; it requires a stable environment to perform as promised. It’s a foundational element of your home’s character, not a plastic laminate that stays frozen in time.
Moisture and Humidity: Managing Movement in the UK Climate
Moisture is the single biggest threat to your floor’s longevity. In the UK, we deal with a specific cycle of damp outdoor air and dry, centrally heated indoor environments. This constant tug-of-war is where most common engineered wood flooring problems begin. If you’ve noticed your floorboards looking a bit “wavy” or gaps appearing as the temperature drops, you’re seeing the material react to its environment. It isn’t necessarily a defect in the wood, but rather a natural response to a changing atmosphere.
The most vital step to prevent this happens before the first plank is even laid: acclimatisation. Many homeowners, and some rushed installers, skip this. Wood is a hygroscopic material, meaning it absorbs and releases moisture to match its surroundings. It needs time to reach an equilibrium with your home’s specific humidity. Skipping those 48 to 72 hours of “rest” in the room where it will be installed is a common recipe for future movement and structural stress.
Identifying Cupping and Crowning
Cupping and crowning are the two primary ways moisture imbalance shows itself. Cupping occurs when the edges of a plank are higher than its centre, creating a concave shape. This usually points to a moisture issue coming from the subfloor, such as a damp concrete slab or a leak. Conversely, crowning is when the centre of the board sits higher than the edges. This is often caused by surface moisture, like over-enthusiastic mopping, or sustained high humidity in the room.
Identifying these early is key to wood floor problem prevention. You can often spot these issues by looking across the floor toward a light source at a low angle. If you suspect an issue, using a professional moisture meter is the only way to get a frank reading of what’s happening beneath the surface. It helps you distinguish between a temporary environmental shift and a serious subfloor failure.
The Seasonal Cycle in British Homes
Our homes go through a dramatic shift every year. In the summer, windows are open and the air is naturally humid. In the winter, we seal the doors and crank up the radiators. This process dries out the air significantly, leading to “dry-cupping” where the top real-wood layer loses moisture faster than the core layers. You might see small gaps appear between planks in the depths of January. Often, these gaps will close up naturally by July when the heating stays off and the air holds more moisture.
Managing this requires keeping your indoor relative humidity (RH) between 40% and 60%. If you’re worried about how your current floor is handling the British weather, it’s worth looking at high-quality wood flooring options designed for better stability. Consistency is your best friend. A simple humidistat can help you monitor these levels, ensuring your floor doesn’t have to work so hard to stay flat throughout the seasons.
Installation Errors: Why Your Floor Squeaks, Creaks, or Bounces
While moisture is the most frequent culprit for common engineered wood flooring problems, poor installation is a very close second. If your floor makes a racket every time you walk across the room, or if it feels like you’re walking on a sponge, the wood itself is rarely to blame. These issues almost always stem from what happened before the first plank was even laid. A floor is only as good as the surface it sits on.
The “Frank” reality of noise is that it’s usually a diagnostic tool. A sharp squeak typically means two pieces of wood are rubbing together, often because the subfloor isn’t flat. A hollow thud, however, suggests there’s a physical gap between the flooring and the subfloor. Identifying which one you have is the first step toward a fix. Fixing a squeak might involve lubrication or localized fastening, but a bouncy, hollow floor often requires more invasive surgery.
Subfloor Leveling and Damp-Proofing
In the world of professional flooring, the “3mm over 2m” rule is non-negotiable. This means that if you lay a two-metre straight edge across your floor, there should be no more than a 3mm gap anywhere beneath it. If your subfloor is uneven, your engineered planks will “bridge” the low spots. Every time you step on that bridge, the floor flexes. This constant movement eventually weakens the tongue-and-groove joints, leading to structural failure and persistent noise.
Damp-proofing is equally critical, especially with concrete screeds. You cannot trust a visual check. Concrete can look bone-dry on the surface while holding significant moisture deep within. We always recommend testing with a hygrometer. If the moisture levels are too high, you’ll need a liquid damp-proof membrane (DPM) or a high-quality underlay with an integrated vapour barrier to protect your investment from the ground up.
The Essential Expansion Gap
Wood needs room to move. It’s a simple fact that is frequently ignored in the quest for a “seamless” look. You must leave a gap of at least 10mm to 12mm around the entire perimeter of the room and at every doorway. If you fit the boards tight against the walls, the floor will have nowhere to go when it naturally expands. This pressure has to be released somewhere, usually by the floor lifting off the subfloor in a process called buckling.
You don’t have to live with ugly gaps, though. You can hide these essential spaces using skirting boards, scotia, or door bars. When transitioning between different floor types, you might even find that items like carpet grippers and specialist threshold strips are the perfect way to maintain a professional finish while allowing for that vital movement. If your floor has already buckled, the only “Frank” fix is to remove the perimeter trim and trim back the boards to create the space they should have had from day one.
The choice between a floating installation and a glue-down method also changes your risk profile. Floating floors are quicker to install but are more prone to “bouncing” if the subfloor isn’t perfect. A glue-down installation feels more solid and quiet underfoot, but it’s much less forgiving of subfloor moisture. Knowing which method suits your specific subfloor is the best way to avoid the most common engineered wood flooring problems before they start.
The Budget Board Trap: Delamination and Wear Layer Limits
Price is often the first thing people look at, but it’s rarely the best indicator of long-term value. In the flooring industry, “bargain” boards often lead to some of the most frustrating and expensive common engineered wood flooring problems. When a manufacturer cuts corners to lower the price, they usually do it where you can’t see: in the quality of the adhesive and the stability of the core. This is where delamination begins, a process where the beautiful top layer of hardwood begins to peel away from the core like an old sticker.
Delamination isn’t just an aesthetic issue; it’s a structural failure. It usually happens because the glue used to bond the layers is of poor quality or hasn’t been cured correctly. In the damp UK climate, cheap 3-ply boards are particularly vulnerable. While multi-ply construction uses several thin layers of birch or eucalyptus to create a rock-solid base, 3-ply boards rely on just three thicker chunks of wood. If moisture gets in, those thicker layers exert more force as they move, often snapping the bond and causing the surface lamella to lift or crack.
Understanding Sanding Limits
One of the biggest myths in flooring is that a thicker board always lasts longer. You can only sand an engineered floor down to the top of the tongue and groove; once you hit that mechanical joint, the floor’s life is over. This is why the wear layer thickness is so much more important than the total thickness of the plank. For example, a 14mm board with a 3mm wear layer is essentially a “one-sand” floor. You might get one professional refinish out of it over twenty years, but if you try for a second, you risk over-sanding and exposing the plywood core beneath.
Hitting the core is a terminal error. It ruins the look of the floor and leaves the structural layers exposed to moisture and foot traffic. If you’re looking for a floor that can handle the rigours of a busy family home for decades, you need to be frank about your expectations. A thinner wear layer is fine for a bedroom, but for high-traffic hallways, you’ll want something more substantial.
Spotting Quality Construction
Before you buy, check the bond between the lamella and the core. On a high-quality board, the transition should be seamless, with no visible gaps or “dry” spots where the glue hasn’t reached the edge. You should also look for European Oak rather than cheaper, faster-growing alternatives. European Oak is naturally more stable and better suited to the humidity fluctuations we see in British homes. For a deeper dive into what makes a board worth your money, check out our Engineered Wood Flooring: The Frank 2026 Guide.
Choosing quality from the start is the only way to avoid the budget board trap. It’s far cheaper to invest in a reliable product once than it is to pay for the uplift, disposal, and replacement of a failed floor five years down the line. If you’re ready to see the difference that proper construction makes, you can view our range of high-quality wood flooring and find a product built to last.
Preventing Problems: A Maintenance Routine That Actually Works
Maintenance isn’t a chore; it’s an insurance policy. While we’ve already covered how moisture and installation errors cause common engineered wood flooring problems, the way you live on your floor determines its final lifespan. You don’t need a complex schedule, but you do need to be disciplined. Most surface damage is cumulative, caused by tiny particles of grit or small amounts of water that eventually compromise the wood’s integrity. If you treat your floor with respect, it remains a foundational element of your home’s character for decades.
The “No-Wet-Mop” rule is the most important thing to remember. Engineered wood is not waterproof. If you use a dripping wet mop, water can seep into the micro-bevels and tongue-and-groove joints. This causes the core to swell and the edges to lift. Use a mop that is barely damp to the touch. It’s also vital to understand your finish. Lacquered floors provide a hard, protective shell but are difficult to spot-repair if scratched. Oiled floors penetrate the grain, allowing you to fix small areas without sanding the whole room, though they require periodic re-oiling to maintain their resistance.
The Daily and Weekly Cleaning Ritual
Stop using supermarket “all-purpose” sprays. These often contain waxes or silicones that leave a greasy film, making the floor look dull and attracting more dirt. Use a specialist wood floor cleaner designed for your specific finish. For daily debris, a soft-bristled vacuum is much better than a standard broom. A broom often just pushes grit around, whereas a vacuum with the beater bar turned off lifts the abrasive particles away before they can act like sandpaper under your feet. Dealing with spills immediately is non-negotiable. If a liquid sits on the surface for more than a few minutes, it can bypass the finish and cause permanent staining or swelling.
Long-term Protection Strategies
Grit is the primary cause of surface wear. A high-quality “walk-off” mat at every external entrance is your first line of defence. It catches dirt and moisture from shoes before they ever reach the wood. Inside the home, felt pads on every piece of furniture are essential. A heavy chair being dragged across the floor without protection can gouge through the wear layer in seconds. If you have pets, keep their claws trimmed. It’s a simple step that prevents deep scratches that might otherwise require a full sand and seal to fix.
Finally, take a frank look at when to recoat your floor. You can DIY a basic clean or a minor scratch repair with a touch-up kit, but you shouldn’t wait until the wood is bare to take action. If you notice the finish is wearing thin in high-traffic areas, it’s time to call a professional for a “clean and coat.” Proactively applying a new layer of lacquer or oil before the wear layer is damaged saves you from the expense of a full professional sanding and avoids the most common engineered wood flooring problems associated with long-term neglect.
Choosing a Floor That Stands the Test of Time
Understanding the science of moisture and the necessity of a perfectly level subfloor is the first step toward a lasting home. We’ve seen how easily common engineered wood flooring problems can take root when shortcuts are taken during installation or when budget boards fail to meet the demands of the British climate. By prioritising a thick wear layer and a robust maintenance routine, you can ensure your floor remains a beautiful, structural asset rather than a source of frustration.
At Frankly Flooring, we bring over 20 years of experience as a family-run business to every conversation. We don’t believe in high-pressure sales; we believe in providing no-nonsense expert advice so you can make the right choice for your property. Whether you’re starting a new renovation or replacing a failed floor, we offer national UK delivery to bring quality materials directly to your doorstep. You can browse our range of high-quality Engineered Wood Flooring to find a surface that’s built for real life and real homes.
Your home deserves a foundation you can trust. With the right knowledge and a focus on quality construction, you’re now ready to choose a floor that looks as good in ten years as it does on day one. We’re here to help you get it right the first time.
Frequently Asked Questions
Can I use a steam mop on engineered wood flooring?
No, you should never use a steam mop on engineered wood. The high-pressure steam forces moisture and heat deep into the wood’s layers and the core material, which often leads to delamination or warping. It’s a fast way to turn a beautiful floor into a series of common engineered wood flooring problems. Stick to a microfibre mop that’s barely damp to the touch.
How do I fix a scratch in my engineered wood floor?
The fix depends entirely on your floor’s finish. For an oiled floor, you can often buff out light scratches and apply a small amount of maintenance oil to the specific area. Lacquered floors are trickier; you’ll likely need a specialist wood filler stick or a repair pen that matches your floor’s colour. If the scratch is deep enough to penetrate the wear layer, you might need to replace the individual plank.
Why is my engineered wood floor gapping in the winter?
Gapping is usually a natural reaction to the dry air caused by your central heating. Wood is a living material that shrinks when the indoor humidity drops during the colder months. These gaps typically disappear on their own when the heating goes off and summer humidity returns. You can minimise this movement by keeping your home’s relative humidity between 40% and 60%.
Is engineered wood flooring compatible with underfloor heating?
Yes, engineered wood is specifically designed to handle the temperature shifts of underfloor heating better than solid wood. However, you must increase the heat gradually to avoid shocking the timber. Most manufacturers recommend a maximum surface temperature of 27°C. Rapid temperature spikes can cause the wood to dry out too quickly, leading to cracks or structural failure in the core.
What is the best way to clean engineered wood floors?
The most effective routine starts with a soft-bristled vacuum or a dry microfibre sweep to remove abrasive grit. For a deeper clean, use a pH-neutral specialist wood floor cleaner. Avoid using supermarket “all-purpose” sprays or vinegar solutions, as these can dull the finish over time. Always spray the cleaner onto the mop rather than directly onto the wood to prevent liquid from pooling in the joints.
Can I install engineered wood flooring in a bathroom?
We don’t recommend installing engineered wood in a bathroom. Even with the best finish, the high humidity and constant risk of standing water are too much for a natural timber product to handle. Persistent dampness will eventually lead to swelling and rot. For wet rooms, you’re much better off choosing a high-quality LVT or vinyl that offers the wood look without the vulnerability to water.
Why does my floor feel bouncy when I walk on it?
A bouncy or “spongy” feel is almost always a sign of an uneven subfloor. If the subfloor has dips or peaks, the planks will bridge those gaps instead of sitting flat. When you step on them, they flex downward. This movement is a major cause of common engineered wood flooring problems, as it puts immense stress on the tongue-and-groove joints. It can also be caused by using an underlay that is too thick or too soft.
How many times can engineered wood flooring be sanded?
This depends on the thickness of your wear layer. A floor with a 3mm wear layer can usually be sanded once, while a 6mm wear layer might handle two or three professional sandings. Remember, you can only sand down to the top of the tongue. If you go deeper, you’ll hit the plywood core and ruin the floor. Always check your floor’s specifications before booking a professional refinish.