
Most homeowners spend more on tools they’ll never touch again than they do on the high-quality underlay that actually protects their investment. It’s a common trap to fall into when you’re searching for diy flooring installation tools and staring down a stack of new planks. You’re likely feeling the pressure to buy every specialized gadget on the shelf just to avoid a costly mistake. We understand the anxiety of potentially ruining a beautiful new floor because you lacked a specific spacer or the right mallet.
At Frankly Flooring, we believe in being direct about what it takes to get the job done right. This guide identifies the essential toolkit required to lay LVT, wood, or carpet with professional precision. You’ll learn which items are non-negotiable for a flush finish and which expensive trade “must-haves” are actually luxury extras you can skip. We’ll provide a prioritized shopping list that builds your confidence without draining your bank account; ensuring your focus stays on the craftsmanship rather than the clutter in your garage.
Key Takeaways
- Stop wasting expensive material by mastering the specific measurement techniques that ensure a seamless, professional finish.
- Identify the essential diy flooring installation tools that separate a professional result from a botched job; including why your standard utility knife often fails.
- Learn the material-specific requirements for LVT and laminate, focusing on the click-system essentials like tapping blocks and pull bars.
- Master the finishing touches by using the right tools for carpet grippers and door transitions to avoid common installation injuries.
- Save money by following our straightforward strategy on when to invest in high-quality hand tools versus visiting a local hire shop.
The Foundation: Preparation and Measurement Tools
Selecting the right diy flooring installation tools starts long before you pick up a saw. Skipping the preparation phase is the fastest way to turn a weekend project into a multi-week headache. Many homeowners view measurement as a formality, but in the world of flooring, it’s the difference between a seamless finish and a garage full of wasted, expensive offcuts. The old “measure twice, cut once” adage isn’t just a cliché; it’s a financial safeguard. One small error in your initial room survey can lead to gaps that no amount of beading will hide.
Before you even open a pack, you must establish a straight starting point. In large rooms, walls are rarely perfectly parallel. Using a chalk line to snap a reference point ensures your first row is straight, preventing the entire floor from looking skewed as you reach the far wall. While you can find a comprehensive list of tools online, we’ve distilled the essentials down to the items that actually impact your floor’s longevity and appearance.
Critical Measurement Gear
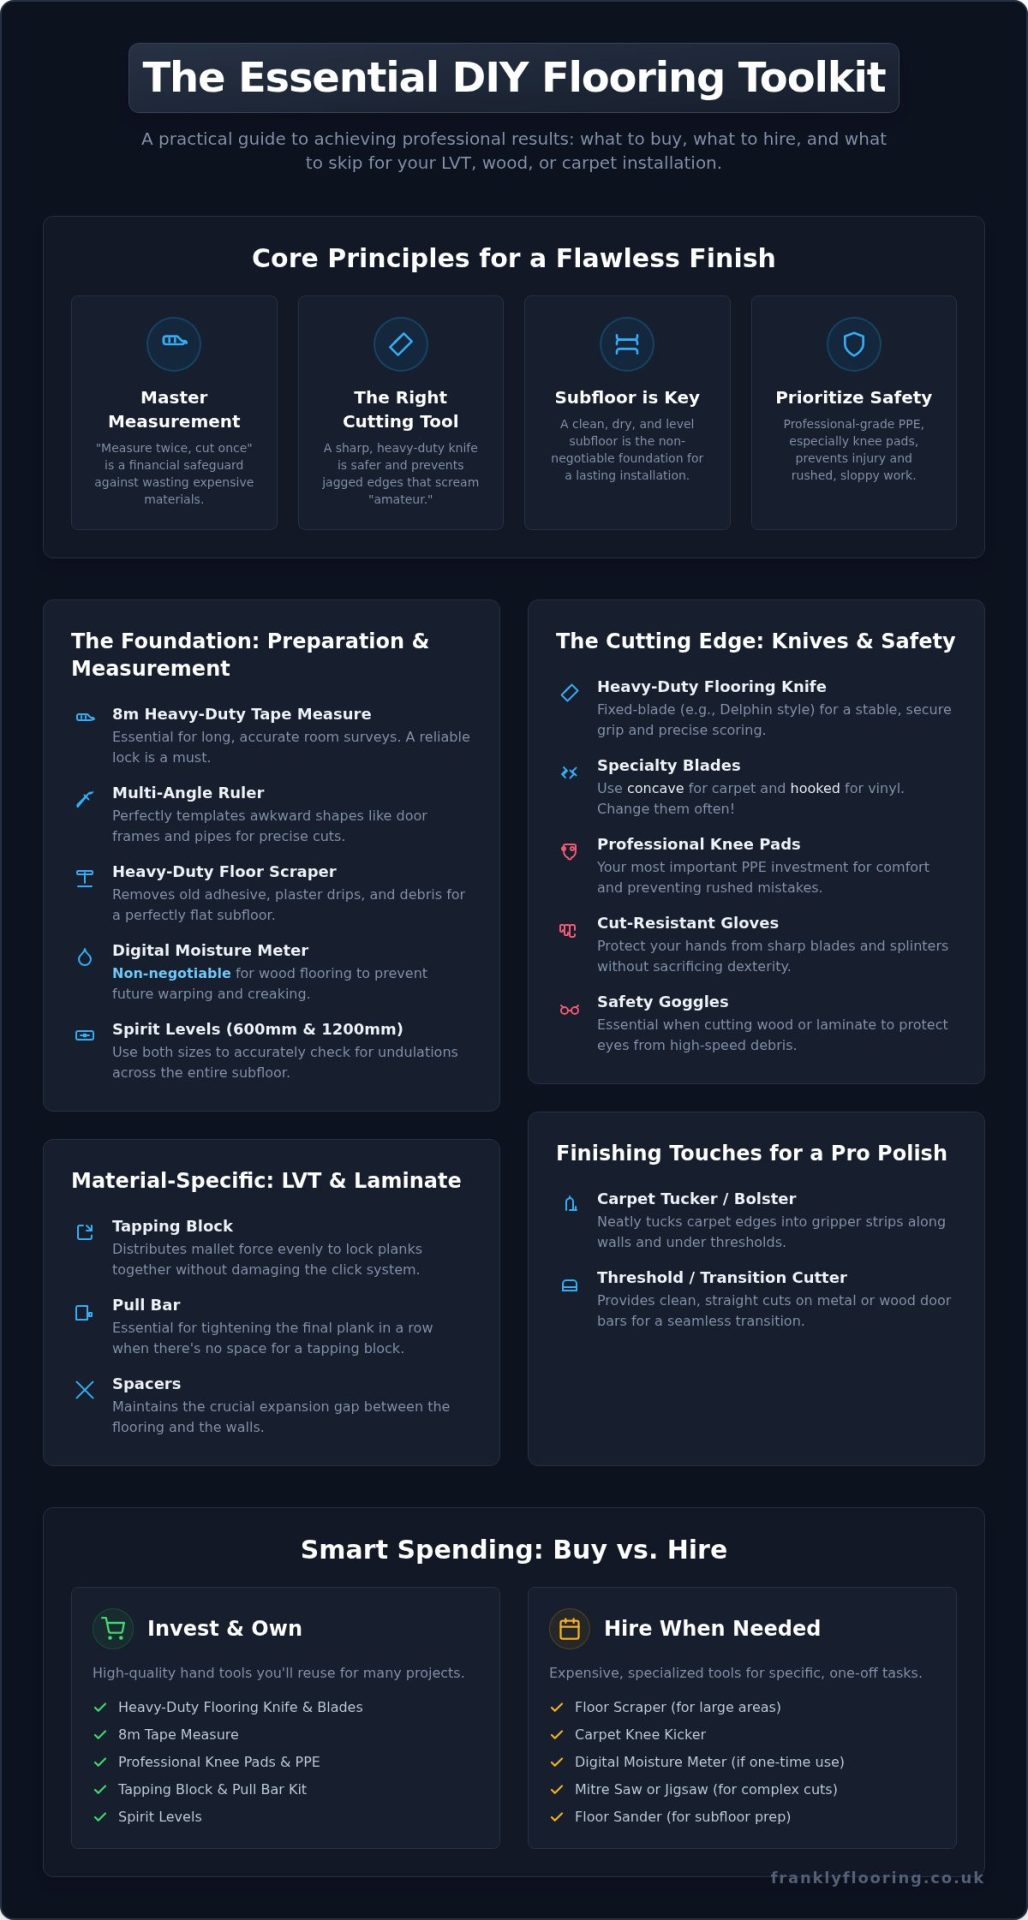
Precision is everything when you’re working with expensive materials. A standard 5m tape measure might work for hanging pictures, but for flooring, you need a heavy-duty 8m version with a reliable, secure lock. You’ll also encounter awkward door frames and radiators where a standard ruler fails. Investing in a multi-angle ruler allows you to template these shapes perfectly, ensuring your cuts are flush against the trim. Finally, don’t rely on a single carpenter pencil. They vanish the moment you set them down; keep three or four sharpened and ready to go.
Subfloor Preparation Essentials
Your subfloor must be clean, dry, and level for a successful install. Professional results rely on removing every plaster drip or old adhesive lump with a heavy-duty floor scraper. If you’re laying engineered wood flooring, a digital moisture meter is a non-negotiable part of your diy flooring installation tools. Wood reacts to humidity, and laying it on a damp subfloor will lead to warping and creaking over time. We recommend using both 600mm and 1200mm spirit levels to check for undulations. If the floor isn’t flat, your planks won’t click together correctly, leading to joint failure later on.
The Cutting Edge: Essential Knives and Safety Gear
The most dangerous tool in your kit isn’t a power saw; it’s a blunt utility knife. When you’re gathering your diy flooring installation tools, don’t settle for the flimsy plastic cutters you use to open boxes. A standard DIY knife often lacks the internal reinforcement needed to withstand the lateral pressure of cutting through thick LVT or heavy carpet. If the blade flexes or the housing slips, you risk a jagged edge that ruins a whole plank. Worse, you risk a trip to the emergency room. Blades are cheap. Flooring isn’t.
Professional installers prefer fixed-blade knives for heavy-duty tasks. A fixed blade doesn’t wiggle or retract unexpectedly when you’re leaning into a deep score. Retractable knives have their place for light trimming, but for the bulk of the work, you need a solid grip and a stable edge. Waste management is also about precision. A sharp blade prevents the frustration of “stepping” your cuts, which occurs when a dull edge forces you to saw back and forth, creating a messy, uneven join. This is why having the right diy flooring installation tools in your belt is non-negotiable for a flush finish.
Flooring Knives and Blades
Invest in a heavy-duty flooring knife, often called a Delphin style, which features an ergonomic shape for a more secure grip. The type of blade you choose is just as critical as the handle. Use concave blades for carpet to slice through the backing without snagging the pile; switch to hooked blades for vinyl to cut from underneath, protecting your subfloor from deep scores. Frequent blade changes are the secret to a professional finish because a sharp edge slices through material with minimal force, preventing the jagged edges that scream “amateur.” While you’re stocking up, don’t forget the high-quality flooring accessories that ensure your new surface stays put.
Personal Protection Equipment (PPE)
Flooring is hard on the body. Professional-grade knee pads are the most important investment you’ll make for a long day of installation. Without them, you’ll find yourself rushing the job just to get off your knees, which leads to sloppy mistakes. Don’t overlook cut-resistant gloves either; modern versions offer excellent protection while still allowing the fine motor control needed to handle small spacers and intricate cuts. Finally, safety goggles are essential when you’re trimming laminate or wood, as high-speed blades can kick up sharp splinters that a standard pair of glasses won’t stop. Your toolkit should protect you as much as it helps you build.
Material-Specific Toolkits: LVT, Wood, and Laminate
Not all diy flooring installation tools are interchangeable. While a tape measure is universal, the gear you use to join planks depends entirely on the material’s density and locking mechanism. LVT is thinner and more flexible than traditional laminate, meaning it requires a lighter touch and different cutting techniques. If you use a heavy-duty wood tapping block on a delicate vinyl edge, you’ll likely snap the click-system before the floor is even half-laid. Our advice is simple: match the quality and type of your tools to the investment you’ve made in your flooring.
For those working with hardwood, the requirements intensify. You aren’t just clicking pieces together; you’re managing natural expansion and often using mechanical fixings. This often means you’ll need more than just a hammer. Depending on your subfloor, you might require specific flooring nailers or high-tack adhesives to ensure the boards stay stable for the next twenty years. Understanding these nuances prevents the frustration of a floor that looks great on day one but starts to “bounce” or gap by month six.
LVT and Vinyl Installation Tools
Luxury Vinyl Tile requires a specific set of accessories to handle its unique properties. A white-headed rubber mallet is essential; black rubber mallets often leave unsightly scuff marks on the surface of lighter tiles that are nearly impossible to remove. If you are opting for a glue-down finish, a pressure roller is vital to ensure the adhesive bonds correctly across the entire surface area. Understanding what is lvt flooring helps clarify why precision is so important. Because the material is thinner than wood, even a millimetre of deviation in your cut will be visible at the skirting board.
Laminate and Engineered Wood Kits
When installing laminate flooring or engineered wood, the expansion gap is your top priority. Laminate spacers are small but critical diy flooring installation tools that keep the floor away from the walls, allowing it to breathe as temperatures change. Without them, your floor will eventually buckle. You also need a dedicated tapping block to distribute the force of your hammer evenly. Never hit a plank directly with a hammer; you’ll crush the tongue and groove profile, making it impossible to achieve a tight join. Finally, a heavy-duty pull bar is the only way to snug up the final row of planks against the wall where a tapping block won’t fit.
Finishing Touches: Tools for a Professional Polish
A floor is only as good as its perimeter. You might have laid every plank or tile perfectly, but if the transitions at the doors look messy or the edges are frayed, the whole project feels unfinished. These final diy flooring installation tools are often overlooked by beginners who assume a standard hammer and a pair of kitchen scissors will suffice. They won’t. To achieve a professional polish, you need specific gear designed to handle the tension of carpet and the rigidity of metal door bars. The Frank truth is that most DIYers injure themselves in the final hour because they start to rush; using the wrong tool for a delicate finishing task is a recipe for a slip.
Before you wrap up, consider your adhesive strategy for the various trims and transitions. For larger areas or securing certain types of underlay, a notched trowel ensures even coverage and prevents adhesive from pooling under the surface. However, for smaller accessories and perimeter fixing, a high-quality spray adhesive is often the more efficient choice. It provides an immediate tack that saves you from waiting for liquid glue to set. If you’re ready to finish your project with the right gear, you can find our full range of high-quality flooring accessories online to ensure every join is secure.
Carpet Fitting Essentials
Installing carpet gripper requires a steady hand and a heavy-duty hammer to ensure the pins bite into the subfloor without crushing the wood strip. Once the grippers are in place, you’ll need a knee kicker to stretch the carpet onto the pins. Use the padded end against your thigh, not your kneecap, to avoid painful bruising. For trimming, put away the household scissors. Professional carpet shears are designed to slice through thick pile without snagging. Finally, use a bolster chisel to tuck the excess carpet into the gap between the gripper and the skirting board for a crisp, professional edge.
Door Bars and Stairrods
Achieving a seamless transition between rooms requires precision-cut door bars. A standard hacksaw with a fine-toothed blade is one of the most useful diy flooring installation tools for this job; it allows you to trim metal bars to the exact width of your door frame without burring the edges. If you’re securing these bars into a concrete subfloor, use small pilot drills to create a guide for your screws. This prevents the subfloor from cracking and ensures the bar sits flush. If your project includes stairs, choosing the right tools for stairrod installation will add a final touch of traditional style that elevates the entire home’s character.
Buy vs. Hire: The Frank Strategy for DIY Success
You’ve chosen your material and mapped out the room. Now you face the final hurdle: the budget for your diy flooring installation tools. It’s tempting to head to a hire shop and rent a professional kit for a week, but that isn’t always the smartest financial move. For most residential projects, the cost of a seven-day hire often equals or exceeds the price of purchasing a mid-range toolkit that you’ll own forever. We want you to spend your money where it actually adds value to your home.
We see many DIYers fall for the “all-in-one” kits sold at major retailers. These are often filled with flimsy plastic spacers and tapping blocks that crack under the first sign of pressure. Buying quality hand tools individually ensures they’ll last through this project and the next three. If you’re tackling multiple rooms over several months, ownership is the only logical choice. Good tools don’t make the craftsman; but bad ones can certainly break the project.
The Economics of Tool Ownership
Consider the “Keep and Reuse” value of your gear. A high-quality tape measure, a solid spirit level, and an ergonomic flooring knife are foundational items for any home maintenance task. Buy quality once and you’ll avoid the headache of tools failing when you’re halfway through a row. Professional-grade machinery, like heavy-duty floor sanders or power stretchers, are the only items where the hire shop makes more sense for a one-off project. For everything else, building your own kit of diy flooring installation tools is a long-term investment in your property.
Getting Started with Frankly Flooring
At Frankly Flooring, we don’t just sell you a product and leave you to figure it out. We believe in providing the technical depth you need to succeed without the high-pressure sales tactics. You can bundle your essential accessories and tools with your carpet or wood order, ensuring everything arrives at once. This avoids multiple delivery fees and ensures your adhesives, grippers, and tools are perfectly compatible with your specific material choice.
Before you make your first cut, run through a final checklist: check subfloor moisture, verify expansion gaps, and count your spare blades. Our team is here to offer honest, direct advice on your specific room layout, helping you avoid the common pitfalls that lead to wasted material. We value your long-term satisfaction over a quick win. That’s the Frank way of doing business.
Ready Your Toolkit for a Professional Finish
You now have a clear roadmap for your project. A professional finish isn’t about owning every trade gadget. It’s about having the right essential diy flooring installation tools for your specific material. By prioritizing accurate measurement and subfloor preparation, you’ll avoid the common mistakes that lead to wasted planks and unnecessary stress. Remember that your toolkit should be a balance of precision measurement gear and the material-specific accessories that ensure a flush, secure fit.
At Frankly Flooring, we lean on our 20 years of trade experience to give you the straight facts. We’re a family-run UK business that values long-term satisfaction over a quick sale. We’ve built our reputation on providing national delivery and the kind of expert advice you can actually trust. Browse our full range of Flooring Accessories and Tools to find exactly what your project requires. You have the knowledge and the strategy. Now it’s time to start laying a floor that will define your home’s character for years to come.
Frequently Asked Questions
Do I really need a knee kicker for a small carpeted room?
Yes, you absolutely need a knee kicker regardless of the room’s size. It’s the primary tool used to stretch the carpet onto the pins of the gripper rods. Without this tension, your carpet will develop unsightly ripples and loose patches within weeks. While it might seem like an unnecessary expense for one small room, it’s a non-negotiable part of your diy flooring installation tools if you want a finish that stays flat and professional.
Can I use a standard wood saw for laminate flooring?
You can use a standard hand saw, but it isn’t recommended. Laminate is incredibly dense and contains hard resins that will dull a standard wood blade after just a few cuts. This leads to splintering and rough edges on your planks. For a cleaner finish, use a fine-toothed saw or a dedicated laminate cutter. These tools are designed to handle the abrasive nature of the material, ensuring your joins remain tight and professional throughout the installation.
What is the most common tool mistake DIYers make?
The most frequent mistake is using blunt utility blades. A dull edge requires more force, which often leads to the knife slipping and ruining a plank or causing an injury. Another common error is skipping the subfloor moisture check. Without a digital moisture meter, you’re guessing whether your subfloor is dry enough for wood or LVT. These oversights are exactly why we emphasize quality diy flooring installation tools over cheap, all-in-one generic kits that prioritize performance.
Is it better to buy a flooring installation kit or individual tools?
It’s almost always better to buy your tools individually. Many pre-packaged all-in-one kits found in big-box retailers contain low-quality plastic spacers and flimsy tapping blocks that break easily. By selecting individual, trade-grade items, you ensure that each piece of gear is durable enough to last the entire project. This approach allows you to prioritize high-quality essentials, like a heavy-duty pull bar, while skipping the filler items that often pad out cheap, generic kits.
Do I need different tools for herringbone vs straight-lay LVT?
The core toolkit remains the same, but herringbone patterns require much higher precision. You’ll need more spacers to maintain perfect alignment across the complex angles. A high-quality set square and a chalk line become vital for establishing the central spine of the room. Because herringbone involves more intricate cuts, ensuring you have a steady supply of fresh, sharp blades is even more critical than it is for a standard straight-lay installation to avoid visible gaps.
What is a tapping block and can I make my own?
A tapping block is a specialized tool designed to distribute the force of a mallet evenly across the edge of a plank. It allows you to snug pieces together without damaging the delicate tongue and groove profile. While some suggest using a piece of scrap wood, we advise against it. Scrap wood can splinter or have uneven edges that crush the click-system. A dedicated professional tapping block is a small investment that protects your much more expensive flooring material.
How many spacers do I need for a standard-sized room?
For a standard-sized room, you should aim for at least 30 spacers. You need enough to place one every 30cm to 50cm along the perimeter walls. This ensures the expansion gap remains consistent as you tap new planks into place. If you don’t have enough, you’ll find yourself constantly moving them, which risks the floor shifting and closing the gap. It’s a small detail, but consistent spacing is what prevents your floor from buckling in the future.
Can I install vinyl flooring with just a utility knife?
You can technically cut sheet vinyl with just a utility knife, but you won’t achieve a professional result without a proper kit. For LVT, you’ll also need a heavy-duty mallet, a straight edge, and spacers. Relying solely on a knife often leads to creeping where the material shifts as you cut, resulting in gaps at the skirting boards. A complete set of accessories ensures the material is held under tension and cut with the precision required for a long-lasting finish.