If you still think vinyl is just a thin, shiny sheet of plastic that peels at the first sign of a leaky dishwasher, you’re living in 1995. Most homeowners want the aesthetic of honey oak or Italian marble but dread the freezing temperature of stone tiles or the high maintenance of real timber. It’s a common worry that choosing a practical material for a high-traffic area means sacrificing the character of your home.
Frankly, you shouldn’t have to settle for a floor that looks cheap just to get the waterproof benefits you need. This guide provides the honest truth about choosing vinyl flooring for kitchens that can withstand heat and heavy foot traffic while staying well within your budget. We’ll explore the 2026 shift toward matte finishes and explain why the new SCS-111 V2.1 certification, introduced in April 2026, is the only standard you should trust for indoor air quality and durability. From the nuances of LVT to the straightforward fitting of sheet vinyl, you’ll learn exactly how to achieve a high-end look that’s warm underfoot and built to last.
Key Takeaways
- Understand the practical differences between sheet vinyl and LVT to find the right balance of budget and durability for your home.
- Identify the technical standards required for safety and longevity, specifically why R10 slip resistance is the gold standard for vinyl flooring for kitchens.
- Explore 2026 “Modern Heritage” trends, including herringbone and concrete effects that provide warmth underfoot compared to traditional stone tiles.
- Learn how to prepare your subfloor properly to avoid the “telegraphing” effect that can ruin the appearance of your new floor.
- Master the process of measuring your kitchen accurately, including tricky areas like fridge gaps, to ensure a seamless buying experience online.
Choosing Between Sheet Vinyl and LVT for Kitchens
Frankly, if you’re still using the term “lino” to describe modern vinyl flooring for kitchens, you’re doing the material a disservice. The thin, brittle linoleum of the 1970s has been replaced by sophisticated synthetic layers designed for the rigours of 2026 living. Today, the choice usually boils down to two distinct formats: sheet vinyl and Luxury Vinyl Tile (LVT). While they share a base material, their performance, fitting requirements, and price points differ significantly.
The most immediate difference is longevity. A quality sheet vinyl typically offers a lifespan of 5 to 10 years, making it an excellent choice for a quick refresh or a rental property. In contrast, LVT is a long-term investment. With a lifespan often exceeding 20 years, it’s built to survive the heavy foot traffic and constant spills of a busy family home. Choosing between them isn’t just about the initial cost; it’s about how often you want to go through the process of clearing out your kitchen for a new fitting.
Sheet Vinyl: Comfort and Seamless Protection
The primary advantage of Sheet vinyl flooring is the lack of joins. In a kitchen, where a leaking dishwasher or a spilled pan of pasta water is a daily risk, a seamless surface acts as a continuous waterproof barrier. It’s much harder for moisture to find its way to your subfloor when there are no gaps to penetrate. It is also naturally softer underfoot, providing a bit of “give” that is much kinder to your back during long sessions of meal prep.
When selecting sheet vinyl, pay attention to the backing. Foam-backed options offer the most cushion and warmth, while felt-backed varieties are better at masking minor imperfections in your subfloor. If your floor isn’t perfectly level, felt-backed vinyl is a straightforward solution that saves you from extensive preparation work.
Luxury Vinyl Tile (LVT): The Hard-Wearing Alternative
LVT is designed to mimic the weight and “clink” of real stone or the grain of natural timber. It doesn’t just look like the real thing; it feels like it too. If you’re curious about the specific construction of these layers, you can read our guide on what is LVT flooring for a deeper dive. Unlike sheet vinyl, which comes on a large roll, LVT consists of individual planks or tiles that are either glued down or clicked together.
This modular nature is a massive benefit for kitchen environments. If you drop a heavy cast-iron pan and gouge the floor, you don’t need to replace the entire room. You simply lift and replace the damaged plank. This repairability, combined with a much thicker wear layer, makes it the premium choice for anyone seeking a vinyl flooring for kitchens that looks bespoke and stays that way for decades.
The Technical Specs: Slip Resistance and Wear Layers
Choosing the right aesthetic for your home is only half the battle; the other half is ensuring you don’t end up on your backside after a minor spill. Frankly, many retailers gloss over technical specifications because they aren’t as exciting as a herringbone pattern, but these numbers dictate how your floor performs under pressure. Choosing the right vinyl flooring for kitchens involves looking past the surface pattern and into the technical data sheet to ensure the material can handle the heat, moisture, and friction of a busy cooking space.
One common concern is heat resistance. While modern vinyl is designed to be stable, it isn’t invincible. Placing a heavy, freestanding oven directly onto a thin vinyl without a heat-shielding gap can cause the material to soften or discolour over time. Most quality LVT products are rated for temperatures up to 27 degrees Celsius, which is perfectly fine for areas near a fridge or dishwasher, but you should always check the manufacturer’s guidelines for underfloor heating or areas with high solar gain from large patio doors.
Deciphering the R-Rating for Kitchen Safety
Slip resistance is measured on an “R” scale, ranging from R9 to R13. In a domestic setting, R9 is the bare minimum, offering basic grip in dry conditions. However, for a kitchen where water, oil, and flour are frequently on the move, you need more protection. R10 slip resistance provides the ideal balance of grip and cleanability for British kitchens, ensuring safety without the abrasive, sandpaper-like texture of higher ratings that tend to trap dirt. If you’re planning an open-plan kitchen-diner, it’s vital to maintain a consistent R10 rating across the entire area to prevent “trip-slips” caused by moving from a grippy surface to a slick one.
Why the Wear Layer is Your Floor’s Best Friend
The wear layer is a transparent top coating that acts as a bodyguard for the printed design. It’s measured in millimetres, and this thickness determines how well the floor resists scuffs from chair legs or the impact of a dropped pan. For a light-use kitchen, a 0.3mm wear layer is often sufficient. However, for high-traffic family hubs, we recommend a 0.5mm layer. This “over-speccing” provides a commercial-grade level of protection that ensures your floor looks new for years longer than a standard domestic product.
The Resilient Floor Covering Institute sets the industry benchmarks for these layers, ensuring they meet strict standards for durability and indoor air quality. While vinyl is incredibly tough, it offers a different kind of resilience compared to laminate flooring, which relies on a hard resin surface. Vinyl’s slight flexibility makes it better at absorbing impacts without chipping. If you’re unsure which spec suits your home, browsing our vinyl collection can help you compare these technical details side-by-side.
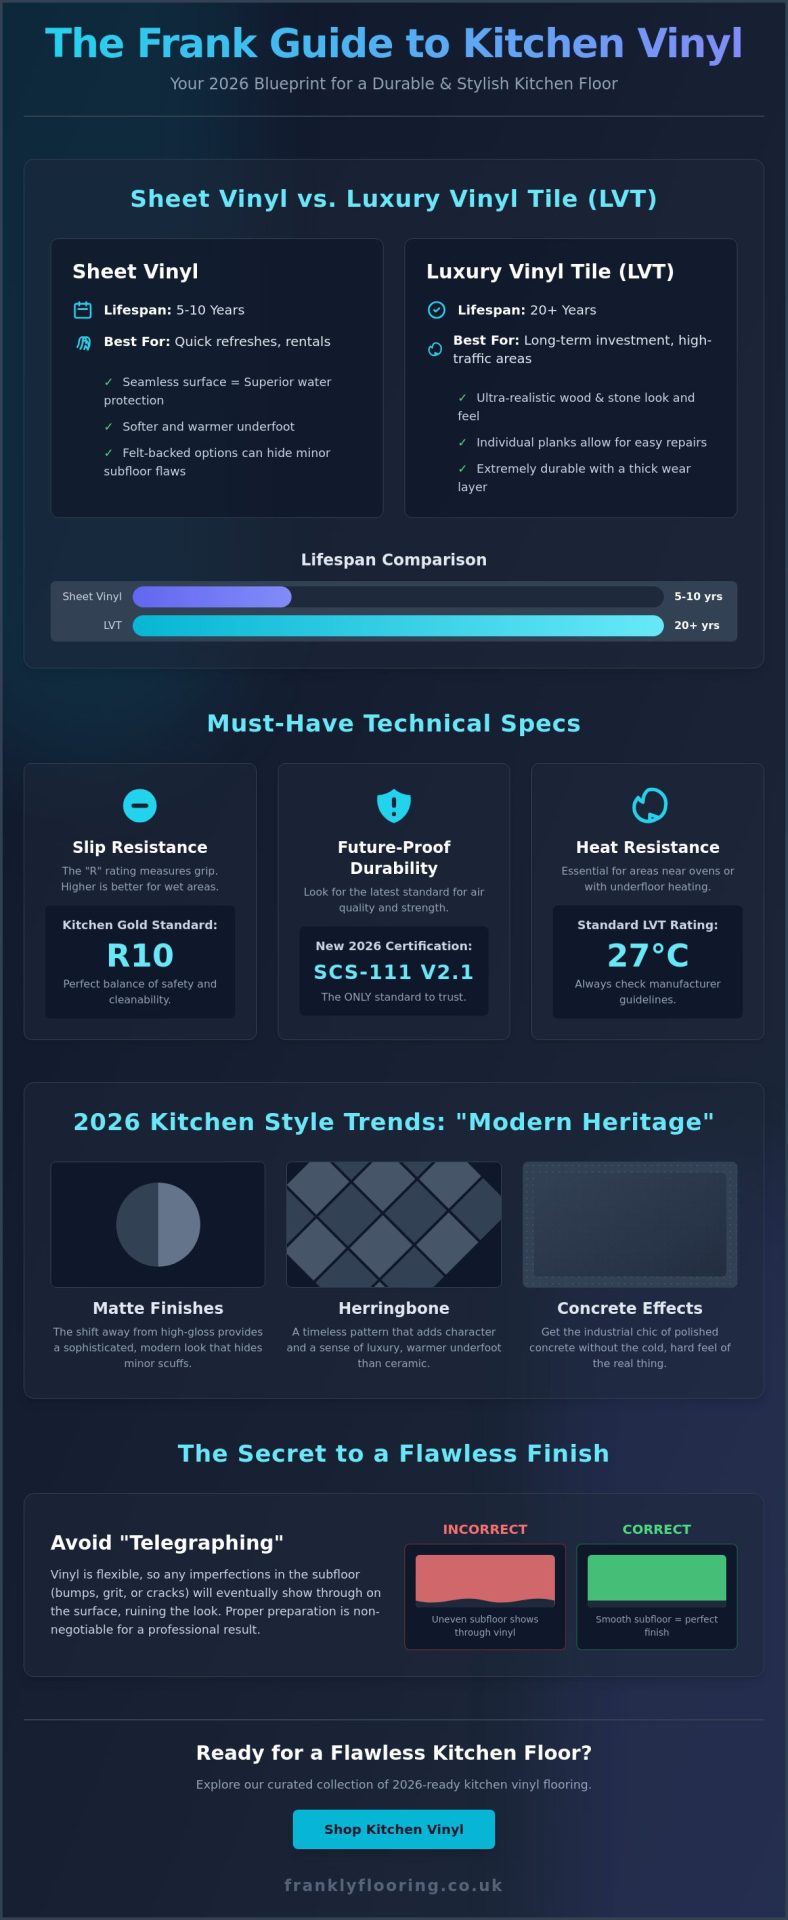
2026 Kitchen Style Trends: From Herringbone to Stone Effect
Frankly, your floor shouldn’t just be a functional backdrop; it’s the foundation of your kitchen’s character. In 2026, we’ve seen a decisive shift away from the sterile, cool grays that dominated the last decade. Homeowners are now leaning into “Modern Heritage” looks. This trend celebrates warmth and texture, moving toward honey, caramel, and light oak tones that make a house feel like a home. Choosing vinyl flooring for kitchens that follows these trends ensures your space feels current without becoming a dated fashion victim by next year.
If you prefer an industrial edge, concrete and slate effects are still incredibly popular. The difference in 2026 is the finish. High-gloss is out, and matte, low-sheen finishes are in. These realistic textures mimic natural, untreated materials so closely that your guests will likely have to touch the floor to realise it isn’t cold, porous stone. When matching your floor to your worktops, follow a simple rule: contrast is your friend. If you have dark, dramatic granite counters, a lighter oak floor prevents the room from feeling like a cave. Conversely, white marble worktops look stunning against a deep, textured slate effect.
Wood-Effect Vinyl: Warmth and Texture
Real wood in a kitchen is a gamble. One plumbing leak or a forgotten spill can cause expensive warping. Wood-effect vinyl flooring for kitchens offers the same visual appeal with none of the water-damage anxiety. For 2026, wide planks of 9 inches or more are the standard for creating a seamless, expansive look in open-plan spaces. If you’re worried about mess, oak tones are far more forgiving than dark walnut. Walnut is beautiful, but it highlights every stray crumb and pet hair, whereas the varied grain of oak hides a multitude of daily sins.
The Stone and Tile Look Without the Grout
Traditional tiles are beautiful until the grout turns gray and requires a toothbrush to clean. Vinyl stone effects solve this problem entirely. Using Embossed-in-Register (EIR) technology, manufacturers can now align the physical texture of the tile with the printed image of marble or travertine. You get the authentic “clink” and feel of stone without the ice-cold temperature in the morning. For smaller kitchens, Victorian or Moroccan patterns are making a massive comeback, providing a statement piece that adds personality to an otherwise neutral room. These patterns work best when the rest of your kitchen cabinetry is simple, allowing the floor to do the talking.
Subfloor Preparation: The Secret to a Long-Lasting Kitchen Floor
Frankly, you can buy the most expensive vinyl flooring for kitchens on the market, but if you fit it over a poor subfloor, it will look terrible within months. We see it all the time; a homeowner spends thousands on new cabinetry and premium LVT, only to skimp on the bit they can’t see. Your new floor is only as good as what’s underneath it. If your subfloor is uneven, damp, or dirty, those issues will eventually migrate to the surface, leading to premature wear or even structural failure of the planks.
The most common issue is the “telegraphing” effect. Because vinyl is a resilient material, it’s flexible enough to eventually “settle” into any dips or ridges in the base. This means every screw head, board gap, or bit of grit will eventually show through as a ghost-like impression on your beautiful new floor. This isn’t just an aesthetic problem; these high points become friction zones where the wear layer will fail much faster than it should. Proper preparation ensures a flat, smooth canvas that lets the design shine without interference.
Preparing Timber and Concrete Subfloors
If you’re fitting over existing floorboards, 6mm plywood is the industry standard for a reason. It creates a stable, uniform surface that bridges the gaps between boards and prevents individual planks from shifting. For concrete bases, a latex-based levelling compound is usually the best approach to smooth out pits and ripples. In new-build kitchens, moisture testing is a non-negotiable step. You must ensure the slab has a Relative Humidity (RH) of 75% or lower before fitting. Subfloor preparation is the single most important factor in ensuring your manufacturer’s warranty remains valid.
The Role of Underlay in Kitchen Vinyl
A common question is whether you need a separate underlay. For sheet vinyl, the frank answer is almost never; the backing is designed to sit directly on a prepared subfloor. However, many modern LVT products come with an integrated underlay. This built-in layer provides vital sound reduction, often cutting noise by up to 19 decibels, which is a massive benefit in open-plan kitchen-diners. While the requirements are different for engineered wood flooring, which often requires a separate moisture barrier, vinyl keeps things simpler. If you’re ready to start your project with the right materials, you can find all the necessary floor preparation accessories in our shop to get the job done properly.
Buying Kitchen Vinyl Online: The Frank Way to Get it Right
Buying vinyl flooring for kitchens online shouldn’t feel like a gamble. While some large retailers try to push home visits to lock you into a high-pressure sale, we believe in empowering you with the right information to make your own decisions. It starts with a tape measure and a bit of patience. Most kitchens are awkward shapes, but the trick is to break the floor plan down into simple rectangles. Measure the maximum length and width of each section, including the “fridge gap” if you plan to run the flooring under appliances, and always account for the footprint of a central island.
Once you have your total area, add 10% for wastage. This is the magic number for kitchen layouts where you’ll have plenty of intricate cuts around cabinetry and plinths. It’s much better to have a few offcuts left over than to be one plank short on fitting day. Before you commit, order samples. The lighting in a professional photo isn’t the same as the natural light in your home at 4 PM or under your evening spotlights. Seeing the texture and colour in situ is the only way to ensure the result matches your vision.
Delivery logistics are equally important. When your flooring arrives, it will likely be on a pallet or in long rolls. Ensure you have a clear space ready for it and check the packaging for any signs of transit damage before signing. Most LVT needs at least 24 to 48 hours to acclimate to the temperature of your kitchen before fitting begins. This prevents the material from expanding or contracting once it’s laid, ensuring those seamless joins stay tight for years to come.
Measuring Your Kitchen Like a Pro
Divide complex kitchen shapes into simple rectangles to keep your calculations straightforward. Don’t forget to account for alcoves, larders, and door thresholds. If your kitchen transitions into a carpeted hallway, you’ll need to measure into the doorway to ensure your carpet grippers or door bars sit correctly. Measuring into the centre of the door frame ensures a clean break between different floor types.
The Frankly Flooring Promise
We provide direct, honest advice without the high-pressure sales tactics found elsewhere. Our materials are sourced specifically for the British home, prioritising longevity and quality over quick wins. We view flooring as a foundational element of your home’s character, and we’re here to guide you through every step of the journey. If you’re ready to transform your space with a floor that stands up to the chaos of daily life, browse our full range of kitchen vinyl flooring today.
Start Your Kitchen Project with Confidence
Choosing a new floor is a significant investment, but it doesn’t need to be a stressful one. You now know that the secret to a long-lasting finish lies in the subfloor preparation and selecting a wear layer that matches your household’s pace. Whether you’ve opted for the seamless protection of sheet vinyl or the premium, repairable nature of LVT, you’re equipped to choose vinyl flooring for kitchens that looks bespoke and performs brilliantly. We’ve cleared the fog around R-ratings and 2026 style trends so you can focus on the finish.
Frankly, we believe you deserve quality materials without the inflated costs of a traditional showroom. As a family-run business with over 20 years of expertise, we provide direct-to-consumer prices and the kind of honest, straight-talking advice you’d expect from a trusted local tradesperson. We don’t hide costs or cut corners; we just help you get the job done right. Shop our honest range of kitchen vinyl and LVT today and take the first step toward a floor you’ll be proud of for years. Your kitchen is the heart of your home, and it’s time it had a foundation to match.
Frequently Asked Questions
Is vinyl flooring really waterproof enough for a kitchen?
Yes, modern vinyl is 100% waterproof because it’s constructed from synthetic PVC layers that do not absorb moisture. Unlike laminate or real wood, it won’t swell or warp if your dishwasher leaks or a pipe bursts. This makes vinyl flooring for kitchens the most reliable choice for wet areas. Just ensure the subfloor is completely dry before fitting to avoid trapping moisture underneath the material.
Can I lay new vinyl flooring over my existing kitchen tiles?
You can lay vinyl over tiles, but you must apply a thin layer of smoothing compound or screed first. If you don’t, the grout lines will eventually “telegraph” through to the surface of your new floor. This creates an unsightly grid pattern that ruins the aesthetic and can lead to uneven wear. Frankly, it’s always better to prep the base properly than to rush the job.
How do I stop my kitchen chairs from scratching my vinyl floor?
Use felt protector pads on the bottom of all furniture legs to prevent surface scratches. While a 0.5mm wear layer provides excellent protection against scuffs, grit trapped under moving chair legs can still cause damage over time. Avoid using rubber or latex-backed mats, as these can sometimes react with the vinyl and cause permanent yellow discolouration on the surface of your floor.
What is the best way to clean vinyl flooring in a kitchen?
A simple sweep and a damp mop with a pH-neutral floor cleaner is all you need for daily maintenance. Avoid using steam mops; the intense heat can weaken the adhesive bond or cause the layers to delaminate over time. For stubborn dried-on food, a soft-bristled brush will remove the mess without compromising the protective wear layer or scratching the printed design underneath.
Is LVT better than sheet vinyl for a kitchen with underfloor heating?
LVT is generally superior for underfloor heating because it’s more dimensionally stable than sheet vinyl. It can handle temperature fluctuations up to 27 degrees Celsius without warping or lifting at the edges. Most modern LVT also features an integrated underlay that helps distribute heat evenly, whereas thick foam-backed sheet vinyl can sometimes act as an unwanted insulator, reducing the efficiency of your heating system.
What happens if I spill red wine or hot oil on my vinyl floor?
Wipe up spills immediately to prevent any chance of permanent staining or surface damage. While vinyl flooring for kitchens is highly resistant to liquids, hot oil can occasionally “melt” or cloud the top wear layer if left for too long. Red wine is rarely an issue due to the non-porous surface, but a quick wipe with a damp cloth ensures the pigment doesn’t settle into the grain.
How much does it cost to fit vinyl flooring in a standard kitchen?
According to April 2026 market data, the average cost to install vinyl flooring ranges between $4 and $12 per square foot, including materials and labour. For a standard 200-square-foot kitchen, you should expect a total project cost between $600 and $2,400. Sheet vinyl remains the most budget-friendly route, with total installed costs ranging from $2 to $5 per square foot depending on the subfloor condition.
Do I need a professional fitter for kitchen vinyl or can I DIY?
You can certainly DIY a kitchen vinyl project if you have basic tools and a perfectly flat subfloor. Many click-system LVT products are designed for straightforward home fitting without professional help. However, if your kitchen has complex alcoves or requires extensive screeding, hiring a tradesperson ensures the finish is seamless and your manufacturer’s warranty remains fully protected. Getting the subfloor right is the hardest part of the job.