
In October 2023, a customer in Leeds discovered that being just 0.5 square metres short on a flooring order can stall a renovation for weeks while waiting for a matching batch. Ordering exactly what your tape measure says is often the quickest way to complicate your project. We know the feeling. You’ve found the perfect floor, but the fear of miscalculating alcoves or bay windows is holding you back. Knowing how to measure a room for lvt involves more than a basic length-times-width sum; it requires a professional approach to the quirks of your home.
Frankly, we believe you shouldn’t have to guess. This guide will teach you how to create a precise floor plan and calculate your total square meterage with total confidence. We’ll explain how different patterns change your material needs and exactly how much extra to allow for wastage. You’ll gain the clarity needed to buy your LVT online without the worry of overspending or running out of planks before the final corner is laid.
Key Takeaways
- Adopt a “measure twice, cut once” philosophy to ensure your floor fitting starts on a solid, professional foundation.
- Follow our straightforward, step-by-step guide on how to measure a room for lvt, covering everything from simple rectangles to complex L-shaped layouts.
- Learn the professional secrets for navigating British architectural quirks like alcoves and bay windows without wasting expensive material.
- Discover the “frank” truth about industry wastage standards and how to accurately calculate the exact number of packs required for your space.
- Identify potential subfloor issues during the measurement phase to ensure a seamless and long-lasting installation.
The Essentials: Preparing for Your LVT Measurement
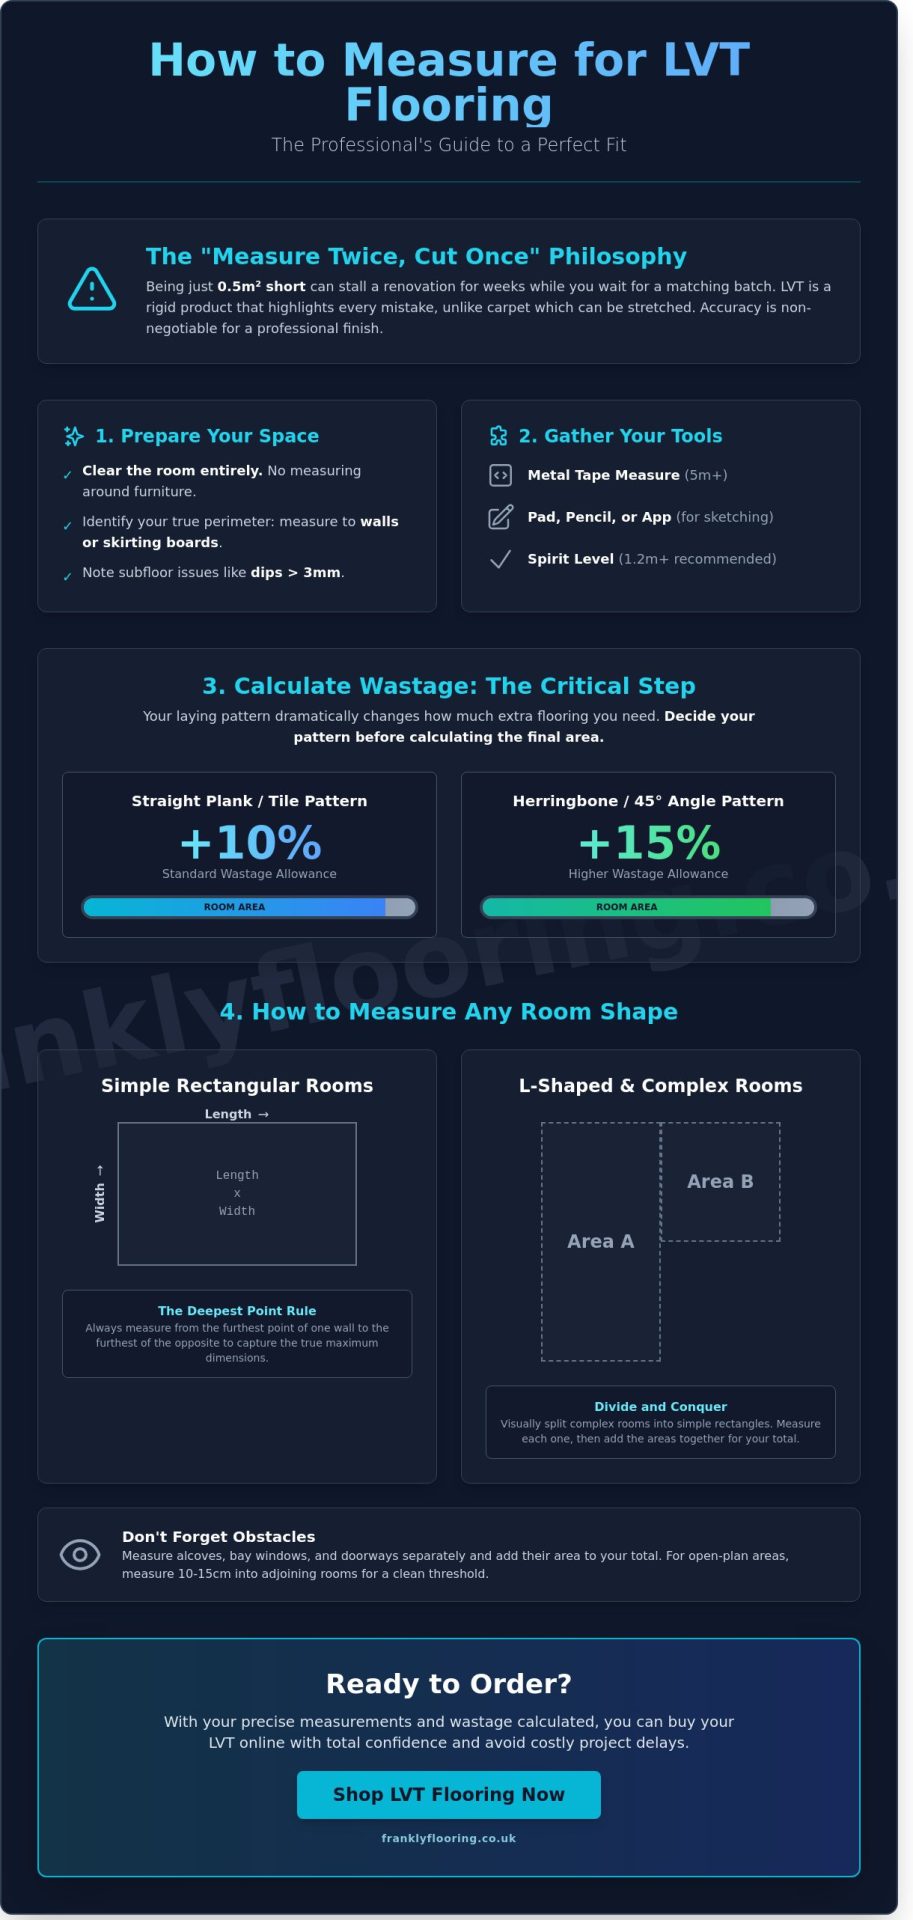
Frankly speaking, getting your numbers right is the most critical part of any flooring project. If you are off by even 10mm, you risk a messy finish or a costly reorder that delays your home improvement. Luxury Vinyl Tile (LVT) is a sophisticated, modern evolution of the classic Vinyl composition tile (VCT), but it requires much tighter tolerances during fitting. While carpet can be stretched or tucked to hide a slight miscalculation, LVT is a rigid product that highlights every mistake. Learning how to measure a room for lvt starts with the “measure twice, cut once” philosophy. You should aim for 100% accuracy to ensure your subfloor is fully covered without excessive waste.
Before you pull the tape, clear the room entirely. Move every piece of furniture out of the way. A tidy room allows you to reach the true corners and see the actual perimeter. Skirting boards and door frames often hide the true dimensions of a floor, so you need a clear line of sight. If you attempt to measure around a heavy sofa or a wardrobe, you will likely end up with a 5% error margin. That small gap might seem minor, but it leads to “short” planks at the edges that ruin the aesthetic of the room.
The Tools You Actually Need
You don’t need a van full of gear to get a professional result, but you do need professional-grade basics. Use a 5m or 8m metal tape measure with a locking mechanism. Avoid soft tailor tapes or plastic rulers because they stretch or bend, leading to inaccuracies. Grab a pad of graph paper or a digital sketching app to map the room’s footprint. Finally, use a spirit level at least 1.2m long. While you are down on the floor, check for dips in the subfloor. LVT requires a flat surface, and identifying a 3mm dip now saves a massive headache during the fitting process.
Choosing Your LVT Type First
The specific product you choose changes how to measure a room for lvt. Click-lock planks usually require a 5mm to 10mm expansion gap around the entire perimeter to allow for natural movement. If you forget to account for this, the floor might buckle when the temperature changes. Glue-down LVT is more stable but requires a perfectly smooth subfloor. You also need to decide on your laying pattern, such as herringbone or a 45-degree angle, before you finish your calculations. Complex patterns often require a 15% wastage allowance rather than the standard 10% used for straight planks. Making these decisions early ensures your final order is honest, accurate, and sufficient for the job.
Step-by-Step: Measuring Rectangular and L-Shaped Rooms
Before picking up the tape measure, grab a pencil and paper. Draw a rough birds-eye view of your room layout. This sketch acts as your map; it doesn’t need to be perfect, but it must be legible. Start by measuring the longest wall-to-wall distance to determine the length. Next, find the widest wall-to-wall distance for the width. When learning how to measure a room for lvt, accuracy prevents costly mistakes. Record every measurement in metres and centimetres. If a wall is 5.42m, don’t round it down to 5.4m. Precision at this stage ensures a seamless fitting later.
Mastering the Simple Rectangle
A standard four-walled room might seem easy, but small details matter. Measure into the deepest part of the room, including any alcoves or recessed areas. Decide now if you’re measuring to the skirting boards or the bare wall. If the skirting stays, measure to the board. If you’re replacing it, measure to the wall. This distinction is vital because LVT requires a small expansion gap around the perimeter. Adhering to industry standards for resilient flooring helps you understand how these gaps and subfloor conditions affect your final numbers.
Tackling L-Shaped and T-Shaped Spaces
Complex rooms are just groups of simple shapes. Visualise an L-shaped room as two distinct boxes. Draw a dotted line on your sketch to separate them, then measure the length and width of each box individually. This method works for T-shaped spaces too; just treat them as three boxes. Roughly 90% of measurement errors in L-shaped rooms occur because people forget to account for the “internal” corners where the two boxes meet.
- The Overlap Check: Verify your math by measuring the total length of the room. It should equal the sum of your individual box lengths.
- Open-Plan Flow: For areas that flow into hallways or kitchens, extend your measurement 10cm to 15cm into the next room. This allows for a clean join at the threshold.
- Managing Joins: Note where the natural break in the floor will be, especially if you’re changing the direction of the planks.
Breaking the room into manageable sections ensures you don’t miss a single square centimetre. If you want a second pair of eyes on your plan, you can book a home visit with us for a professional check. We prefer to get the numbers right from the start so there are no surprises on fitting day.
Navigating Obstacles: Alcoves, Bay Windows, and Doorways
British architecture is rarely about perfect rectangles. Most homes built before 1990 feature chimney breasts, alcoves, or bay windows that complicate your calculations. Getting the geometry right is the difference between a seamless finish and a floor that looks like a jigsaw puzzle gone wrong. When you’re learning how to measure a room for lvt, these quirks require a methodical approach to avoid ordering too much or, worse, too little material.
Fixed furniture like kitchen islands or heavy built-in wardrobes should be treated as permanent walls. Don’t measure under them unless you plan to move them during the fitting. For fireplaces, measure right up to the hearth. We recommend adding a 10% waste margin to your total area to account for the intricate cuts needed around stone or brick features. This ensures you have enough planks to maintain a natural pattern without running short on the final row. It’s an honest safeguard against the frustration of a stalled project.
Measuring into Alcoves and Bay Windows
The most reliable way to handle an alcove is to treat it as a separate mini-rectangle. Measure the width and the depth of the recess, calculate that small area, and add it to your main room total. If you have an angled bay window, use the 45-degree rule. Measure the longest point of the bay and the deepest point of the recess. This creates a virtual box that covers the entire footprint. It might seem like you’re over-ordering, but those offcuts are essential for ensuring your LVT planks run straight through the feature without unsightly gaps.
Doorways and Transitions
Doorways are where 40% of DIY measuring errors occur. Most people stop measuring at the wall line, but LVT needs to run into the doorway to meet the next floor covering. Always measure to the centre of the door frame. This ensures the transition sits directly under the door when it’s closed, hiding the join between two rooms. You’ll also need to account for the thickness of your finishing strips. You can check how to choose the right door bar to see how different profiles affect your final tile cut. A standard door bar usually requires a 10mm to 15mm gap between different flooring types to allow for a secure fit. Getting this right when you how to measure a room for lvt saves you from awkward gaps at the threshold later.
Calculating Area and the “Frank” Truth About Wastage
Once you have your floor plan sketched, understanding how to measure a room for lvt moves from the tape measure to the calculator. This stage is where many homeowners feel a bit of pressure, but it’s simply a matter of logic. Accuracy here prevents the frustration of being two planks short on a Sunday afternoon or overpaying for three boxes you’ll never open.
Calculating Your Square Meterage
Most rooms aren’t perfect squares, but they’re almost always a collection of rectangles. Use the simple formula of Length x Width to find the area of each section. If your room is an L-shape, split it into two clear blocks, calculate the square metres for both, and then add them together for your grand total.
Trusting your math is easier when you perform a quick sanity check. Walk the room and look at your final number. If your lounge is roughly 4 metres by 4 metres, your total should be around 16 square metres. If your calculation says 25, you’ve likely included a hallway or misread a decimal point. It’s a five-minute check that saves hours of logistical headaches later.
Wastage Percentages by Pattern
To be frank, the industry-standard 10% wastage figure is often a bit of a myth. While it’s a safe middle ground, your chosen floor pattern is the real factor that determines how much extra material you need. When you’re figuring out how to measure a room for lvt, the “Frank” truth is that your floor pattern dictates your final cost.
- Straight lay planks: For standard rooms with straight walls, 5-7% wastage is usually sufficient. This covers the basic cuts at the ends of each row.
- Herringbone and Parquet: You must allow for at least 15% wastage. Herringbone patterns require complex diagonal cuts at every wall edge, which inevitably creates smaller, unusable off-cuts and increases your total material needs.
Rounding up is your final safety net. LVT is sold in full packs, so you’ll never buy the exact square meterage of your room. Always round up to the nearest full box. Having half a pack left over isn’t a waste; it’s an insurance policy. If a plank is damaged five years from now, you’ll have a perfectly matched replacement from the same batch ready to go.
If you’re still feeling unsure about your calculations, we can help you get the numbers right. You can book a professional home survey to ensure your measurements are perfect before you order.
Final Checks: Subfloors and Ordering Your LVT
Measuring the dimensions of your space is only one part of the preparation process. To be frank, even the most accurate measurements won’t save a project if the foundation isn’t right. While you’re down on the floor with your tape measure, you need to look at what’s happening beneath the surface. Knowing how to measure a room for lvt involves assessing the quality of your subfloor just as much as the distance between your walls.
The Subfloor Assessment
A flat floor is often more critical than a perfectly measured one. If your subfloor has a deviation of more than 3mm over a 2-metre area, your LVT planks might click out of place or show visible “telegraphing” over time. Use a long spirit level or a straight edge to identify high spots or deep dips while you work.
Check for moisture too. If you’re fitting over a concrete base in a ground-floor room, look for dark patches or salt blooming, which indicate damp. These issues usually require a damp-proof membrane or a specific underlay to prevent the adhesive or the tiles from failing. You can explore our guide to LVT flooring to understand more about the specific prep your subfloor might need before the fitting begins.
Ordering with Confidence
Once you’ve confirmed your measurements, you’ll need to translate those square metres into physical boxes. Every LVT product has a specific pack size listed on the technical specifications. To find the number of boxes you need, take your total area (including the 10% waste margin we discussed earlier) and divide it by the square metre coverage of a single pack. Always round up to the nearest whole box.
It’s a smart move to order a “spare pack” beyond your calculated waste. Having a box of the same batch tucked away in a cupboard is a lifesaver if a tile gets gouged by a heavy appliance or stained by a chemical spill years down the line. Before you click “buy” on your LVT flooring online, run through this final checklist:
- Check Batch Numbers: Ensure every box you receive has the same batch or “lot” number. Minor colour variations between different production runs can be quite obvious once the floor is laid.
- Plan for Acclimatisation: Your LVT needs at least 48 hours to adjust to the temperature of your home. Store the boxes flat, side-by-side, in the room where they’ll be fitted. Don’t stack them too high or lean them against walls.
- Verify the Delivery Path: LVT boxes are surprisingly heavy, often weighing between 15kg and 20kg each. Make sure you have a clear, dry space ready for the delivery driver to offload the pallets.
Getting your head around how to measure a room for lvt is the first step toward a professional finish. By being thorough with your subfloor checks and patient with the acclimatisation process, you ensure that your new floor doesn’t just look good on day one, but stays looking great for a decade or more.
Ready to Put Your Measurements into Practice
Getting your floor dimensions right is the foundation of a successful fitting. By following this guide, you’ve accounted for every alcove and doorway while ensuring that crucial 10% wastage buffer is included in your final figures. It’s these small, precise details that prevent project delays and unexpected costs. Now that you’ve mastered how to measure a room for lvt, you can approach your home renovation with total confidence.
At Frankly Flooring, we’ve spent over 20 years building a family-run business based on straight-talking advice and quality craftsmanship. We offer direct UK-wide delivery on all LVT orders, ensuring your materials arrive safely at your door without the typical corporate runaround. We don’t do hidden costs or high-pressure sales; we just provide the honest expertise you need to transform your space. Your new floor is closer than you think.
Browse our full range of Luxury Vinyl Tiles and order your samples today to find the perfect match for your home. You’ve done the hard work with the tape measure, so let us handle the rest. We’re looking forward to helping you create a floor you’ll be proud of for years to come.
Frequently Asked Questions
Do I need to remove my skirting boards before measuring for LVT?
No, you don’t need to remove your skirting boards just to take measurements. Simply measure from the face of the skirting on one wall to the face of the skirting on the opposite side. We suggest adding 50mm to your final width and length calculations to ensure you have enough material if you decide to remove the boards during the fitting process.
How much extra LVT should I order for a herringbone pattern?
You should order a 15% wastage allowance for any herringbone or parquet pattern. This is higher than the standard 10% used for straight planks because the 45-degree cuts required at the room’s edges create more offcuts. For a 20-square-metre room, this means ordering enough for 23 square metres to guarantee a perfect finish without running short.
Can I just measure the old carpet to find the room size for LVT?
No, you shouldn’t use your old carpet as a template when learning how to measure a room for lvt. Carpets are flexible and often stretched into place, which can hide the true floor dimensions by as much as 30mm per wall. To get a frank and accurate reading, use a metal tape measure to record the distance between the actual walls or skirting boards.
What is the best way to measure a room with a fireplace?
The most straightforward method is to measure the entire room as a large rectangle and then measure the fireplace area as a smaller rectangle to be subtracted. If a hearth extends 400mm into the room and is 1200mm wide, you calculate that 0.48 square metre area separately. This precise approach ensures you don’t pay for material you won’t use while keeping the process simple.
Should I measure in feet and inches or metres and centimetres?
You should always measure in metres and centimetres because LVT is sold by the square metre in the UK. Most packs cover a specific metric area, often between 2.2 and 3.5 square metres. Using metric units from the start prevents rounding errors that can lead to a 5% discrepancy in your order, ensuring you get exactly what you need.
How do I calculate how many packs of LVT I need from the total area?
Divide your total room area, including your 10% or 15% wastage, by the square metre coverage listed on the individual LVT pack. If your total required area is 18 square metres and each pack covers 2.1 square metres, you’ll need 8.57 packs. Since shops don’t sell partial boxes, you must round up and order 9 full packs to complete the job.
What happens if I measure the room incorrectly?
Measuring incorrectly often leads to a shortage that can delay your project by 3 to 5 days while you wait for more stock. Even worse, ordering a single extra pack later increases the risk of batch variation, where the colour or texture differs slightly from your original 100% of flooring. It’s always better to be honest with your measurements and include that vital wastage buffer.
Do I need to account for the expansion gap in my measurements?
You don’t need to subtract the expansion gap from your initial measurements, but you must keep it in mind for the fitting. Most LVT products require a 5mm to 8mm gap around the perimeter to allow for floor movement. When you’re figuring out how to measure a room for lvt, focus on the total wall-to-wall area; your standard wastage allowance will cover these small gaps easily.